Difference between revisions of "Trutzbox Manual"
(→What happens if TrutzBox services are not being extended?) |
(→TrutzChat (XMPP Service)) |
||
| Line 1,724: | Line 1,724: | ||
* The same certificates and keys are used to encrypt messages and authenticate the TrutzBox of the communication partner as for TrutzMail. | * The same certificates and keys are used to encrypt messages and authenticate the TrutzBox of the communication partner as for TrutzMail. | ||
<br/> | <br/> | ||
| − | Once created, TrutzMail addresses can also be used directly for messaging. | + | Once created, TrutzMail addresses can also be used directly for chat/messaging. This does not require any configuration on the TrutzBox. |
<br/><br/> | <br/><br/> | ||
[[File:TrutzRTC 010a.png|700x700px|link=]] | [[File:TrutzRTC 010a.png|700x700px|link=]] | ||
| Line 1,821: | Line 1,821: | ||
<br/> | <br/> | ||
[[#top|-> <u>Table of Contents </u> (of this manual)]]<br/><br/> | [[#top|-> <u>Table of Contents </u> (of this manual)]]<br/><br/> | ||
| − | |||
==== TrutzMeeting: Audio- and Video-Conference Service ==== | ==== TrutzMeeting: Audio- and Video-Conference Service ==== | ||
Revision as of 14:06, 2 May 2018
Contents
- 1 The TrutzBox®
- 2 Fast Lane (for TrutzBox® Administrator)
- 3 TrutzBox® Setup (for TrutzBox® Administrator)
- 4 Use of the TrutzBox® (-> for users)
- 5 Administrieren der TrutzBox® (für TrutzBox® Administrator)
1 The TrutzBox®
Comprehensive background information and technical details that go beyond setting up and using the TrutzBox® are provided by the Comidio Compendium', see https://comidio.de/trutzbox-kompendium/.
1.1 Searching the manual
Comment on "Search":
This manual is structured as a single, large wiki page. Therefore the search function (top right) is not helpful.
To search, please use "Ctrl f", i.e.
- Press and hold the " Strg" or "Ctrl" key
- Press the "f" key simultaneously (for "find")
A search line will appear at the bottom of the browser window.
Enter the search term in the search window on the left, and depending on the search direction, press down arrow or up arrow to jump to the next search result.
If the search text is displayed on a red field, the search term does not appear in the entire text.
(To hide the search line: click on "x" on the right side in the search line.
1.2 Before you turn to the TrutzBox... updates!
Please make sure that the following Updates are done and that you can access your Internet router user interface.
| Operating system | Please make sure that your operating system is up to date with the latest update. Only in this way can you be sure that you are optimally protected by the latest updates.In addition, TrutzBox is set up with its own updates to work with the latest operating system updates. If the operating system is not equipped with the latest update, the TrutzBox may not be able to work and thus do not offer optimum protection. |
| Browser | Bitte achten Sie darauf, dass jeder Ihr Browser mit dem neusten Update versehen auf dem neusten Stand ist. Only in this way can you be sure that you are optimally protected by the latest updates. In addition, TrutzBox is set up with its own updates to work with the latest browser updates. If the browser is not equipped with the latest update, the TrutzBox may not work and therefore does not offer optimum protection.
|
| Internet- Router |
Please make sure that your Internet router is up to date with the latest firmware update. Only in this way can you be sure that you are optimally protected by the latest updates.In addition, settings are made on the Internet router for certain functions of the TrutzBox. In this respect, access to the user interface of the Internet router may be necessary, i.e. the Internet router administrator should know its call and password'. |
-> Table of Contents (of this manual)
1.3 Follow this manual
| ATTENTION:
We can only provide support if you first go through Quick Start
|
The TrutzBox® will now make your Internet more secure. It has the effect that you cannot be observed while e-mailing and cannot be spied on while surfing. You leave fewer traces on the Internet and you are less traceable. With the TrutzBox ® you strengthen your privacy.
The TrutzBox® is the security center of your home network. It controls incoming and outgoing Internet traffic. With the TrutzBox® you determine which information the devices connected to the Internet in your home network may disclose.
With the TrutzBox® you can control the Internet connections of your
- Internet devices at home, like computers, tablets, smartphones,
- mobile Internet devices on the move, such as laptops, tablets, smartphones,
- Internet-enabled devices, such as television, house control (e.g. roller shutters, heating), toothbrush, refrigerator, etc.
The TrutzBox® will make the lives of criminal Internet hackers, professional data traders and secret services, which have been observing you while surfing and use your data for their own purposes or commercially, more difficult to a previously unknown extent.
Comidio TrutzBox® offers optimal protection of your privacy through
- automatic end-to-end encryption of your e-mails,
- traceless surfing the Internet,
- maximum protection for your children,
- Firewall and virus protection,
- easy operability,
- cost-effective use,
and thus delivers optimal anonymity.
The TrutzBox® offers plug and play settings and is already optimally configured for most requirements at the factory. Special personal requirements are set via the easy-to-use user interface.
-> Table of Contents (of this manual)
1.4 TrutzBox with or without (own) WLAN?
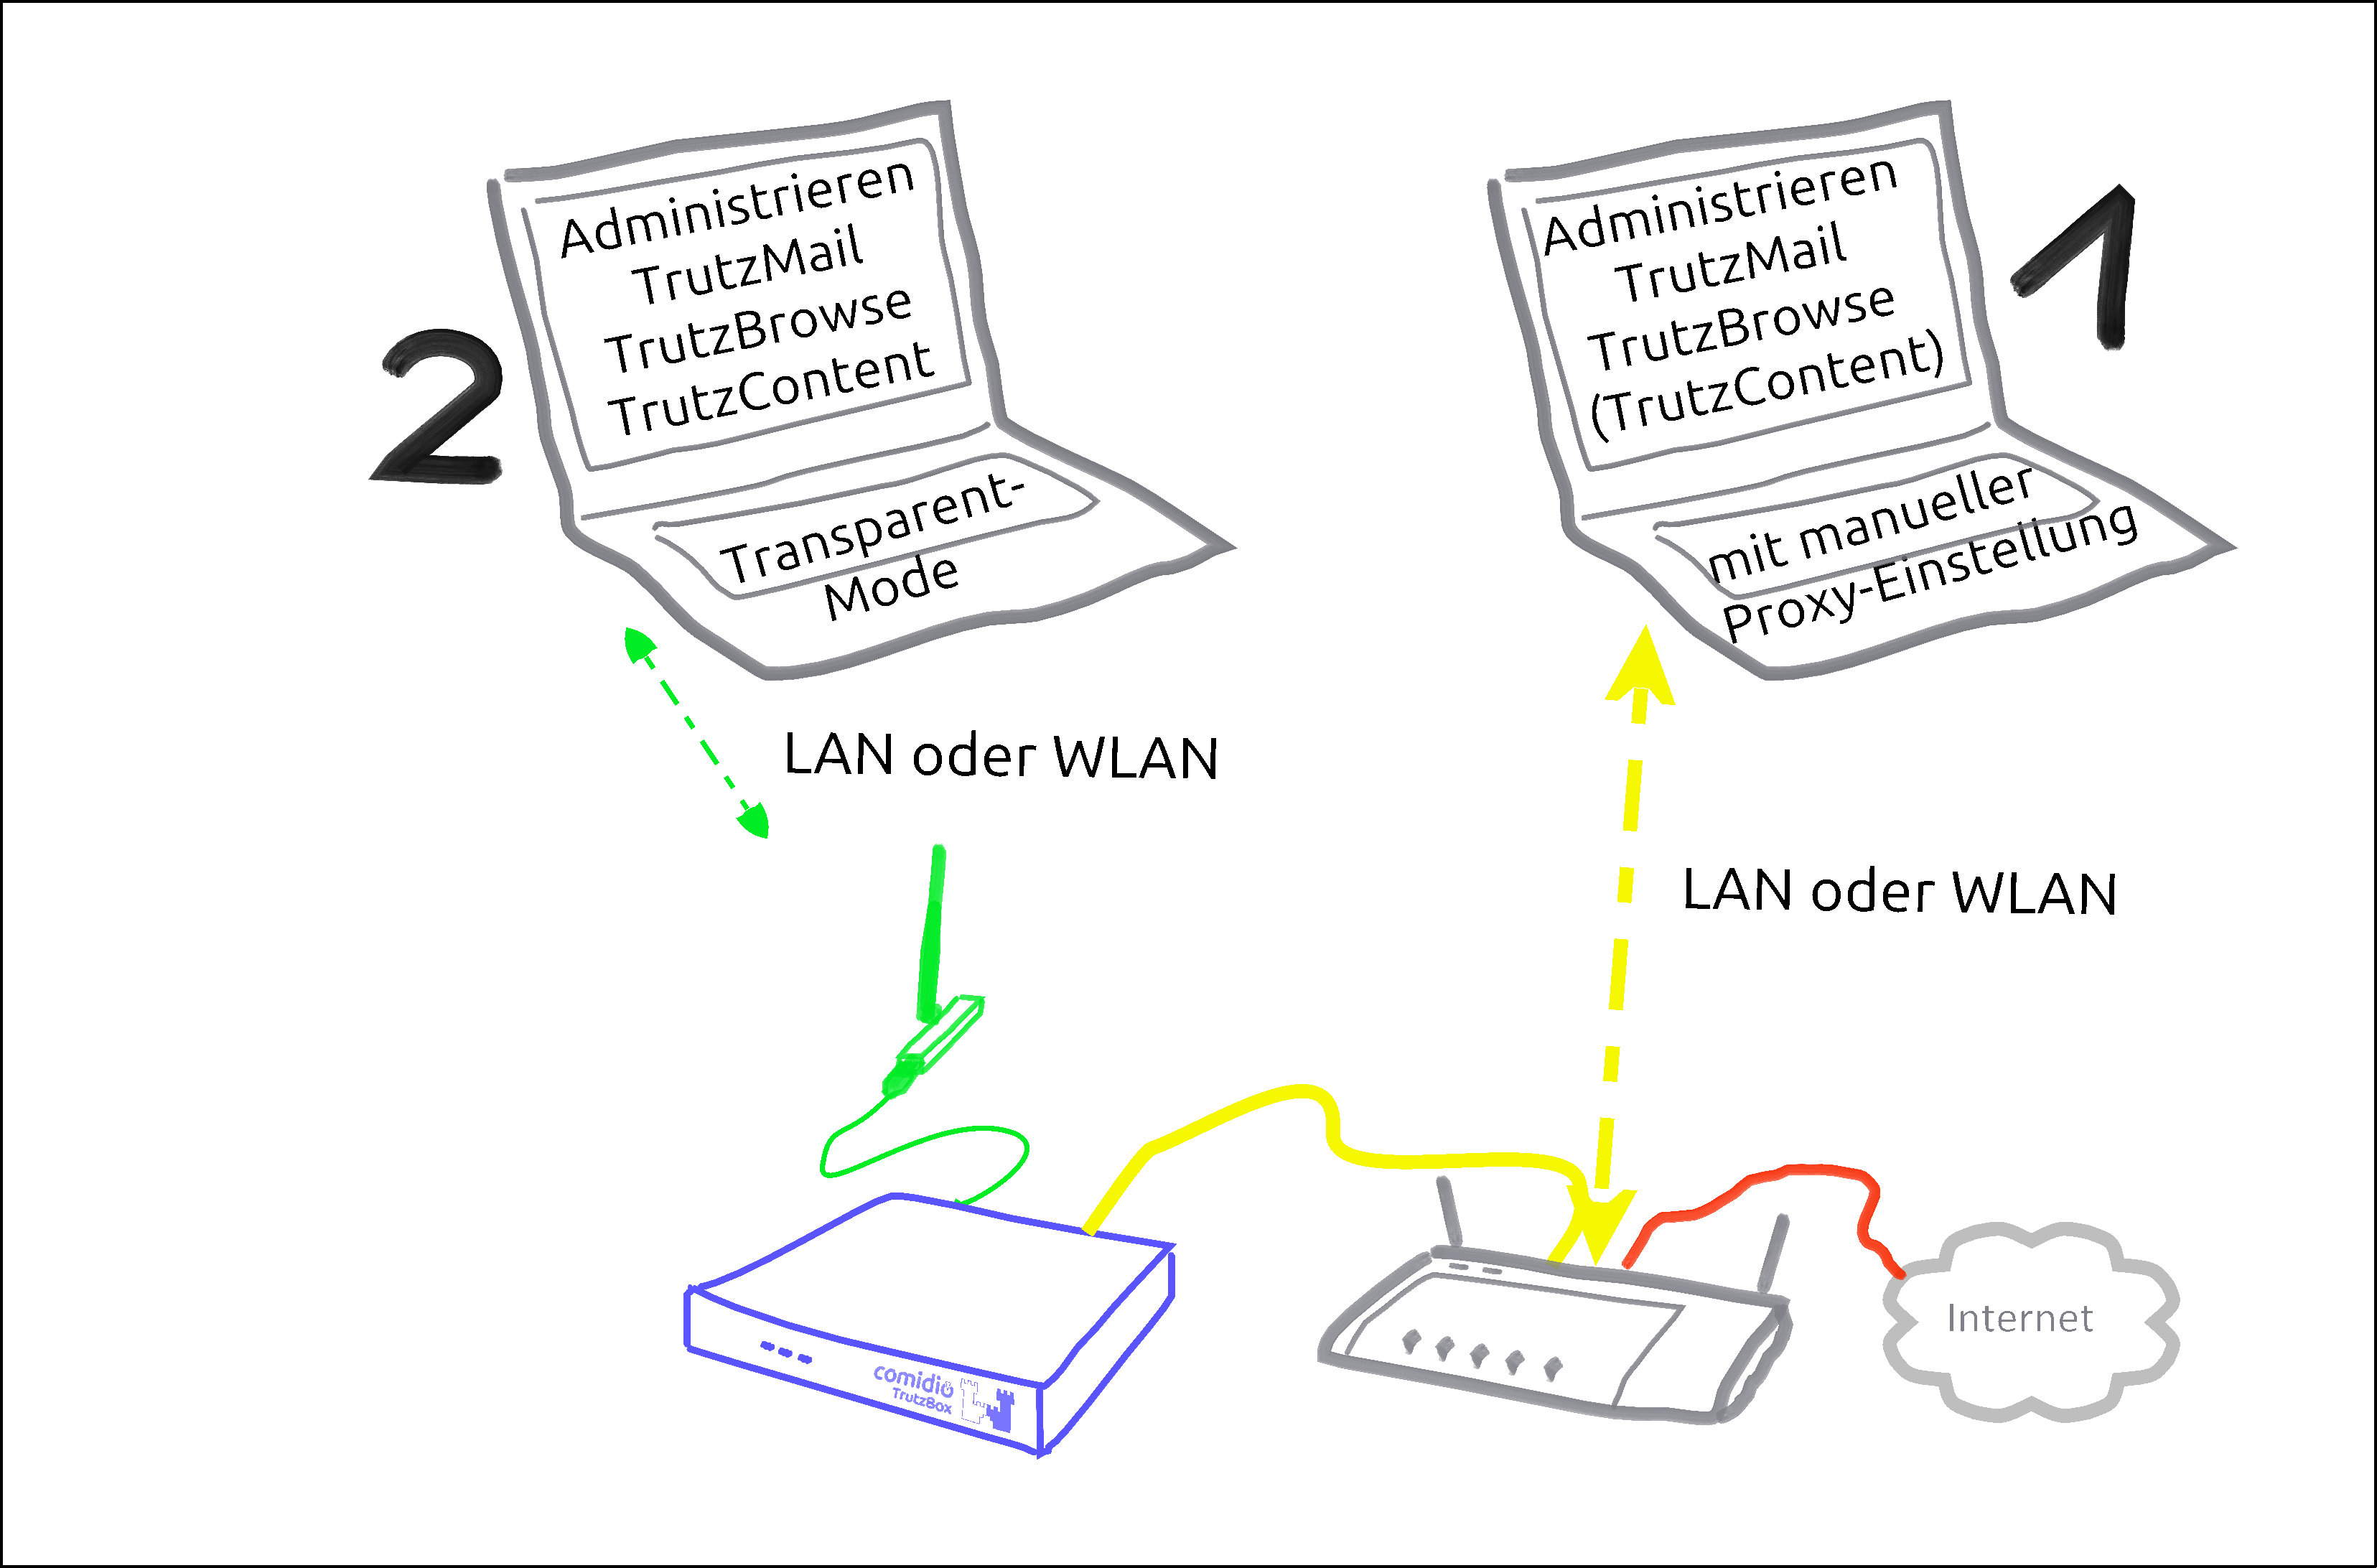
The WLAN module of the TrutzBox is required if a mobile device is to be controlled via the TrutzBox®. This is then connected directly to the network of the TrutzBox (= its WLAN).
There are basically two ways to connect devices to the TrutzBox®:
| Case 1: | PC 1 is connected to the Internet router via WLAN or network cable (dashed yellow).
|
| Case 2: | PC 2 is connected to the TrutzBox® via WLAN or network cable (green dashed). All Internet traffic (surfing) automatically passes through the TrutzBox®.This mode is called |
To use the TrutzBrowse and TrutzContent functions (secure surfing for and protection of minors), it can be decided for each device whether it should be left on the network of the Internet router (e.g. Fritzbox) (proxy mode) or connected to the TrutzBox network (transparent mode).
The aim is to connect as many or all devices as possible in the home network directly via the TrutzBox® (i.e. in "transparent mode").
It is advisable to reach this state step by step.
Therefore, you should start "small" at the beginning and gain experience in "proxy mode" by not changing anything on your home network, i.e. the devices initially remain on the Internet router.
You can also intentionally surf in a browser (e.g. Firefox) in proxy mode while surfing in parallel in a second browser (e.g. Chrome) without protection.
For example, you can track the influence the security slider has on unprotected access in various positions (e.g. effects on advertising offers shown).
If you have sufficient experience in proxy mode and would like to gain additional security, you can gradually connect devices in transparent mode by connecting them directly to the TrutzBox® via WLAN (or network cable).
[Since there are occasional exceptions in which website use is not possible even with SliderLevel 10 (TrutzBox set to "pull-through"), it is recommended to operate a browser-based client device in proxy mode, so that the TrutzBox can be switched off as a proxy in the browser of this client device if necessary. This allows the browser of this device to access the Internet directly via the Internet router (bypassing the TrutzBox). After the exception has been made, the TrutzBox should be activated again in the browser as a proxy].
This means that the TrutzBox can also be operated safely without a WLAN module and the WLAN module can be added later if required.
The other TrutzBox functions, such as Webmeeting, Mail, Chat and Remote Access, work in both modes unaffected by this.
To change from transparent mode to proxy mode or vice versa, please proceed as follows:
- Shut down PC or device (= switch off by software).
- If previously connected to TrutzBox, now connect to the Internet router or vice versa.
- Switch on/restart the device (now the device automatically receives an IP address valid in this network area).
-> Table of Contents (of this manual)
1.5 Phases, users and administrator
This manual describes two roles in these words:
”User”
Anyone using TrutzBox functions is referred to in this manual as "'User'".
Administrator
A person who uses certain administrative functions of the TrutzBox that are not available to every user is described in this manual "Administrator".
With private use of the TrutzBox the administrator is usually an adult, in families e.g. a legal guardian.
For commercial use of the TrutzBox, the administrator is usually an internal or external IT administrator.
In general, the following phases can be distinguished when using the TrutzBox:
| Phase | activities | |
| start up (ca. 15 Min.) |
Unpacking, checking, connecting and switching on the TrutzBox | Administrator |
| set up (ca. 30 Min. plus updates) |
Test Internet connection, import certificate, set admin password, register TrutzBox, create TrutzMail address, set WLAN name and password | Administrator |
| Usage (ongoing) |
Surfing, Mailing, Webmeets | User |
| Administrieren (as needed) |
Manage users, create PGP partners, manage TrutzBrowse filters, set up remote access (VPN), import certificates on end devices, reactivate SecuritySlider, advise and support users | Administrator |
-> Table of Contents (of this manual)
1.6 How do I set up my TrutzBox?
Depending on the administrator's IT skills, the following sections of this manual may be helpful:
| Administrator is ... | recommended chapter |
| IT-Expert | chapter: 2.1 (Weiter zu 2.1) |
| IT- knowledgable | chapter: 2.2 (Weiter zu 2.2) |
| interested layperson | chapter: 3 (Weiter zu 3) |
-> Table of Contents (of this manual)
Fast Lane *** Fast Lane *** Fast Lane *** Fast Lane *** Fast Lane *** Fast Lane *** Fast Lane *** Fast Lane
2 Fast Lane (for TrutzBox® Administrator)
Chapter 2 contains information for technically affine users:
- für IT-Experts, following, in chapter 2.1 (Weiter zu 2.1)
- for IT-knowledgable in chapter 2.2 (Weiter zu 2.2)
Interested laymen will find detailed information in chapter 3 (Weiter zu 3)
2.1 Installation Instructions (Overview for Experts)
Folgende Tabelle kann auch als PDF heruntergeladen werden: Download
| TrutzBox Function | Sub-Function | Action |
| Wiring the Hardware | Connect the TrutzBox LAN-Ext socket to the Internet router using the LAN cable supplied. Connect TrutzBox to the power supply with the power supply unit. (Details) | |
| Carry out setup | "http://trutzbox" enter in browser (Details); Confirm certificate error |
|
| Install TrutzBox certificate on any device & on any browser | Install TrutzBox certificate on any device & on any browser (Details) |
| little-tracking surfing | transparent mode (every software on the device is controlled) | Connect the Device to the TrutzBox network (via WLAN or LAN) (Details) |
| Proxy mode (only browser accesses are controlled) | Keep Device on the network of the Internet router and Automatic proxy configuration "http://trutzbox/api/proxy/pac" configure in the browser (Details) |
| encrypted mails |
secure mail exchange with other TrutzBoxes (TrutzMail) | set up an additional email address in the email program: incoming mail server (IMAP): trutzbox, port: 143, TLS; outgoing email server (SMTP): trutzbox, port: 587, TLS (Details) |
| Exchange PGP-encrypted emails with "normal mail accounts“ | configure external SMTP server on the TrutzBox and enter public keys of the mail recipients (Details) |
| Access restrictions for young people or IoT |
transparent Mode (any software on the device) | If necessary, select another user group on the TrutzBox or define your own access restrictions (Details) |
| secure video conferencing | Set up a new video conference room | Think up a room name and call it up in your browser (preferably Chrome) https://trutzbox:9082/raumname and log in with your mail account (Details) |
| Subscribers are connected to the internal network | call up in your browser (preferably Chrome): https://trutzbox:9082/raumname | |
| Participants want to connect via the Internet | Set up port sharing for TrutzRTC on the Internet router: Port 9083 UDP and port 9082 TCP. In the browser (preferably Chrome) launch https://ip-addr:9082/raumname. ip-addr is the external IP address or (if configured) DynDNS domain of the Internet router. |
| secure Chat/ Messaging |
install xmpp-client: Apple Macintosh Adium (https://adium.im) |
| Remote access to TrutzBox (mobile access) | Allow VPN access on the Internet router | Setting up port sharing for VPN on the Internet router: Port 1194 UDP |
| DynDNS - Get domain and activate remote access on the TrutzBox | If not yet available: Get DynDNS domain for the Internet connection from a service provider. Z.B. spdyn.de:
Activate DynDNS in the Internet router. |
|
| VPN client setup on the mobile device | Activate remote access on the TrutzBox for the user. User will then receive a TrutzMail with an OpenVPN configuration file. This must then be imported into the OpenVPN software on the mobile device. (Details) | |
| Use remote access - establish connection | Connect the device to the Internet and activate connection setup in the VPN client. (Details) |
This table can also be downloaded as PDF: Download
-> Table of Contents (of this manual)
2.2 TrutzBox Setup-Guide
The following quick introduction corresponds to the two-sided "TrutzBox Setup Guide", which is included with the TrutzBox delivery.
For better navigation, the Quick Start wiki contains green headings.
Steps A - D must be performed one after the other.
Safety instructions:
- Use only the supplied power supply and network cable. Connect only compatible accessories.
- The TrutzBox is not splash-proof. Do not place them in bathrooms or shower rooms.
- Protect the TrutzBox from shocks, dust and chemicals.
- The TrutzBox must not be exposed to strong temperature variations and may only be operated indoors. Protect the TrutzBox from overheating and direct sunlight; do not place the TrutzBox near stoves, radiators or similar heat sources.
Disposal:
It is prohibited to dispose of the TrutzBox (including the entire scope of delivery) with household waste. If the adjacent symbol of a crossed-out waste bin is attached to a product, this product is subject to European Directive 2002/96/EC. Please dispose of the device including the scope of delivery in accordance with this directive. If you have any questions regarding disposal, please contact the local authority responsible for disposal. The TrutzBox contains a built-in battery. You are legally obliged to dispose of the (used) battery only via specialist electrical retailers or recycling collection points (do not dispose of it with household waste!).
2.2.1 Check scope of delivery (Step A)
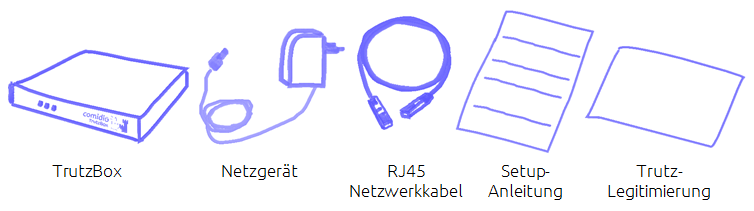
... and if applicable the WLAN antenna installation kit.
-> Details zu Lieferumfang überprüfen
-> Table of Contents (of this manual)
2.2.2 Connecting TrutzBox (Step B)
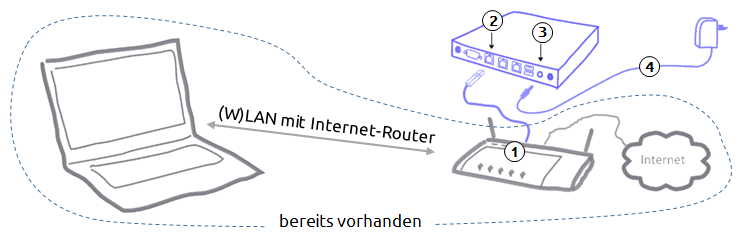
- Connect the network cable to the Internet router (1) and "Ext" on the TrutzBox (2).
- Connect the power supply unit to the "12V DC" connection of the TrutzBox (3) and then to the power supply (4).
- After approx. 1 minute the TrutzBox beeps and after approx. 3-4 minutes the left-hand LED on the front of the TrutzBox starts to flash "and after another approx. 5-6 minutes (after a total of approx. 9-10 minutes) the TrutzBox is ready for operation.
If required, the WLAN built-in antenna available in the Comidio Shop (www.comidio.de/shop) can be retrofitted at any time.
-> Details zu TrutzBox anschließen
-> Table of Contents (of this manual)
2.2.3 Setting up TrutzBox (Step C)
In the Internet browser address bar of a computer connected to your home network, type: http://trutzbox
Now 9 screen pages follow one after the other for the initial setup of your TrutzBox:
- Page 1: Welcome : TrutzBox self-tests whether it has access to the Internet,
- Page 2: License terms : accept the license agreement,
- Page 3: Import Root-Zertificate
| Schritt 1: | Download Root-Zertificate |
| Step 2: using Firefox: |
2a. Certificate is automatically loaded into Firefox certificate management 2b. Confirm the first box of the certificate trust query |
| Step 2: using IE* / Chrome |
2a. Root certificate is located in the download directory 2b. Importing the root certificate into Windows certificate management |
| Step 3 | Start test |
- Page 4: Set admin password : Setting the administrator password for your TrutzBox,
- Page 5: Register TrutzBox : Enter TrutzLegitimierung (TrutzKennung und TrutzSchlüssel),
- Page 6: Create TrutzMail Adresse: Create name, e-mail address and password,
- Page 7: WLAN settings : Setting the WLAN name (SSID) and the WLAN password (can be done later in case of later WLAN setup),
- Page 8: source packages : Determine memory release or storage of source packages, and
- Page 9: recap : Presentation of the entries, and if OK: "Start initial setup".
*IE = Internet Explorer
At the end of setup, updates are downloaded to the TrutzBox.
This process can take more than 60 minutes. Please do not switch off the TrutzBox or start any other process during this time. As soon as the "Complete Setup" window appears, all updates are complete. Press on „Fertig“.
Then the TrutzBox user interface appears, which can be opened with the just defined admin password (4.). Re-call the TrutzBox user interface with http://trutzbox.
-> Details zu TrutzBox einrichten
-> Table of Contents (of this manual)
2.2.4 Enter TrutzBox as a proxy in your browser (Step D)
In order for the PC to surf the Internet securely via the TrutzBox (and not unprotected via the Internet router), the TrutzBox must be entered as a proxy (= deputy, quasi "bouncer" to protect your devices) in each browser of the connected devices.
-> Details zu TrutzBox als Proxy in Browser eintragen
To enable and disable the TrutzBox as a proxy in the browser - especially in the initial phase -, the use of a proxy switch is recommended.
-> Details zu Verwendung eines Proxy-Schalters
This completes the setup.
For more information on using the TrutzBox see chapter 4.
-> Details zu Nutzung der TrutzBox
2.2.5 Import TrutzBox Certificate
For other devices that wish to use TrutzBox via browser, mail or XMPP chat: To identify the TrutzBox as a secure device, the root certificate generated during setup must be imported into every Firefox browser and operating system used on the device (PC, tablet, smartphone).
-> Details zu TrutzBox Zertifikat importieren
*** END of Fast Lane *** END of Fast Lane *** END of Fast Lane *** END of Fast Lane *** END of Fast Lane *** END of Fast Lane ***
-> Table of Contents (of this manual)
3 TrutzBox® Setup (for TrutzBox® Administrator)
This chapter includes
- Start-up of the TrutzBox®
- Set-up of the TrutzBox®
The aim is to connect as many or all devices as possible in the home network via the TrutzBox®.
However, this only happens after setting up according to the manual.
After the TrutzBox® is connected to the Internet router, start "small" by entering the TrutzBox® as "Proxy" (= deputy, quasi "doorman") in a browser of a connected PC and thus controlling the TrutzBox® the incoming and outgoing Internet traffic of this connected PC.
After completing this quick start, the user can
- surf without tracks (at least with few tracks) with presets,
- encrypted email via web access and
- use the proposed filter lists for child and youth protection.
Once this state has been reached, further devices should be connected to the TrutzBox® in a controlled manner.
Devices for which a proxy can be set up
Devices for which a proxy can be configured (e.g. browser on PC or, if available, on TV set) should first be connected to the Internet router via WLAN (or network cable) and the TrutzBox® should be entered as the proxy.
Once you have gained experience in this way, you can connect the devices directly to the TrutzBox® via WLAN (or network cable).
Devices for which no proxy can be set up
Devices for which no proxy can be set up (e.g. refrigerator or toothbrush) should be connected to the TrutzBox®; then the communication characteristics can be monitored and, if necessary and controlled, external communication can be permitted.
-> Table of Contents (of this manual)
3.1 Start-up of the TrutzBox®
| ATTENTION:
We can only provide support if you first go through Quick Start
|
3.1.1 Before connecting the TrutzBox®
Before you connect the TrutzBox®
- check the scope of delivery,
- check the prerequisites for start-up,
- read "Safety and Handling" and
- familiarize yourself with connections and displays..
Please only put your TrutzBox® into operation afterwards.
3.1.1.1 Scope of delivery
Please check the completeness of the scope of delivery:
3.1.1.2 Prerequisite for start-up
For the start-up of the TrutzBox® the following requirements must be fulfilled:
- Computer or Internet-enabled device with access to the Internet router,
- the up-to-date web browser (e.g. Internet Explorer, Google Chrome, Mozilla Firefox) and
- Internet connection.
-> Table of Contents (of this manual)
3.1.1.3 Safety and Operation
Before installing and using the TrutzBox® read the following safety and operating instructions.
Safety instructions:
Before connecting the TrutzBox® ®, please take note of the following safety instructions to protect yourself and the TrutzBox® from damage.
- Use only the supplied AC adapter and network cable. Incidentally, only connect compatible accessories.
- The TrutzBox® is not splash-proof. Therefore, only place them in dry rooms; not in bathrooms or shower rooms.
- Protect the TrutzBox® against shocks, dust and chemicals.
- The TrutzBox® must not be exposed to strong temperature changes and may only be operated indoors.
- Protect the TrutzBox® from overheating and avoid direct sunlight on the TrutzBox® as well as the proximity of the TrutzBox® to ovens, radiators or similar heat sources.
- Avoid overloading sockets, extension cords and socket strips. Overloaded power supplies present a fire and electric shock risk.
- Do not place the TrutzBox® on carpet or upholstered furniture.
- Do not cover the TrutzBox® .
- Do not place the TrutzBox® on heat-sensitive surfaces, as the underside of the unit may heat up during normal operation.
- Do not install the TrutzBox® during thunderstorms.
- Disconnect the TrutzBox® from the power supply and the Internet connection during thunderstorms.
- Do not allow liquids to penetrate inside the TrutzBox®, as electric shocks or short circuits may result.
- Do not open the housing of the TrutzBox® . Improper opening and improper repairs can pose a risk to users of the device.
Operation
- If you want to establish wireless connections between the TrutzBox® and computers, place the TrutzBox® in a central location.
- Ensure sufficient distance to sources of interference such as microwave ovens, DECT telephones or electrical appliances with large metal housings.
Disposal:
It is prohibited to dispose of the TrutzBox (including the entire scope of delivery) with household waste. If the adjacent symbol of a crossed-out waste bin is attached to a product, this product is subject to European Directive 2002/96/EC. Please dispose of the device including the scope of delivery in accordance with this directive. If you have any questions regarding disposal, please contact the local authority responsible for disposal. The TrutzBox contains a built-in battery. You are legally obliged to dispose of the (used) battery only via specialist electrical retailers or recycling collection points (do not dispose of it with household waste!)
-> Table of Contents (of this manual)
3.1.1.4 Interfacing and LEDs
Connections (rear panel) The following connections are located on the rear panel:
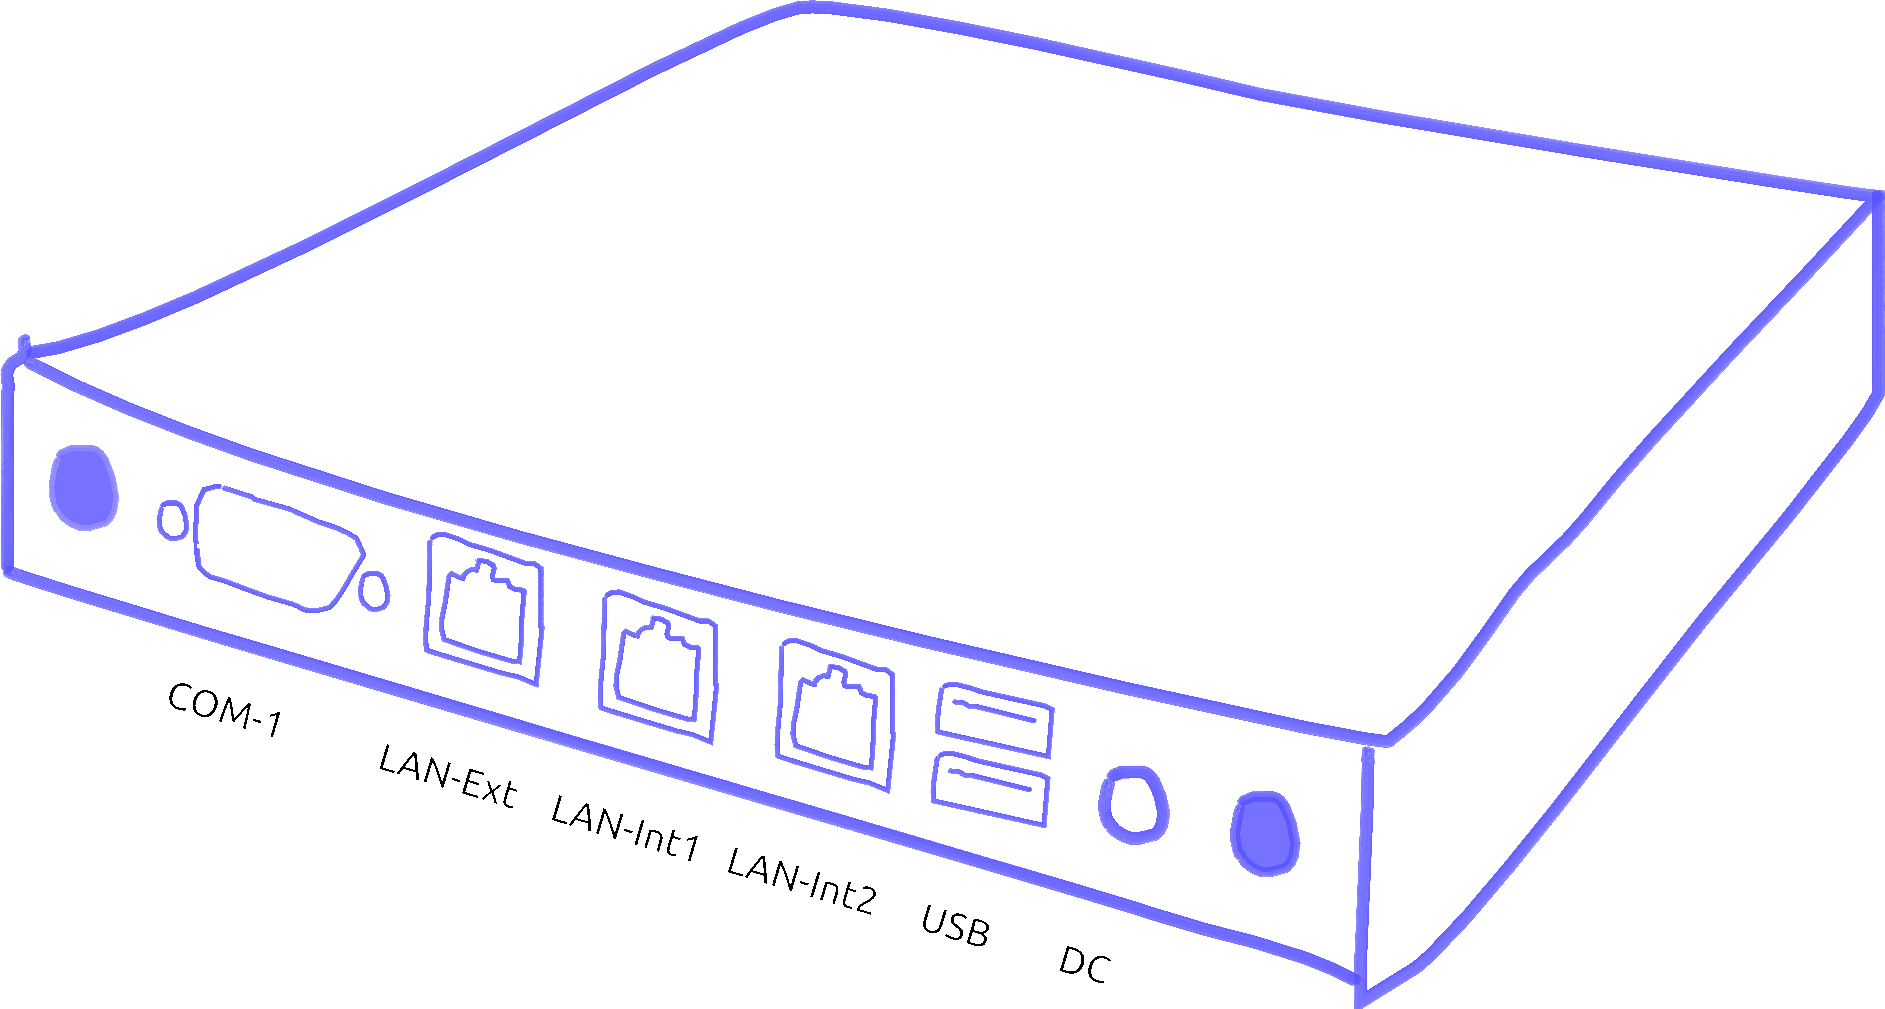
| COM-1 | V24 connection (not required) |
| LAN-Ext | Network connection, insecure network: Internet router |
| LAN-Int1 | Network connection, secure network: network-compatible device, e.g. PC or switch |
| LAN-Int2 | Network connection, secure network: network-compatible device, e.g. PC or switch |
| USB | two USB ports (e.g. for connecting a WLAN adapter via USB cable) |
| 12 V DC | Power supply unit connection via included power supply unit |
-> Table of Contents (of this manual)
LEDs (front panel) At the front panel there are three LEDs:
| left LED: Heartbeat |
off permanent on Rhythmic blinking |
TrutzBox® is switched off TrutzBox® is booting TrutzBox® in operation |
| LED Mitte: TrutzMail |
Lights Up | TrutzMail is sending or receiving an e-mail |
| right LED: TrutzBrowse, TrutzContent |
Lights Up | Short flash as soon as tracker / website are blocked |
-> Table of Contents (of this manual)
3.1.2 Connecting the TrutzBox®
Before initial operation of the TrutzBox® observe the instructions in the section "Safety and Operation“.
Connect the TrutzBox® as follows:
- Connect the RJ45 network cable to a network socket of the Internet router (1) and to the "Ext" connector on the back of the TrutzBox® (2).
- Connect the power supply unit to the "12V DC" connection of the TrutzBox® (3) and to the 100-240V power supply (4). Only use the supplied power supply unit for connection to the power supply.
After approx. 1 minute the TrutzBox beeps and after approx. 3-4 minutes the left LED on its front side starts to flash, and after another approx. 5-6 minutes (after a total of approx. 9-10 minutes) the TrutzBox is ready for operation.
If required, the WLAN options available in the Comidio Shop (www.comidio.de/shop) can be retrofitted at any time.
|
Important:
|
-> Table of Contents (of this manual)
3.2 TrutzBox® Set up
To set up your Trutzbox, you can do this with any browser. The process is a little different, depending on which browser is used. There are two groups:
- Mozila Firefox (with own certificate management) and
- Internet Explorer or Google Chrome (with shared certificate management in the operating system).
The following example shows the processes for both types; starting with Mozilla Firefox.
After connecting the TrutzBox® according to chapter "Connecting the TrutzBox®" it starts up. This can take 9-10 minutes.
Then connect your computer's browser to the TrutzBox® by entering"http://trutzbox" in the browser's address bar..
It is recommended to open 2 browser windows, so that you can work e.g. in the left window on the TrutzBox® user interface and directly next to it, e.g. in the right window, you can access the manual or the browser administration.
This is shown below:
- Part I is the same for all browser types,
- Part II distinguishes between Firefox (2a) and "Non-Firefox" (2b) and
- Part III is identical again.
3.2.1 Part I: Preparation of the setup
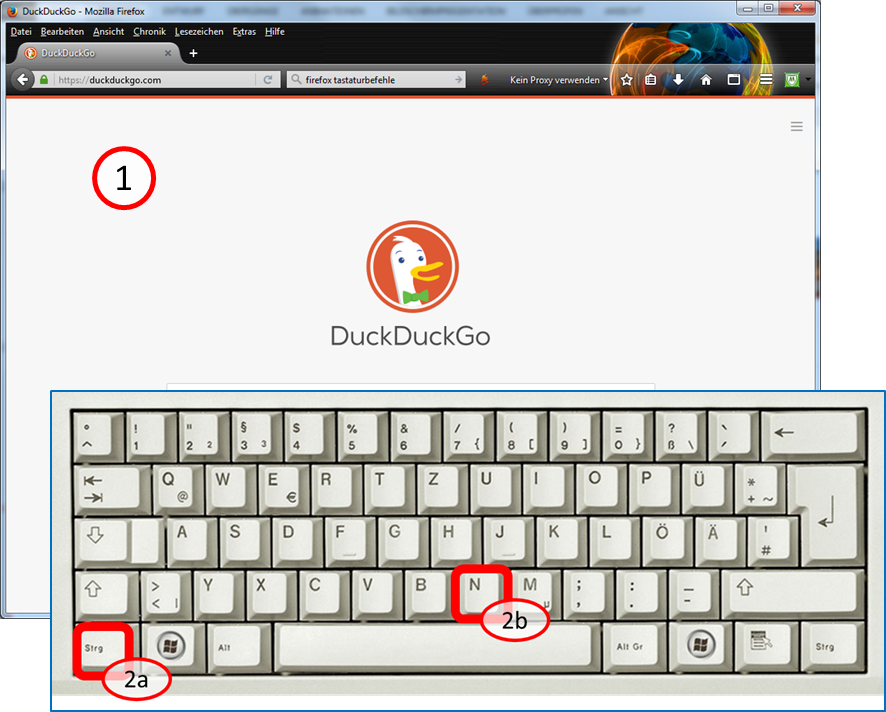
After you open a browser window, enter <Ctrl><N> on the keyboard:
Hold down key <Ctrl> (2a) and additionally press key "n" (2b).
This opens a second browser window.
-> Table of Contents (of this manual)
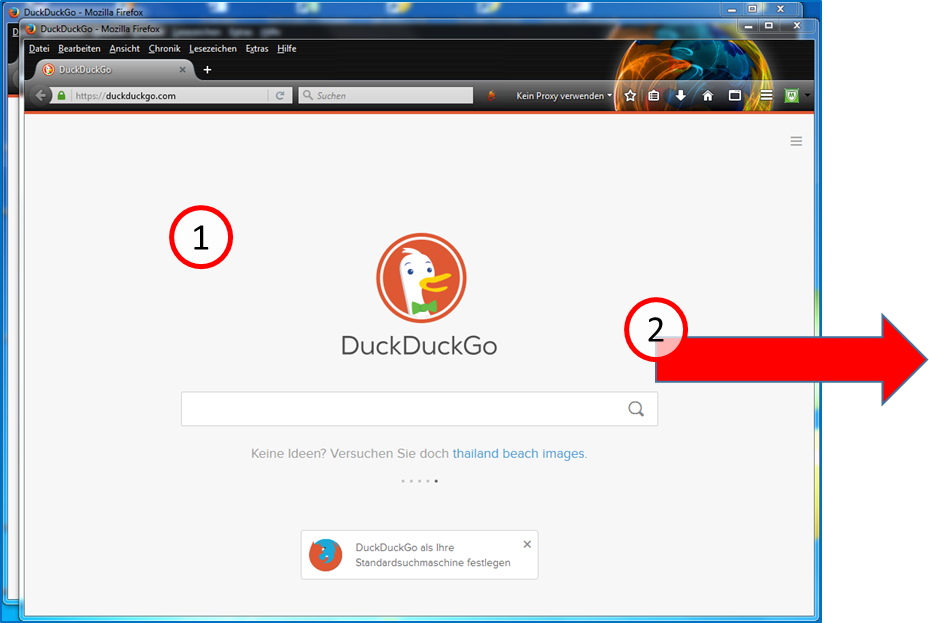
The second window (1) is now above the first window. Click with the left mouse button on the upper frame of the browser window and move the second window (with pressed left mouse button) to the right, next to the first window.
-> Table of Contents (of this manual)
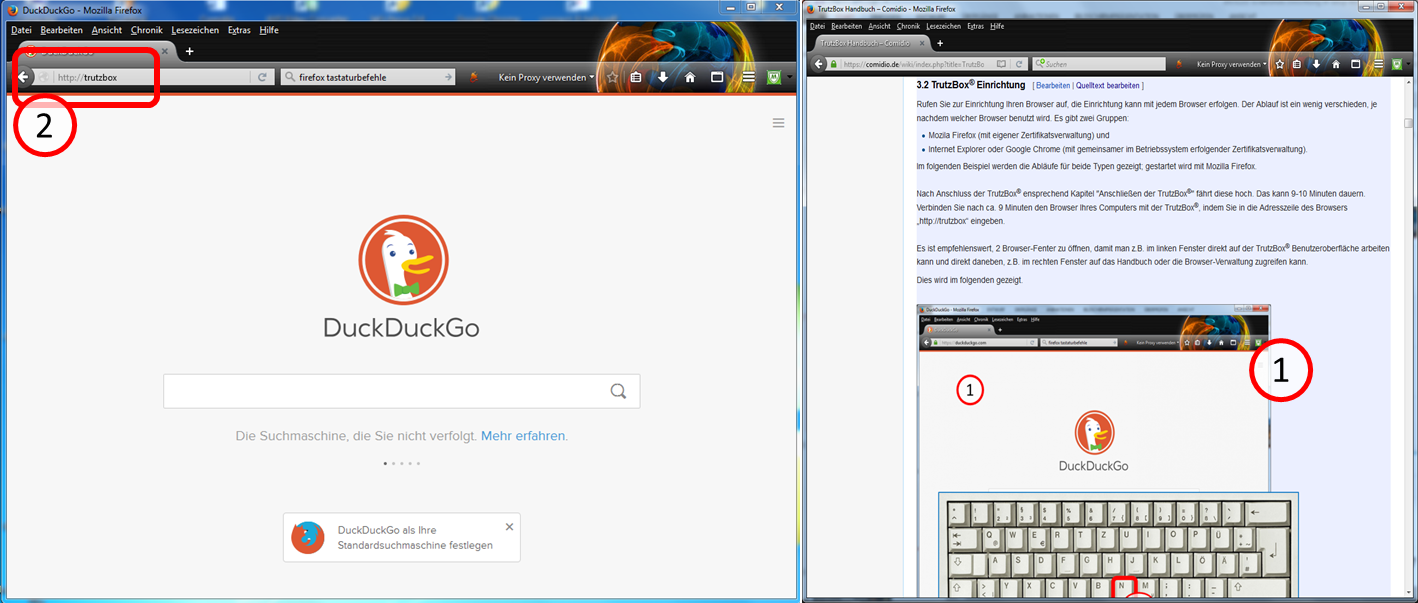
Open the wiki manual in the right window (1) (www.comidio.de/wiki) and go to chapter 3.2.
Enter in the left window (2) "http://trutzbox".
If you are using Firefox, please read on...
If you are not using Firefox, please continue reading at "Part IIb: Setup with Non-Firefox"
3.2.2 Part IIa: Setup with Firefox
-> Table of Contents (of this manual)
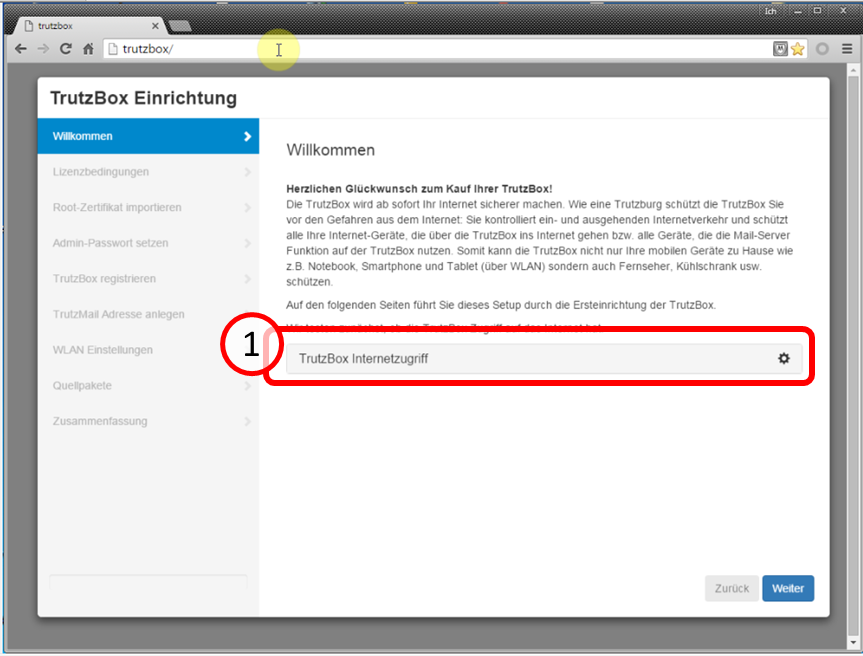
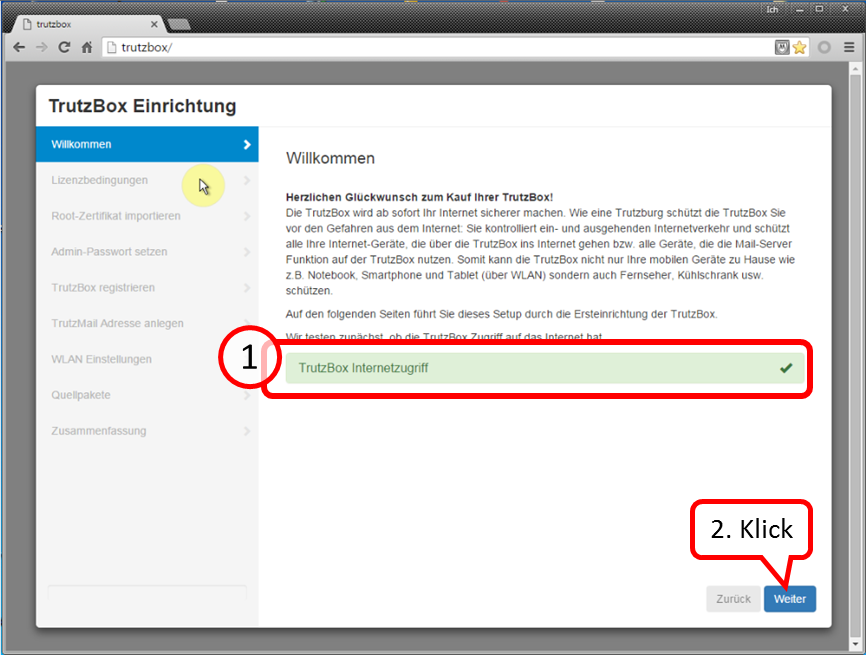
The TrutzBox® checks the Internet connection (1) ...
-> Table of Contents (of this manual)

... and confirms the connection with a green tick (1).
Click on "Next" (2).
-> Table of Contents (of this manual)

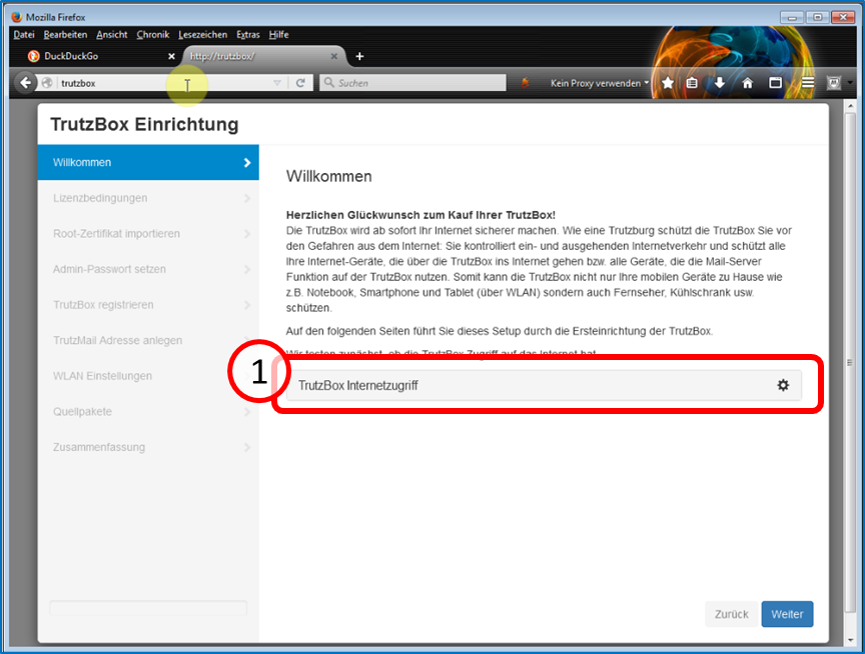
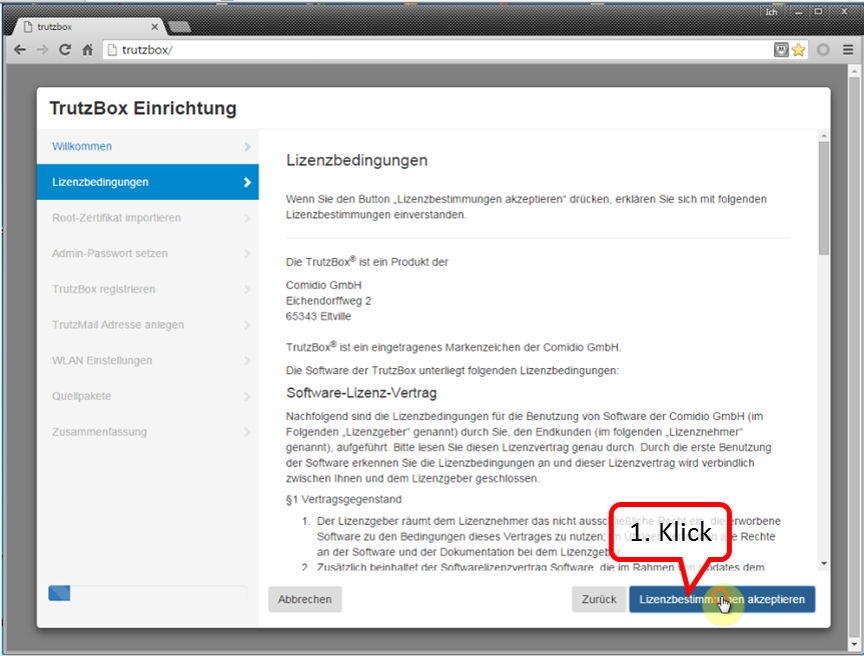
Here you can read the license conditions.
If you agree, click on "Accept license terms" (1).
-> Table of Contents (of this manual)
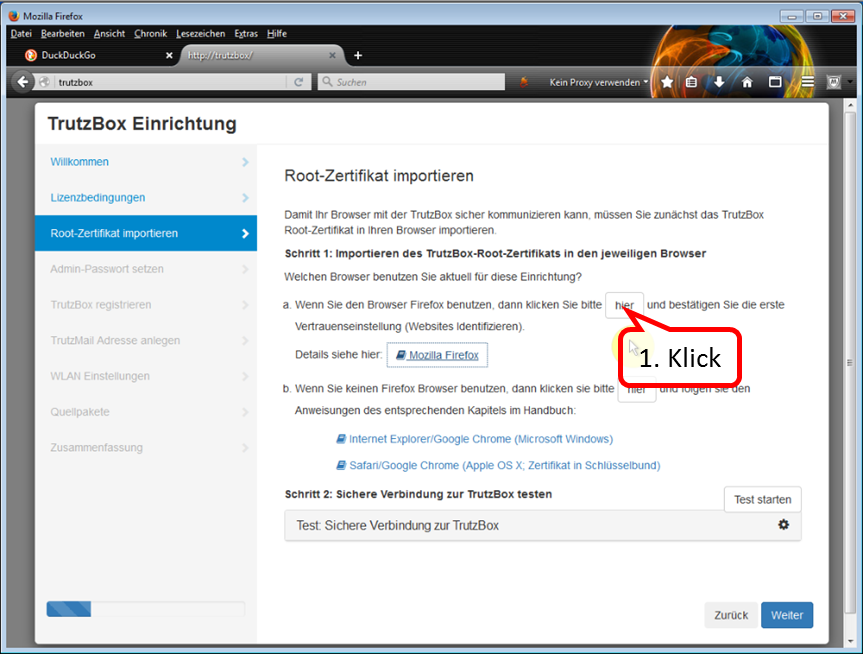
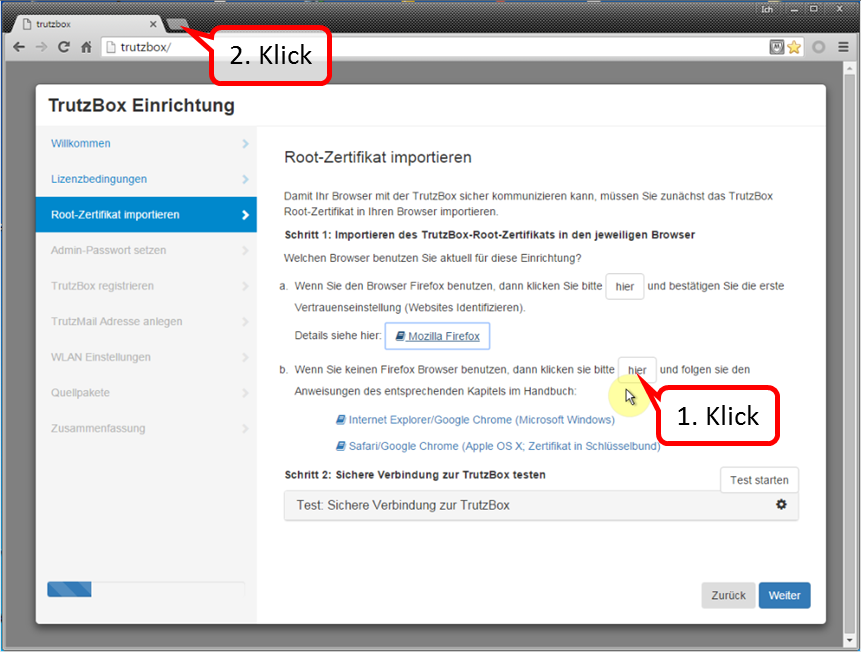
Since we are currently using Firefox, click on "here" in step 1 of (a)(1)
-> Table of Contents (of this manual)
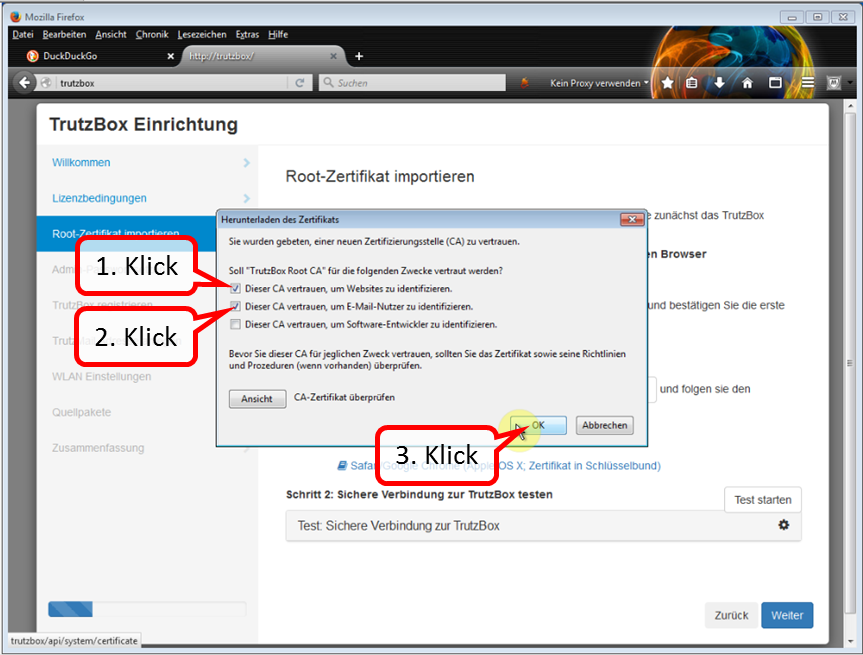
In the trust query, set the two upper check marks (1)+(2).
Click on "Weiter" (3).
-> Table of Contents (of this manual)
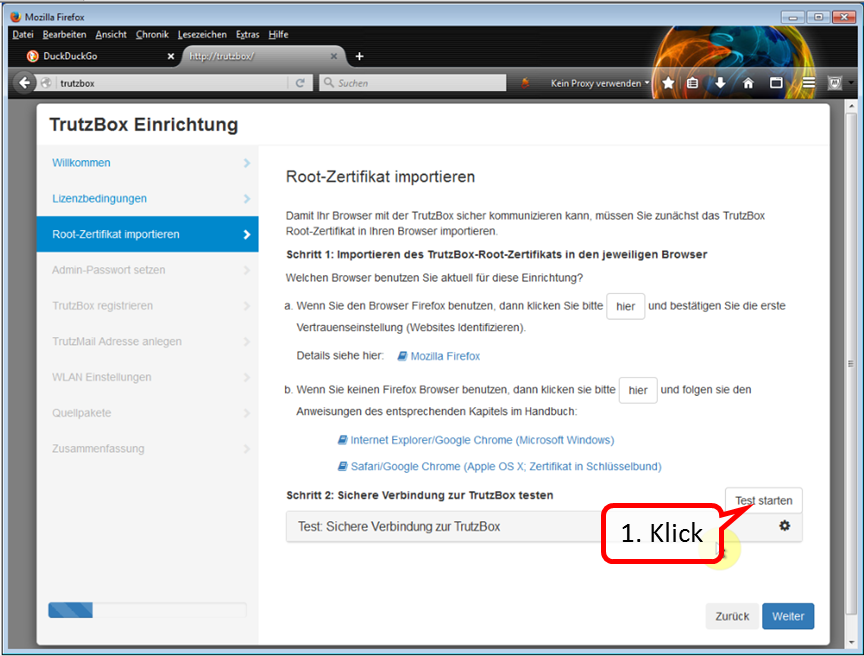
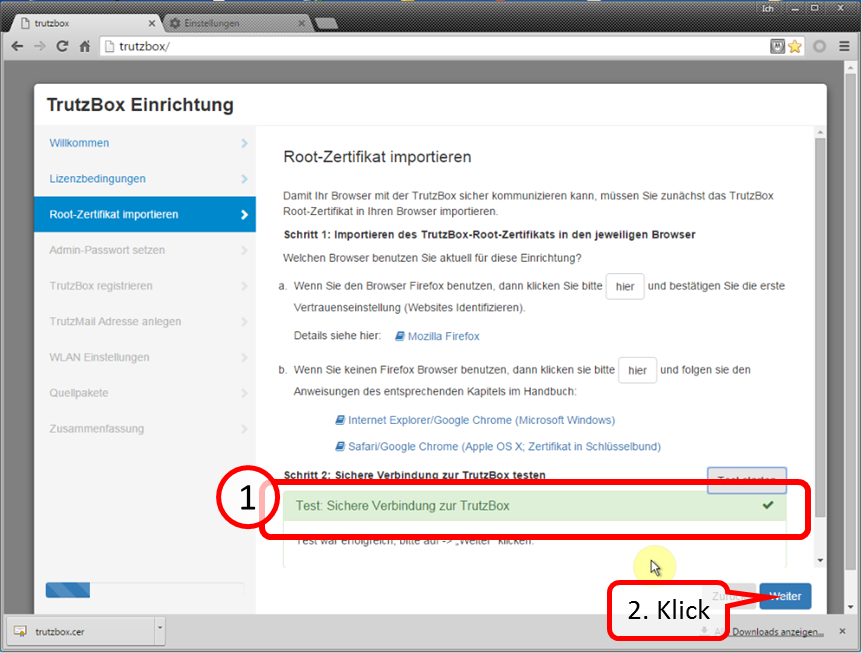
Click on "Test starten" (1) ...
-> Table of Contents (of this manual)
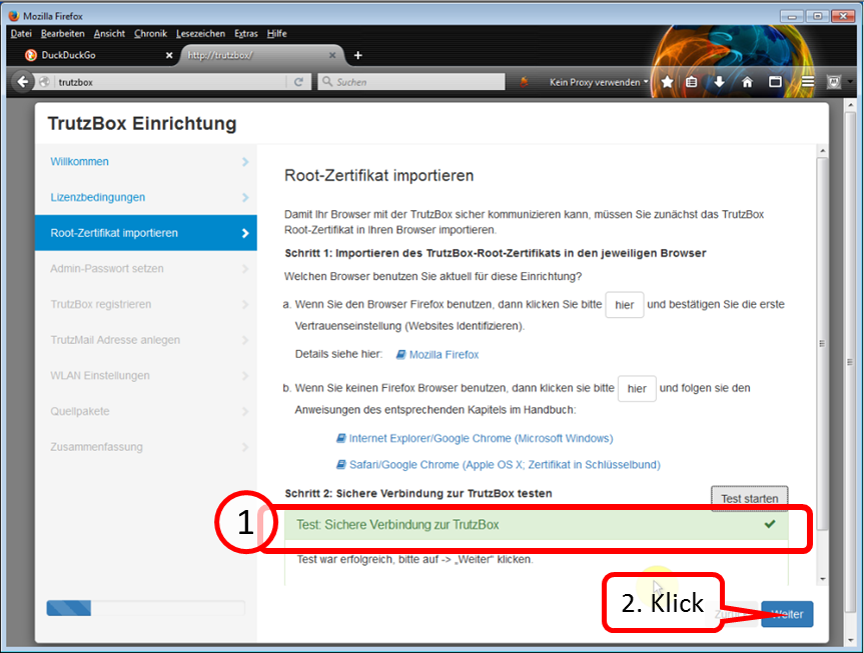
... and wait for the test result (1).
Click on "Weiter" (2).
Continue to "Part III: Completion of the setup".
3.2.3 Part IIb: Setup with Non-Firefox
The main difference to "Setup with Firefox" is that with non-Firefox the root certificate
- is downloaded into the download directory of the PC and
- is imported from the download directory into the certificate management of the PC..
Then, the root certificate is automatically available to both Internet Explorer and Google Chrome.
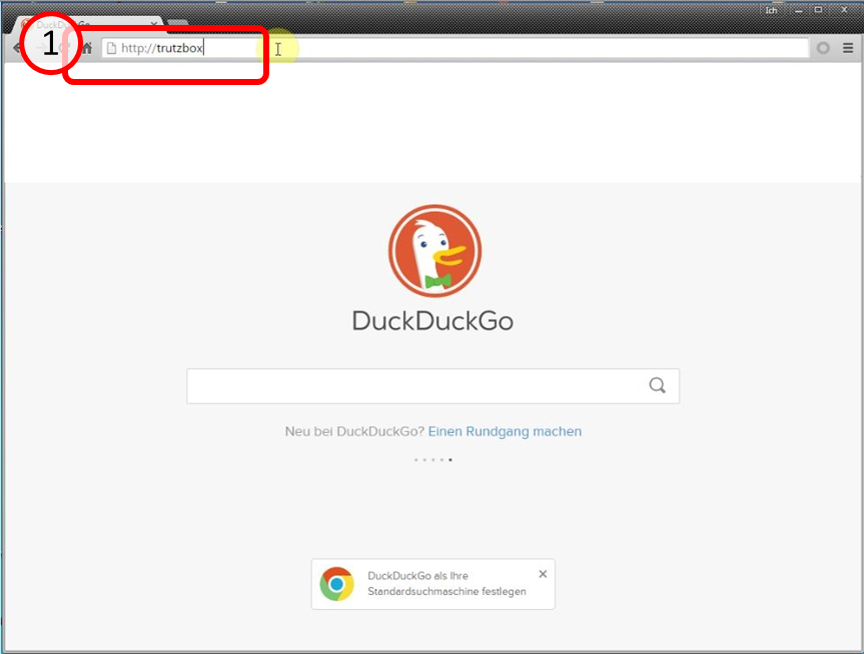
Then connect your computer's browser to the TrutzBox® by entering"http://trutzbox" in the browser's address bar (1).
-> Table of Contents (of this manual)
The TrutzBox® checks the internet connection (1) ...
-> Table of Contents (of this manual)
... and confirms the connection with a green checkmark (1).
Click on "Weiter" (2).
-> Table of Contents (of this manual)
Here you can read the license conditions.
If you agree, click on "Accept license terms" (1).
-> Table of Contents (of this manual)
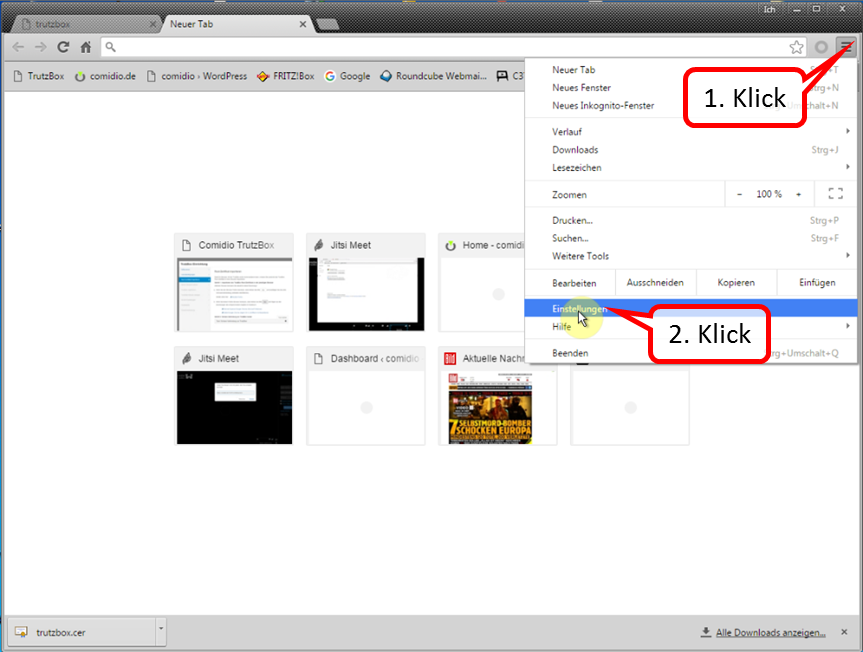
Since you are currently using Chrome (i.e. non-Firefox), click on "here" in step 1 (b) (1).
This downloaded the root certificate under the name "trutzbox.cer" into the download area.
Open a second tab window (2) to import the root certificate.
-> Table of Contents (of this manual)
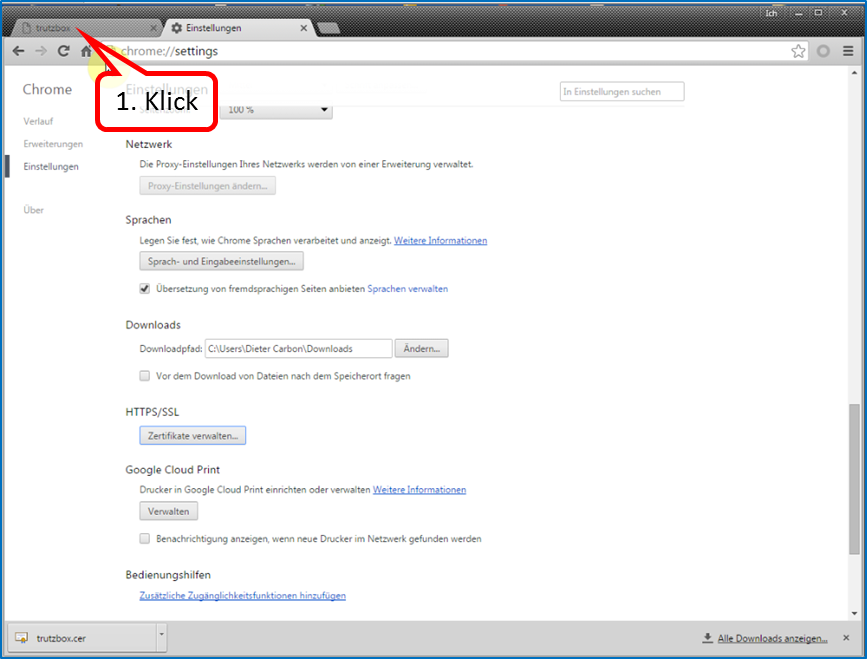
Open "Customize and configure Google Chrome" (1) and click on " Settings " (2).
-> Table of Contents (of this manual)
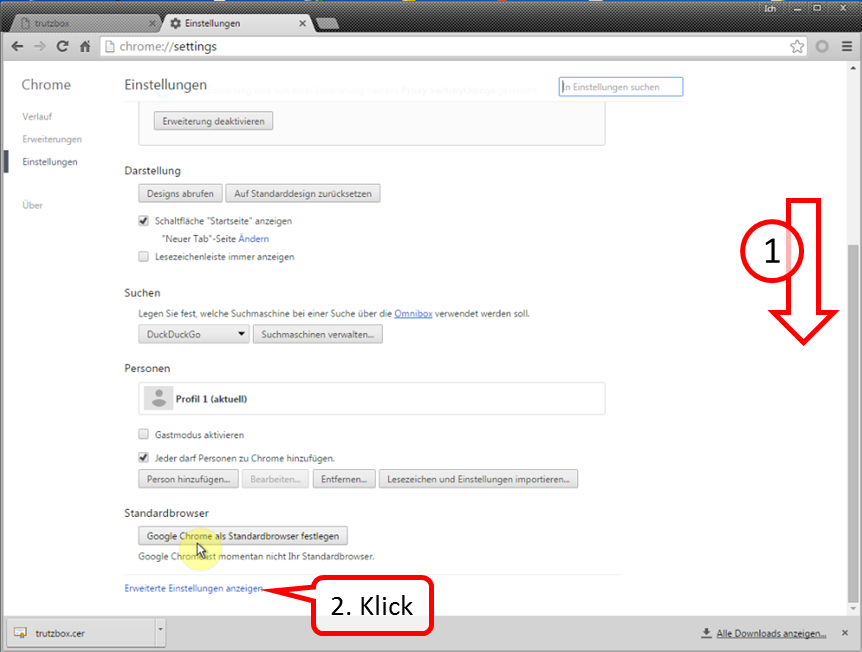
Scroll all the way down (1) and click on "Show advanced settings" (2).
-> Table of Contents (of this manual)
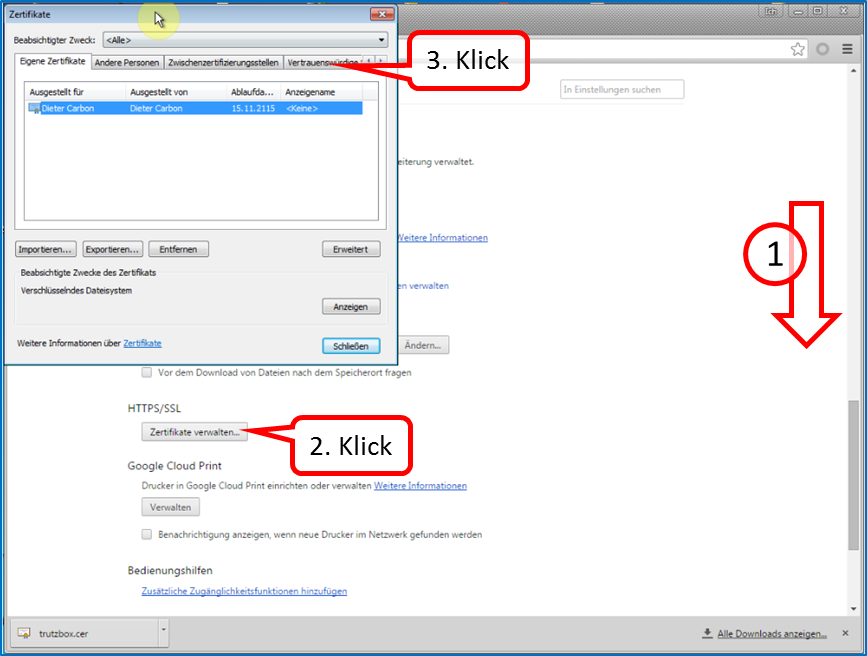
Scroll down (1) and click on "Manage Certificates" (2) and then on "Trusted Root Certification Authorities" (3).
-> Table of Contents (of this manual)
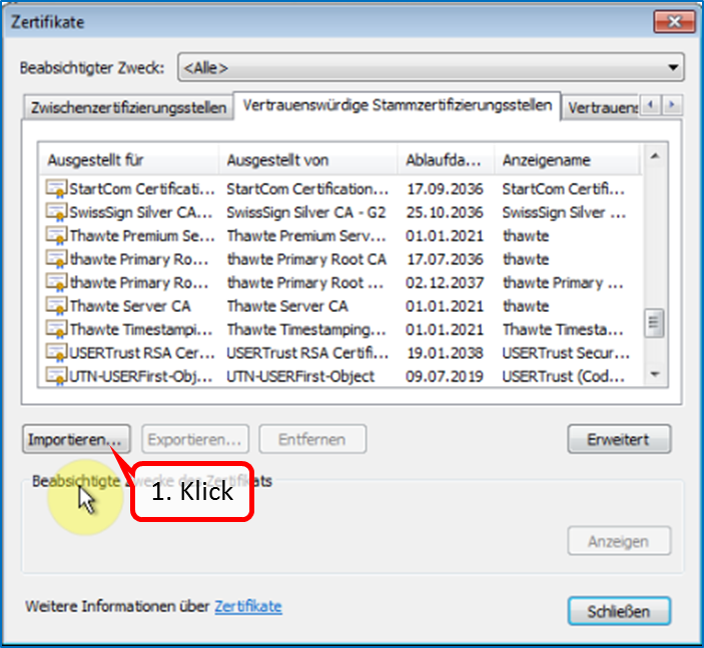
Click on "Import" (1).
-> Table of Contents (of this manual)
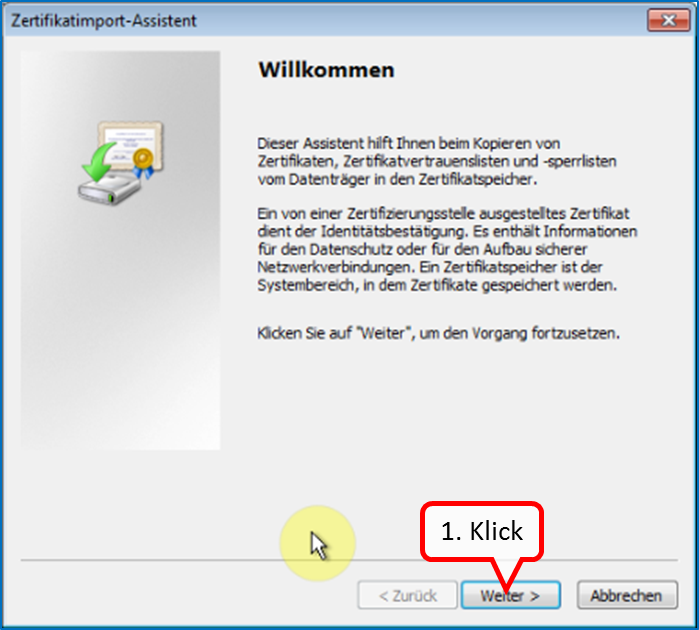
Click on " Weiter " (1).
-> Table of Contents (of this manual)
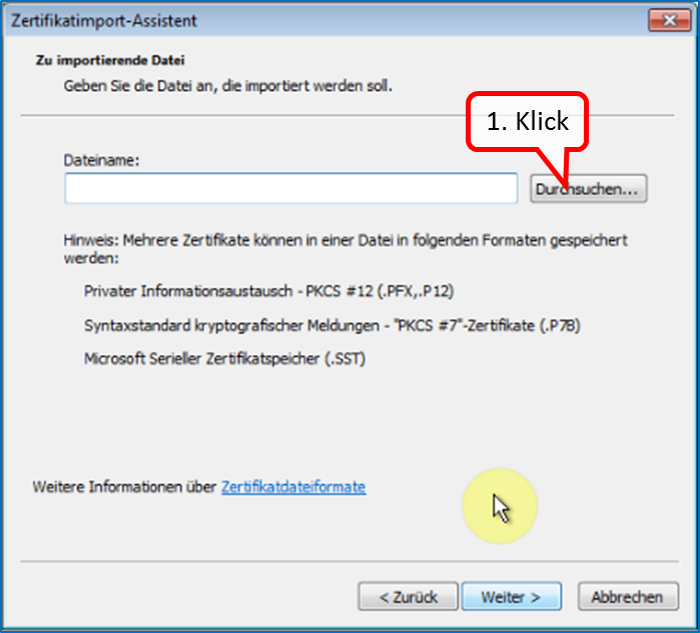
Click on " Durchsuchen " (1).
-> Table of Contents (of this manual)
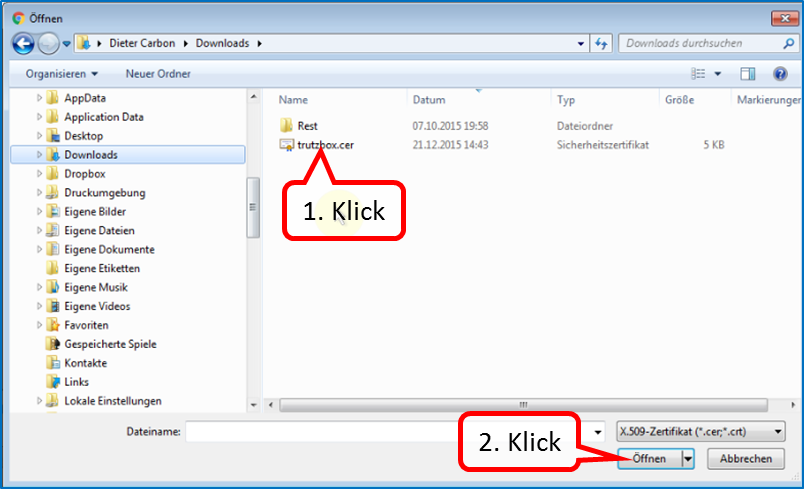
Click on "trutzbox.cer" (1) and then on "Open" (2).
-> Table of Contents (of this manual)
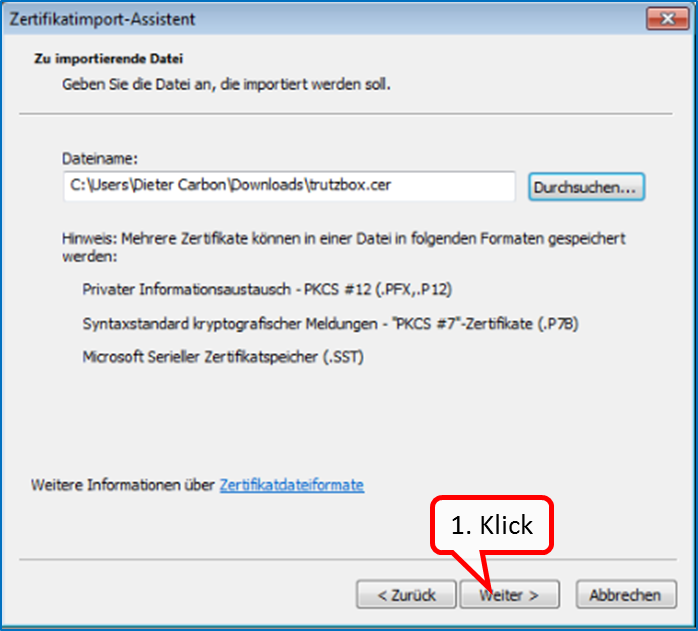
Click on " Weiter " (1).
-> Table of Contents (of this manual)
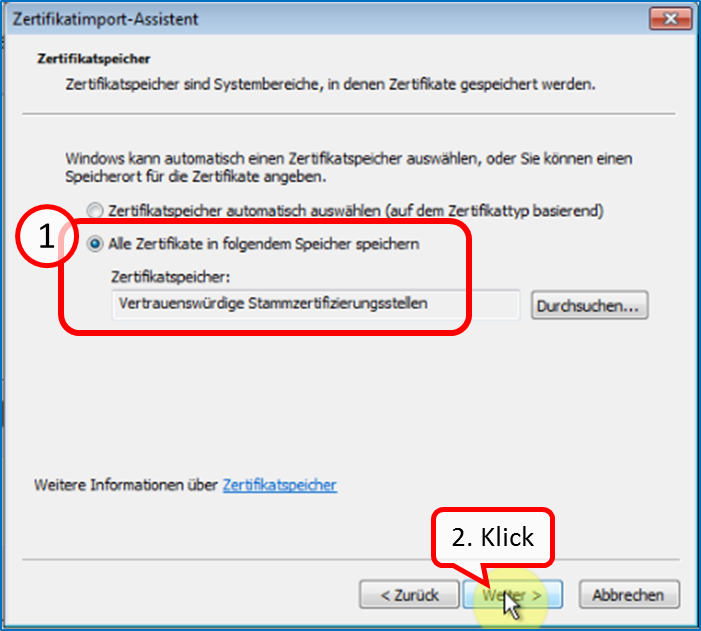
Check that "Trusted Root Certification Authorities" is checked (1) and click "Next" (2).
-> Table of Contents (of this manual)
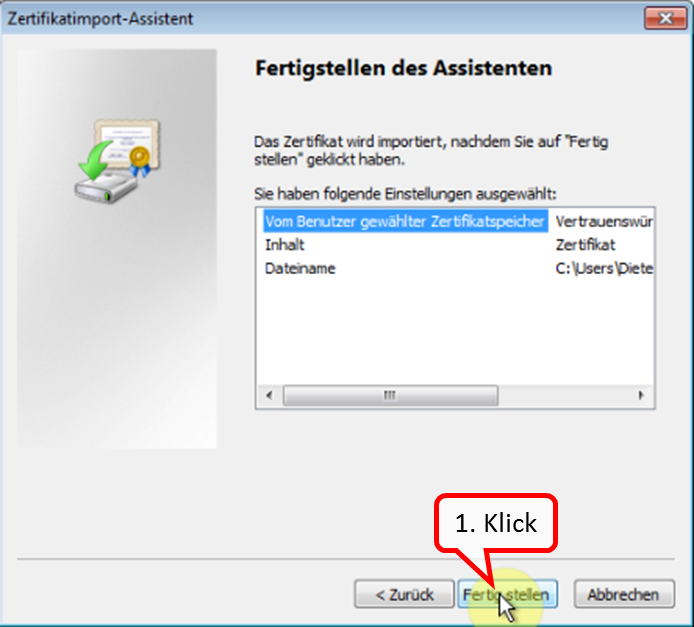
Click on " Fertigstellen " (1).
-> Table of Contents (of this manual)
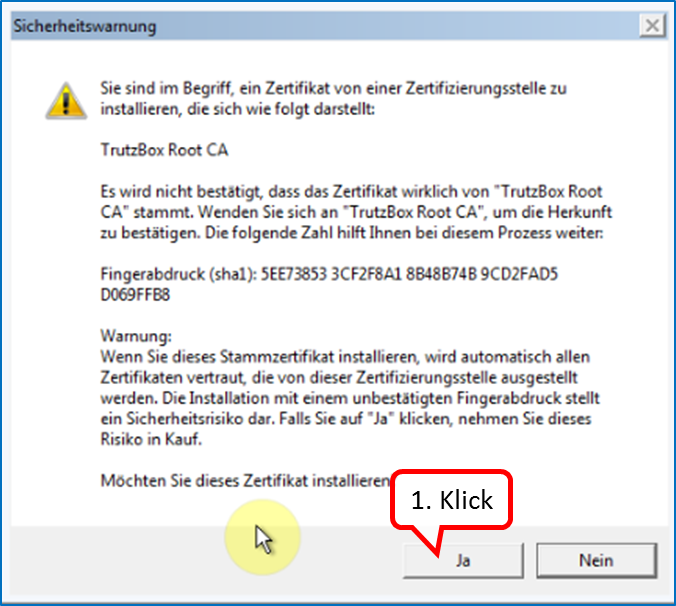
Click on " Ja " (1).
-> Table of Contents (of this manual)
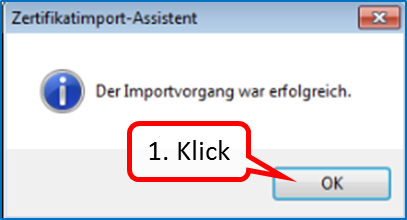
Click on " OK " (1).
-> Table of Contents (of this manual)
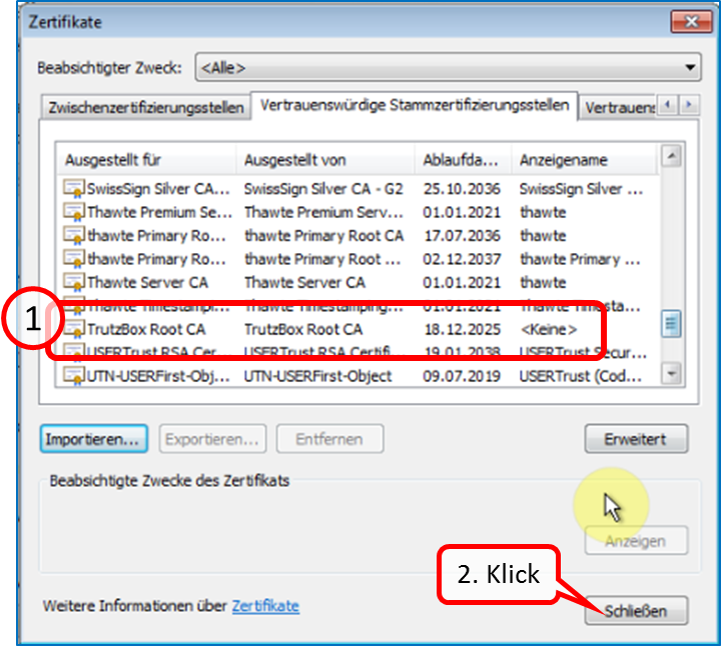
The TrutzBox root certificate (1) appears in the list; click on "Close" (2).
-> Table of Contents (of this manual)
To continue the TrutzBox setup, switch back to the first tab window (1).
-> Table of Contents (of this manual)

Click on " Test starten " (1). ...
-> Table of Contents (of this manual)
... and wait for the test result (1).
Click on " Weiter " (2).
-> Table of Contents (of this manual)
3.2.4 Part III: Completion of the setup
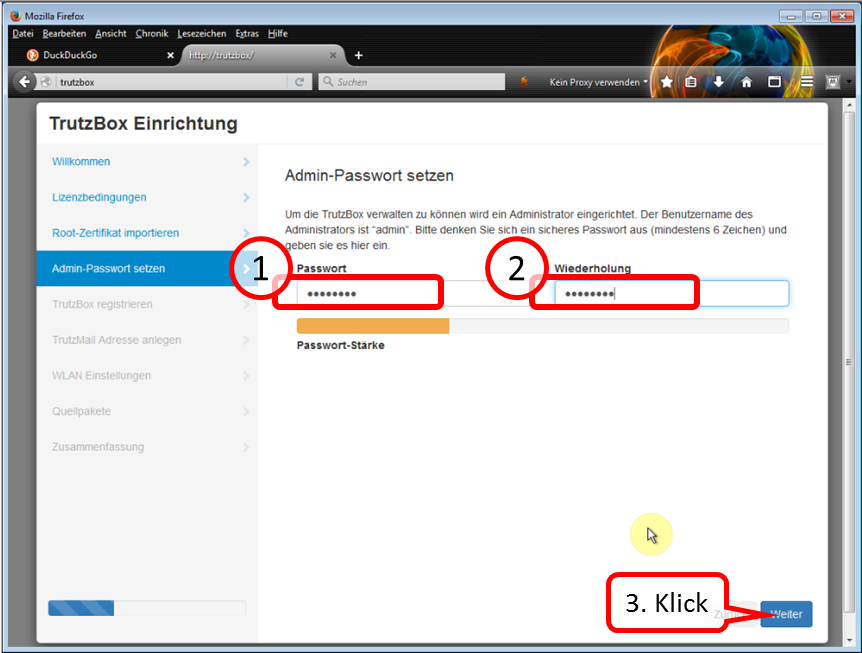
Determine, enter (1) and repeat administrator password (2).
All characters according to ASCII table https://en.wikipedia.org/wiki/ASCII#ASCII_printable_code_chart are allowed.
This password is required to open the TrutzBox® user interface as administrator..
Click on " Weiter " (3).
-> Table of Contents (of this manual)
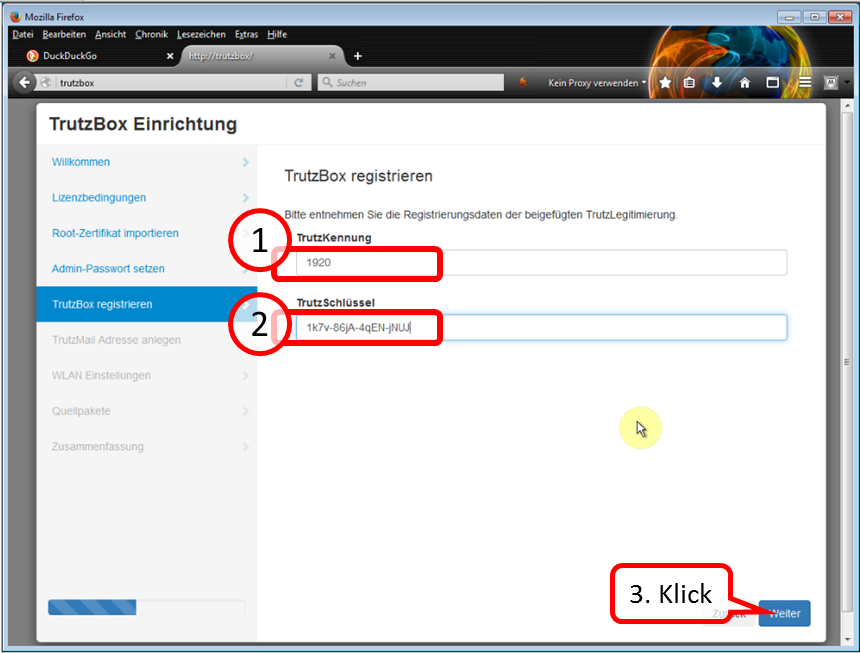
Take the data from the TrutzLegitimierung (coloured paper) and enter the TrutzKennung (1) and TrutzSchlüssel (2).
Click on " Weiter " (3).
-> Table of Contents (of this manual)
Self-chose and enter TrutzMail details:
- Name (1),
- TrutzMail address (2): please enter only the name of the user, "@comidio.email" will be added automatically.
- Set, enter (3) and repeat (4) the TrutzMail password. All characters according to ASCII table https://en.wikipedia.org/wiki/ASCII#ASCII_printable_code_chart are allowed.
These are your TrutzMail account data, which you need to use your webmail or to configure your e-mail program.
Click on " Weiter " (5).
-> Table of Contents (of this manual)
Enter a WLAN name of your choice [SSID = Service Set IDentifier = Name of wireless network)] (1) and WLAN password (2).
All characters according to ASCII table https://en.wikipedia.org/wiki/ASCII#ASCII_printable_code_chart are allowed.
Note: choose a pseudonym as name (SSID), no clear name, as the wireless network connection name is visible with a range of up to approx. 50 m.
With this TrutzBox® SSID you connect the WLAN devices of the home network.
Click on " Weiter " (4).
-> Table of Contents (of this manual)
If the check mark remains set (1), about half a gigabyte of memory space is freed up.
Click on " Weiter " (2).
-> Table of Contents (of this manual)

Check your details; for corrections click on „Zurück“.
Then click on „Ersteinrichtung starten“.
Please note that this process can take several minutes.
-> Table of Contents (of this manual)
The TrutzBox® checks if there are current updates; if yes, they will be downloaded now (1).
Please note that this process can take up to 30 minutes.
-> Table of Contents (of this manual)
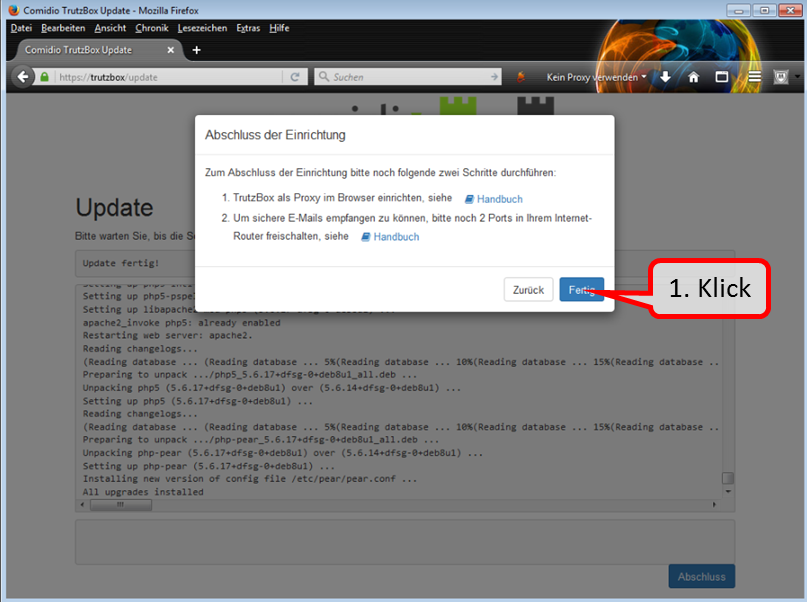
The updates are completely downloaded when the window " Abschluss der Einrichtung " appears.
Click directly - without clicking on steps 1 & 2 - on the "Fertig" button to end the setup process.
(Step 1 follows only after the installation; Step 2 can now be saved due to the further development of the TrutzBox).
-> Table of Contents (of this manual)
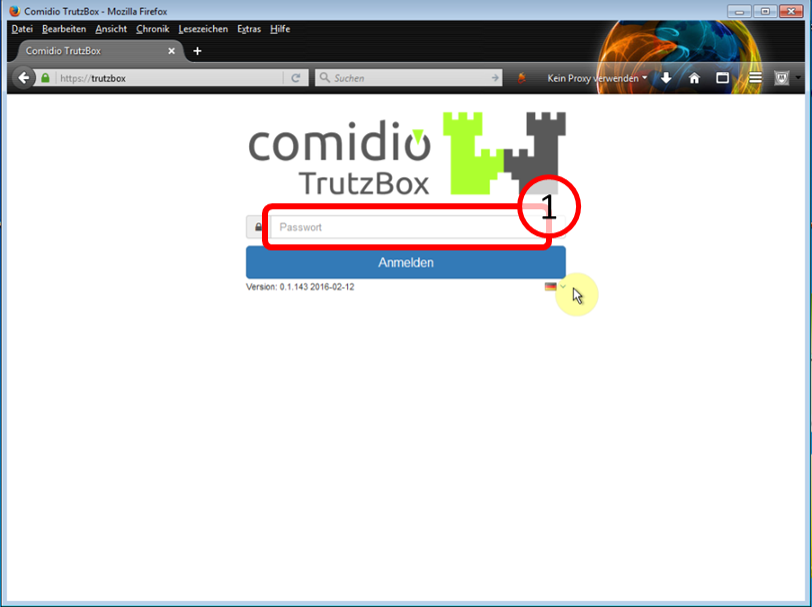
Then the TrutzBox user interface appears automatically and shows you:
Now the quick start is complete.
-> Table of Contents (of this manual)
After downloading, your TrutzBox® is ready for operation.
The next step is to
- set up the TrutzBox as a proxy; see Chapter entitled "Connecting the device to the TrutzBox" and
- import the root certificate (if you want to use other devices with a browser in addition to your PC); see the "Certificates" chapter.
On every other device with a browser that uses the TrutzBox®, the certificate
- if browser is Firefox: must be imported into the Firefox certificate management,
- if browser is not Firefox: must be imported into the certificate management of the other browser, and thus automatically into the certificate management of the operating system. (see chapter "Certificates").
To use TrutzMail or TrutzChat, the TrutzBox certificate must also have been imported into the certificate management of the operating system.
The TrutzBox certificate only needs to be imported once into the certificate management of the operating system and is then available there for
- all non-Firefox browsers and
- TrutzMail and
- TrutzChat.
If you do not import the certificate into the browsers and notify the mail system, you will be prompted for security confirmation each time you open it.
Therefore it is recommended to download the TrutzBox® certificate from the TrutzBox® to the device with browser and import it into the browser afterwards.
-> Table of Contents (of this manual)
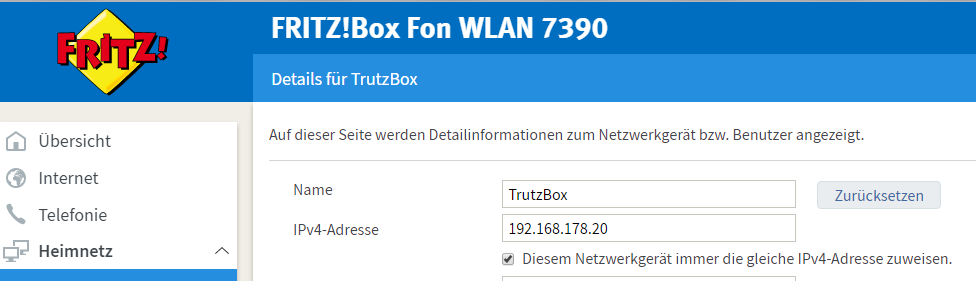
3.2.5 Disable IPv6
The TrutzBox works exclusively with IPv4 addresses.
If your TrutzBox is not connected to the router or your terminal device (e.g. PC) cannot reach the TrutzBox, one reason for this may be that the router assigns IPv6 addresses. To avoid this, it should be ensured that the router assigns IPv4 addresses.
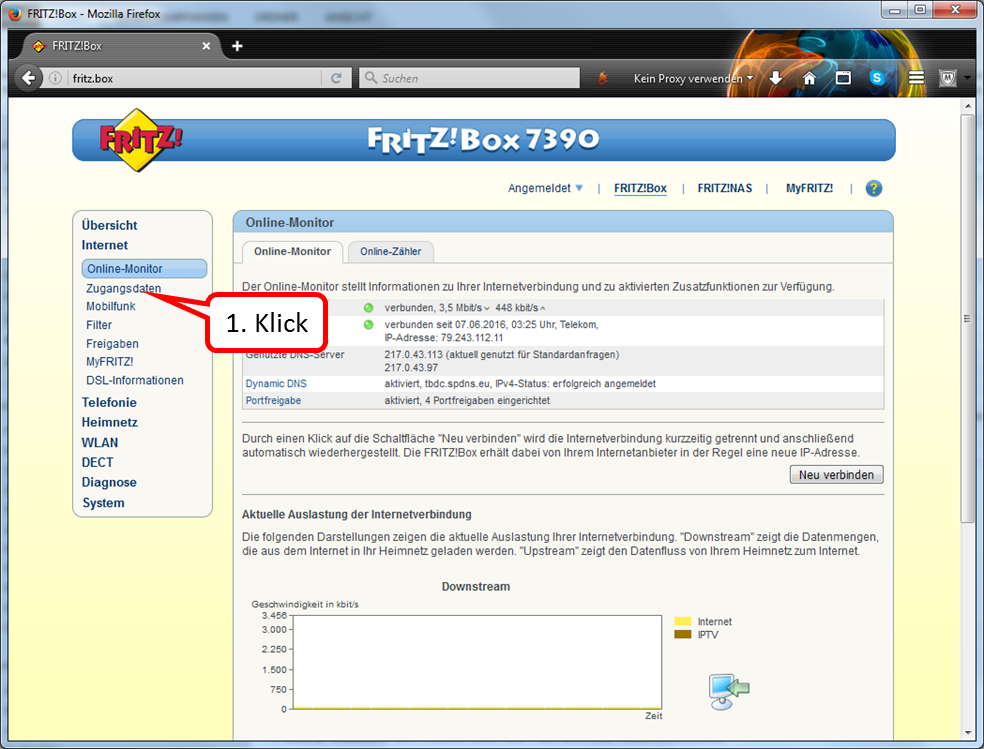
To disable IPv6 addresses, proceed as follows:

In the FRITZ!box user interface, call up Internet.
-> Table of Contents (of this manual)
Click on " Zugangsdaten " (2).
-> Table of Contents (of this manual)
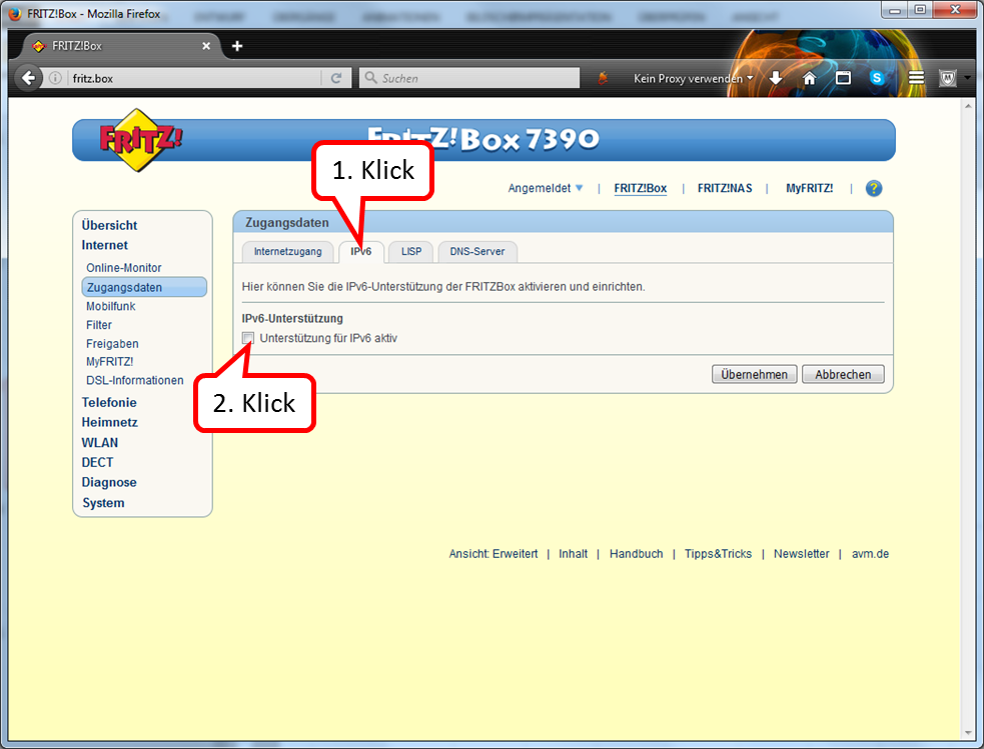
Click on " IPv6" (1).
The box under "IPv6 support" should not be checked (2).
-> Table of Contents (of this manual)
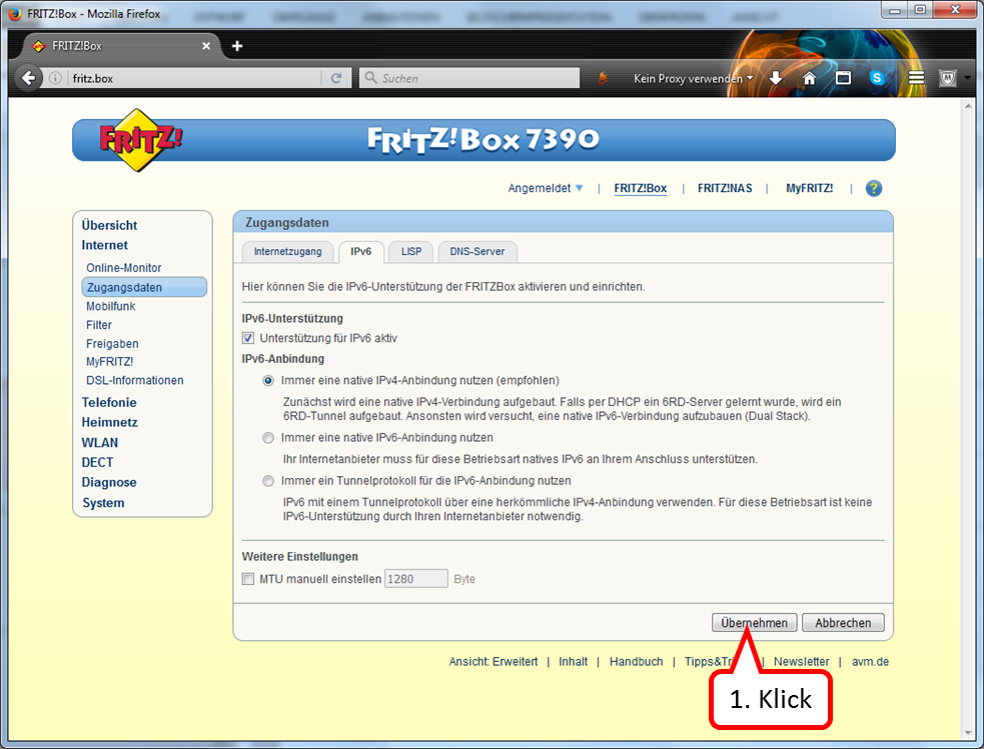
If a check mark is set, deactivate this option.
-> Table of Contents (of this manual)
3.3 WLAN Installation Guide
3.3.1 Replacement installation of WLAN-Plus (e.g. after WLAN basic)
If you have already used another WLAN hardware (e.g. WLAN-Basic EDIMAX stick) with the TrutzBox, please proceed according to the following "WLAN Installation Info" BEFORE installing the built-in antenna.
Call Webmin
- via TrutzBox user interface: System -> Advanced settings, or
- via call: https://trutzbox:10000.
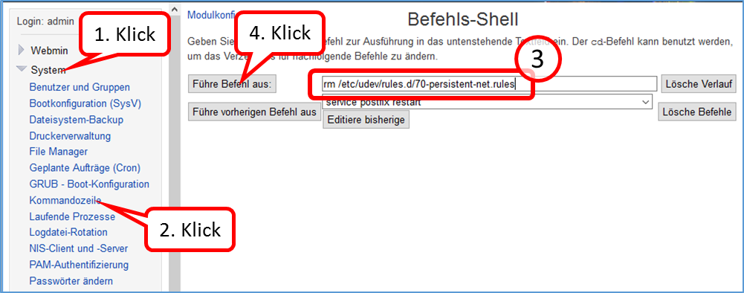
In Webmin:
- System (1)
- -> Kommandozeile (2)
- enter there in the field to the right „Führe Befehl aus:“ (3): rm /etc/udev/rules.d/70-persistent-net.rules
- and click on "Führe Befehl aus" (4).
-> Table of Contents (of this manual)

Shutdown TrutzBox
- using Webmin: System (1)
- -> System-Start und –Stop (2),
- scroll down (3) and
- click on „System herunterfahren“ (4).
When LEDs are off, remove TrutzBox from the power supply, open the housing and install the built-in antenna (see the following WLAN installation instructions).
-> Table of Contents (of this manual)
3.3.2 First installation of WLAN-Plus
- Attention, the WLAN card can be damaged by electrical (discharge) charging. Before opening the WLAN card bag and touching the WLAN card, be sure to touch an earthed metal part (e.g. radiator) or at least the TrutzBox housing with both hands (to drain off possible charging).
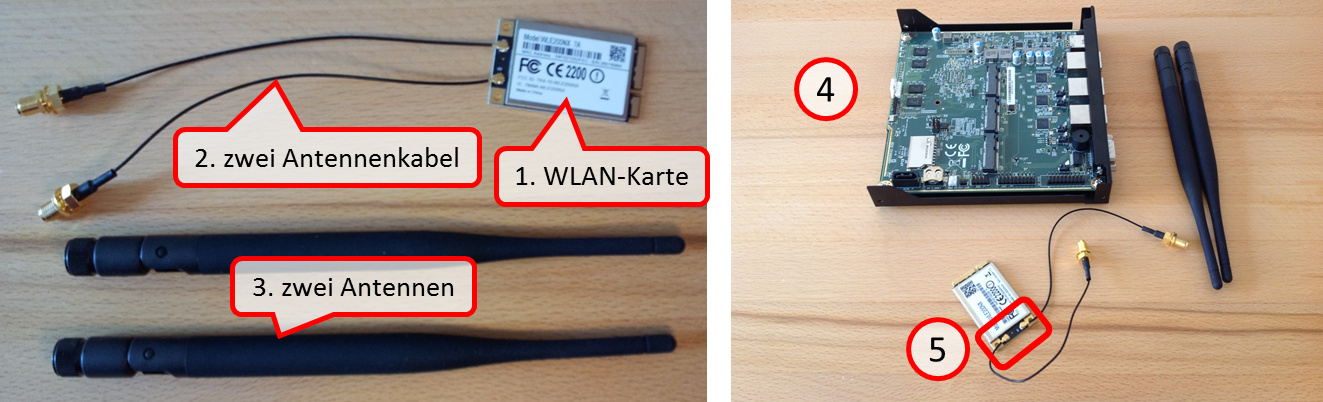
- Check scope of delivery: WLAN card (1), two antenna cables (2) and two antennas (3).
- If necessary, shut down the TrutzBox and disconnect all cable connections, including the power supply.
- Open the TrutzBox by loosening the 4 screws and remove the housing cover. (4).
- Check that the cables of the supplied WLAN card are still firmly plugged onto the WLAN card (5).
-> Table of Contents (of this manual)
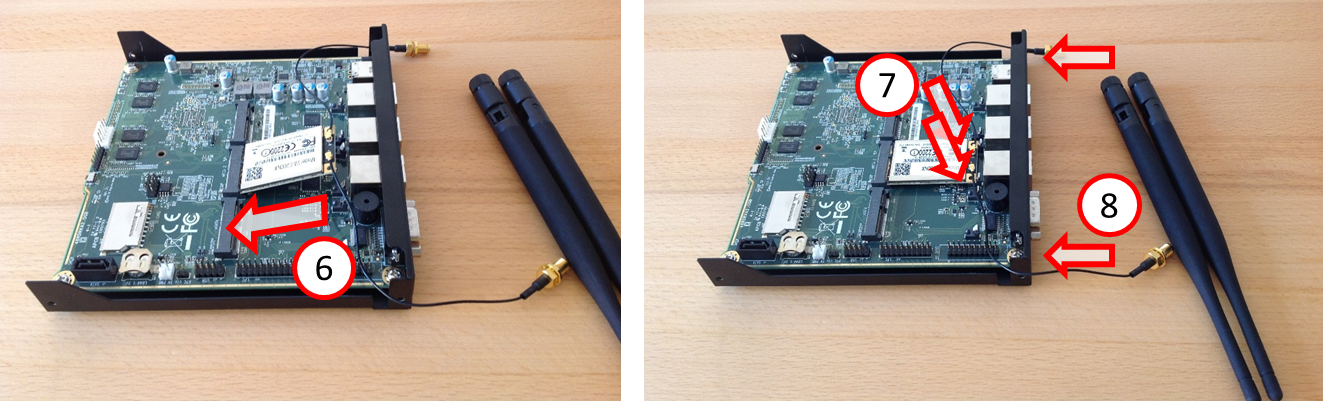
- Carefully insert the card at an angle into the middle terminal strip (6) seen from behind and carefully press the card downwards until it clicks into place on both sides (7).
- Remove the two rubber caps inserted into the back of the TrutzBox (8).
-> Table of Contents (of this manual)
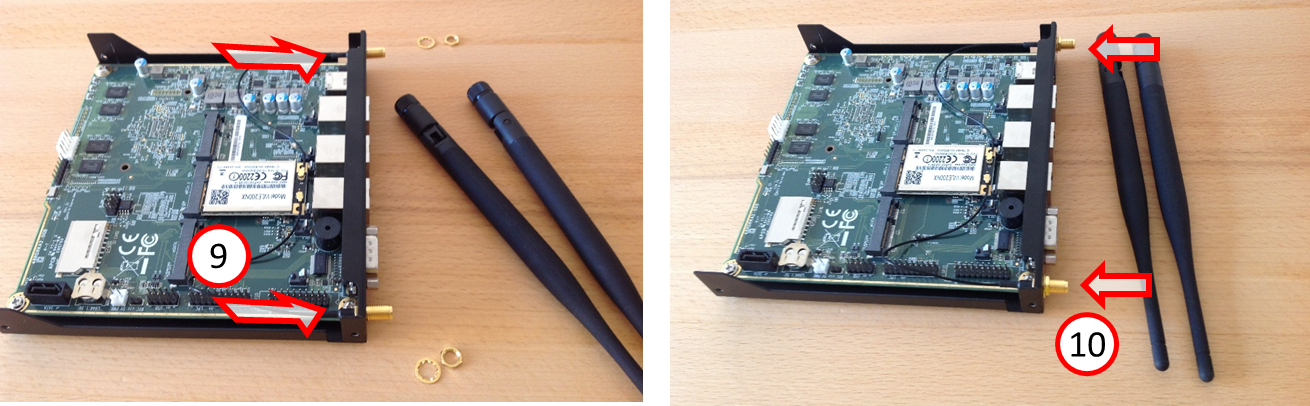
- Insert the two antenna cables into the two outer cut-out holes on the TrutzBox rear side (from the inside) (9) - Attention: the thread and hole are flattened at the top - and (from the outside) screw on (10) with washer and nut (8 mm wrench).
-> Table of Contents (of this manual)
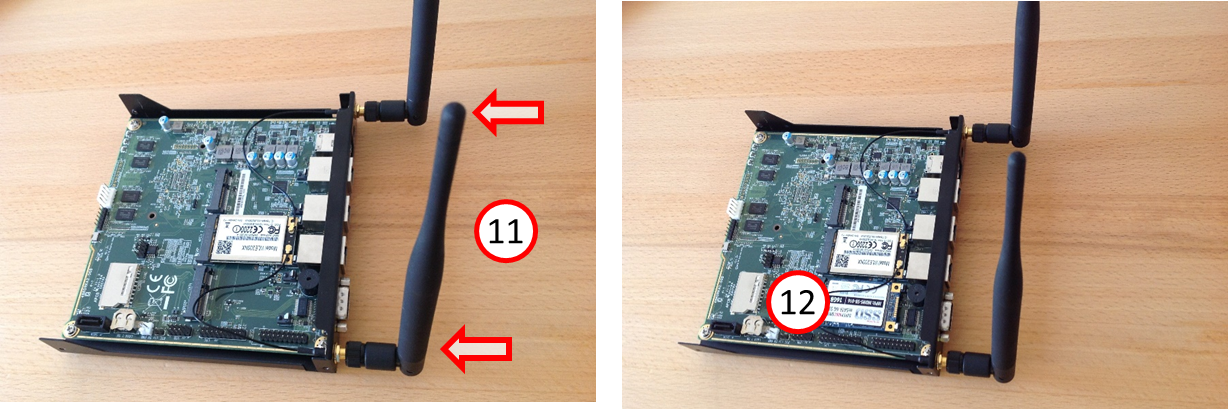
- Screw on the two antennas (11).
- In the left position (seen from behind) the SSD is located (12).
- Replace the housing cover on the TrutzBox and tighten it with the 4 screws..
- Connect TrutzBox to router and power supply - so that it boots
( wait approx. 10 minutes).
If a WLAN has not already been set up in the TrutzBox interface, set the SSID (name of the TrutzBox WLAN network) and the access password in the TrutzBox interface under Network -> WLAN.
-> Table of Contents (of this manual)
3.4 SSD Installation Guide
- Attention, the WLAN card can be damaged by electrical (discharge) charging. Before opening the WLAN card bag and touching the WLAN card, be sure to touch an earthed metal part (e.g. radiator) or at least the TrutzBox housing with both hands (to drain off possible charging).
- Shut down the TrutzBox and disconnect all cables, including the power supply.
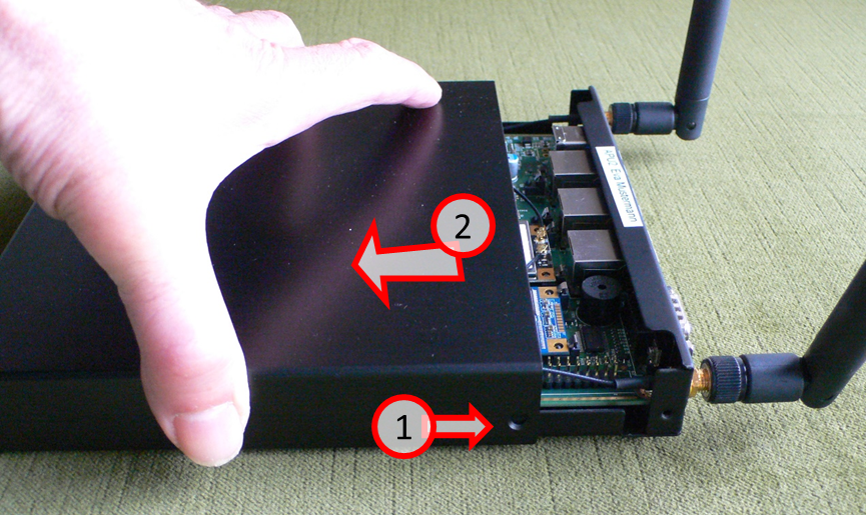 Loosen the 4 screws (1) and remove the housing cover (2).
-> Table of Contents (of this manual)
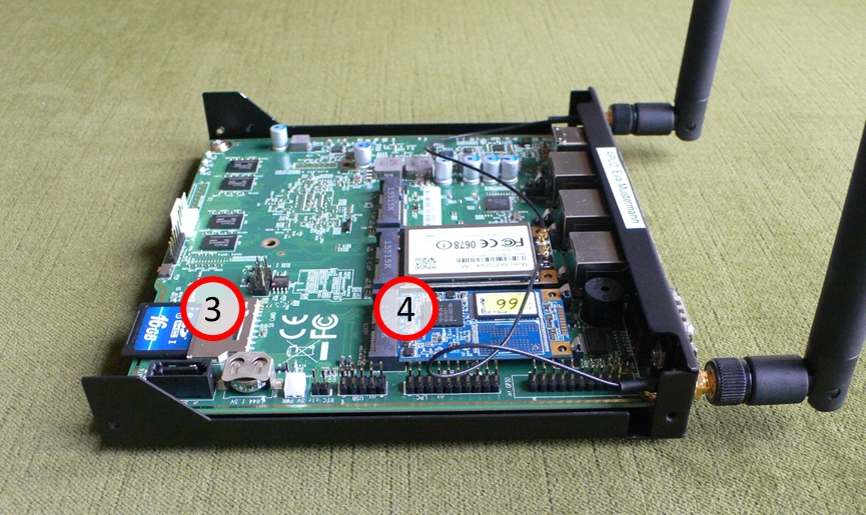
As necessary, remove the SD card (3) or the SSD card/plate (4).
-> Table of Contents (of this manual)
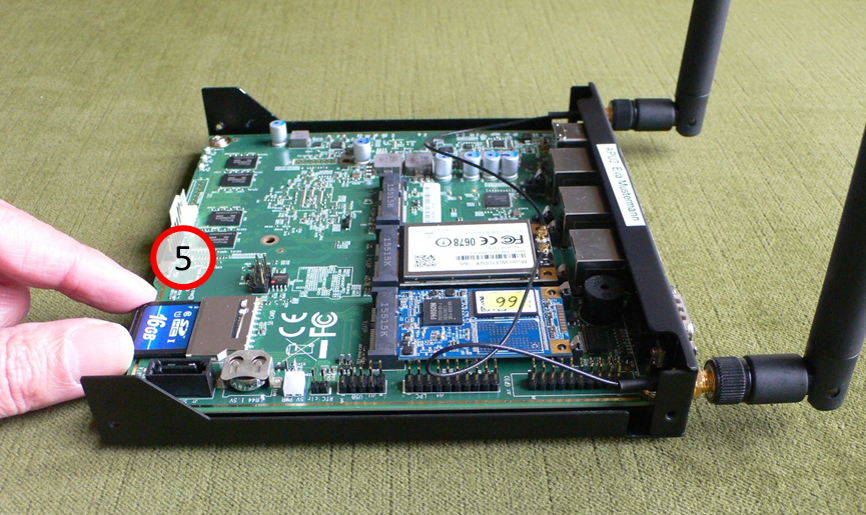
Remove SD card: Grab SD card (5) …
-> Table of Contents (of this manual)
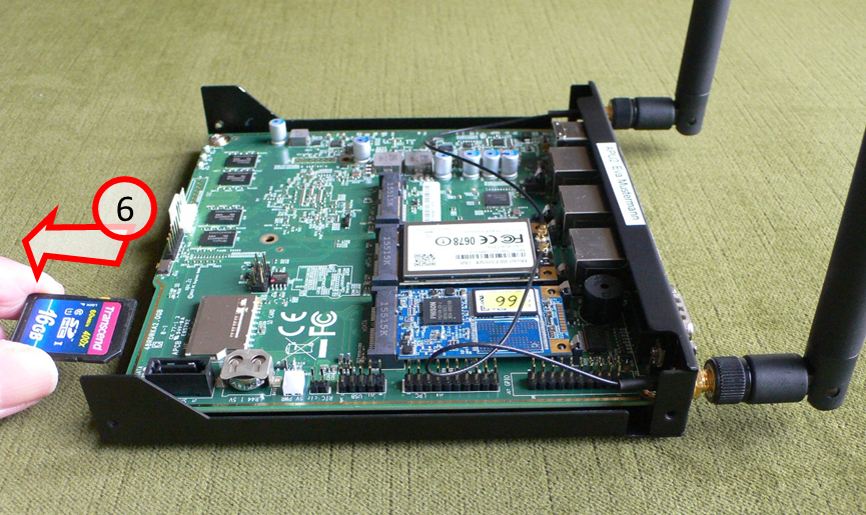
… and carefully pull out the SD card (6).
-> Table of Contents (of this manual)
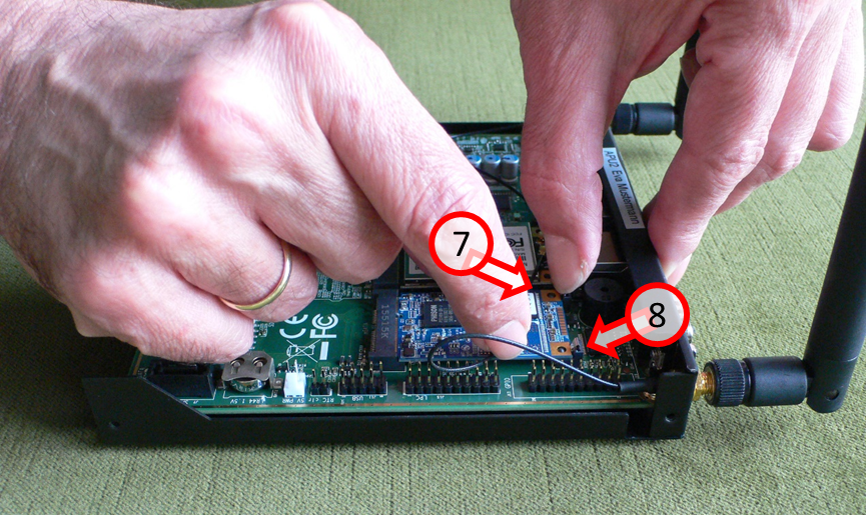
Remove the SSD card: Carefully push both locking springs (7) and (8) backwards, towards the back of the housing …
-> Table of Contents (of this manual)
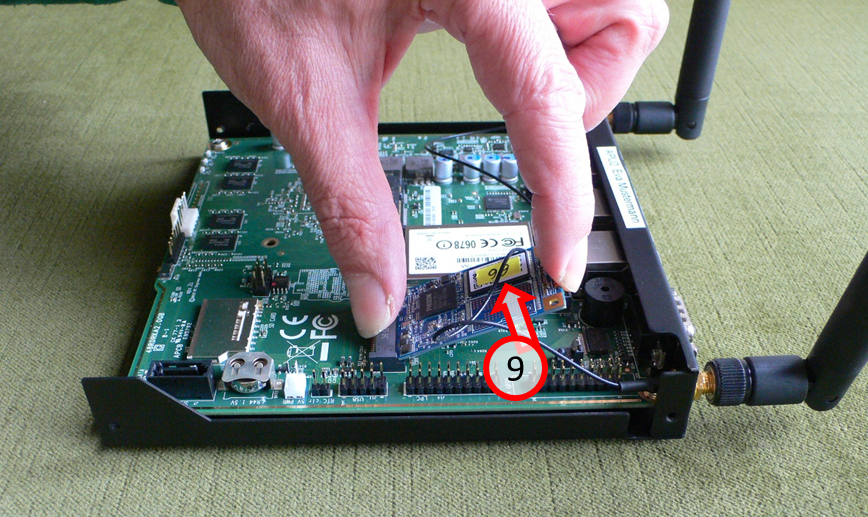
… and carefully lift the detached SSD card upwards (9).
-> Table of Contents (of this manual)
Carefully pull out the old SSD card (10) at an angle upwards..
-> Table of Contents (of this manual)
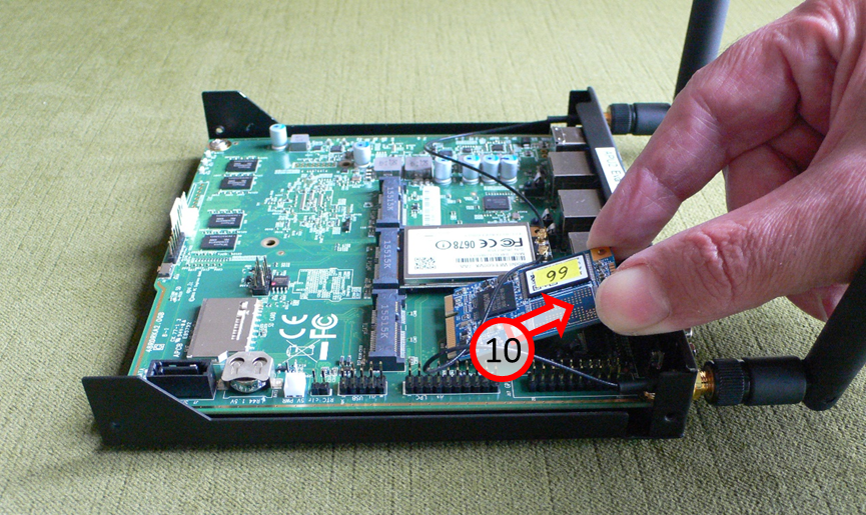
Carefully insert the new SSD card (11) at an angle to the bottom....
-> Table of Contents (of this manual)
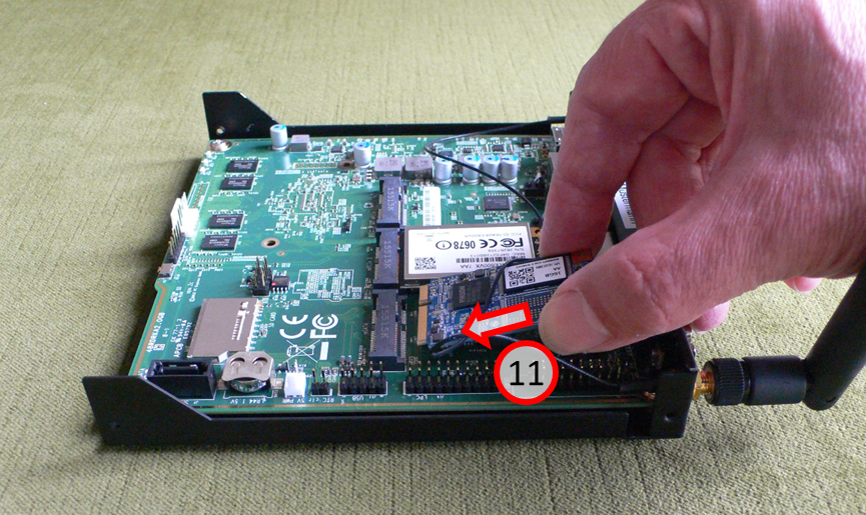
... and insert the SSD card (12) into the holder with gentle pressure.
-> Table of Contents (of this manual)
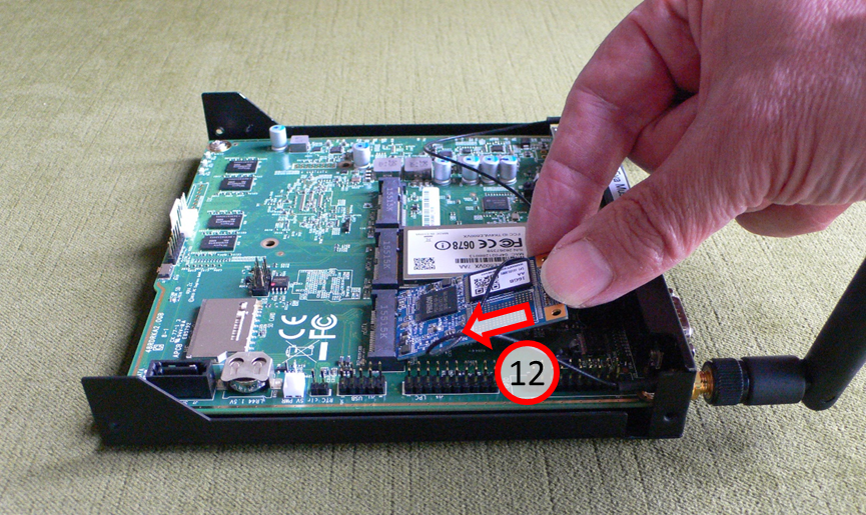
Press SSD card on "free side" with feeling down (13)...
-> Table of Contents (of this manual)
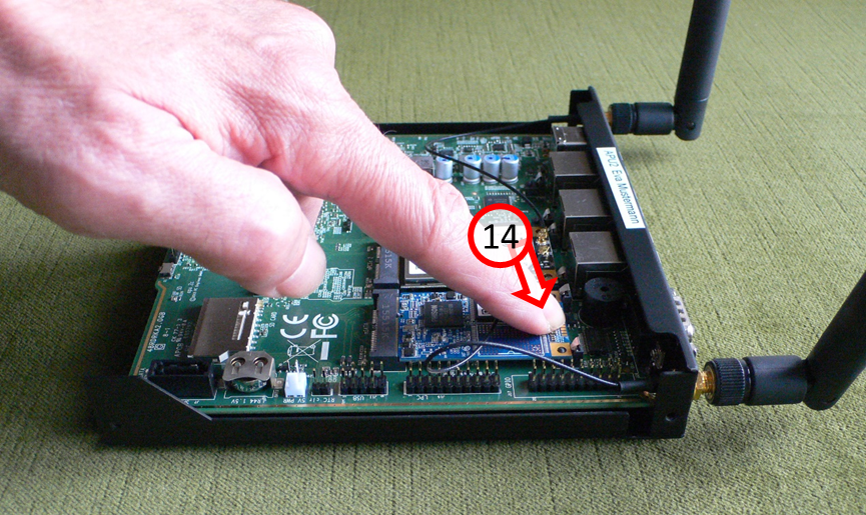
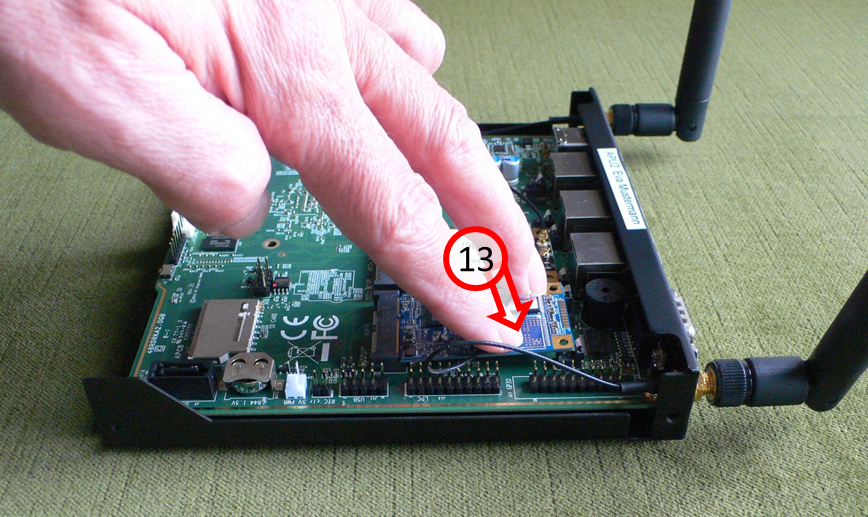
... until SSD card audibly engages in both retaining springs (14).
-> Table of Contents (of this manual)
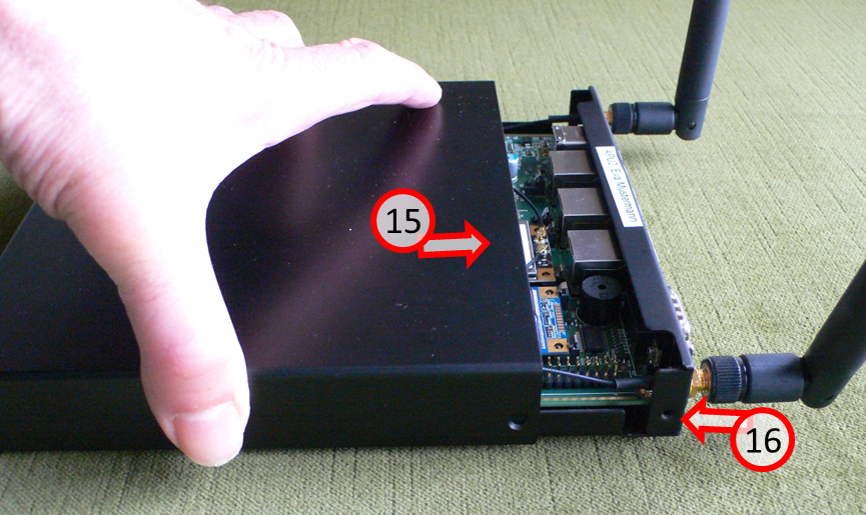
Slide the housing back on (15) and screw in the 4 screws again (16).
Good luck with your new SSD!
-> Table of Contents (of this manual)
4 Use of the TrutzBox® (-> for users)
The TrutzBox® is delivered by Comidio with security settings suitable for everyday use, so that even inexperienced users can email and surf immediately protected and without a trace.
The following sections describe the functions and options that the inexperienced user can use immediately after setting up TrutzBox.
These include:
- TrutzBrowse: Traceless surfing through modified, incomprehensible browser profile data.
- TrutzMail: End-to-end email service with encrypted content and encrypted metadata.
- TrutzContent: Maximum protection for children and young people by using filter lists to block inappropriate websites.
- TrutzRTC': Real-time communication with TrutzChat (Messaging) and TrutzMeeting (Audio and Video Conferencing Service)
- TrutzBase: Use of modern virus protection, firewall and intrusion detection systems
4.1 Traceless Surfing - TrutzBrowse
Independent of browser (e.g. Mozilla Firefox, Chrome, Internet Explorer, Safari, etc.) and operating system (Microsoft windows, Apple iOS, Linux), the TrutzBox helps to avoid data tracing while surfing.
Use your browser as usual (in the following as an example with windows 7 and Firefox).
4.1.1 TrutzBrowse in standard operation
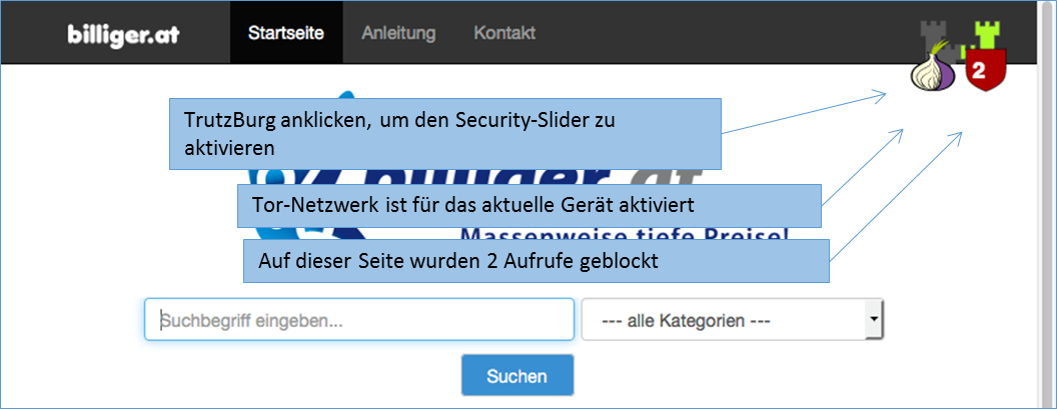
The TrutzBurg symbol in the upper right corner of the website indicates that TrutzBrowse is activated with the security settings. With the above setting, the TrutzBox (symbol: TrutzBurg) and the Tor network (symbol: onion) are activated.
The color of the TrutzBurg shield indicates the setting of the security slider for this URL; green = level 1 = highest security level; red = level 9 = lowest security level.
If there are operating elements on the website which are hidden by the TrutzBurg and can therefore no longer be operated, the TrutzBurg can be moved to another corner of the browser window.
For touch screens, simply touch the symbol for longer than 1s.
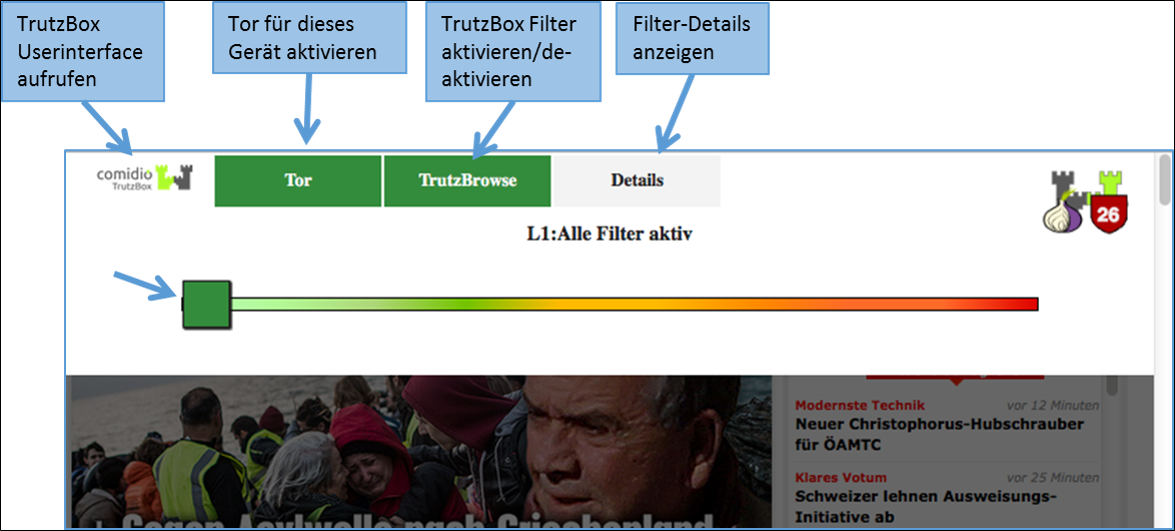
After clicking on the TrutzBurg, the security slider and four further functions are available.
The Security-Slider can be set to 10 security levels (Level 1 = highest protection up to Level 9 = lowest protection; Level 10 = for this website the TrutzBox is switched off). From level 1-9, the user can make the settings himself. If set to level 10 (TrutzBox protection is disabled), only the administrator can reset the level for this website.
On delivery, the security slider is set to "highest security level" (level 1, green, far left).
If the website shows malfunctions, e.g. because it wants to store a cookie, the user can gradually deactivate individual security and anonymisation measures by dragging the security slider to the right (towards red) in order to restore the website's functionality.
However, the security level should only be reduced for trusted websites.
Click on "Details" to see a list of all web accesses accessed from this website.
Blocked HTTP calls are marked by a "red crossed out circle“.
The overview also shows the HTTP headers that have not been completely blocked (marked by a "green tick in a green circle").
This makes it obvious which data was transmitted from the browser to a Web server ("Request" tab) and which data went from a Web server to the browser ("Response" tab).
Depending on how the TrutzBox® is configured for the current position of the Security Slider, certain HTTP header data may not be transmitted to the web server at all (blocked headers) or may be changed (replaced headers).
On the left, the HTTP calls are listed, which are automatically called in the background - without the user's active intervention - in addition to the web page called up by the user (here: www.krone.at). On the right under "Details" you can see which header information has been blocked or replaced.
Click on one of the HTTP calls listed on the left to obtain additional information on this.
Set a check mark to " Nur Blockierungen anzeigen ", then only the blockings are listed.
-> Table of Contents (of this manual)
4.1.2 TrutzBrowse for experts
The TrutzBox® monitors web access and is thus able to prevent unwanted data traffic. The TrutzBox® distinguishes whether a device or a user calls up a web page directly or whether a web server - after the deliberately called up web page has been loaded - contacts further web pages and loads them without the user's knowledge and without his consent.
The TrutzBox® offers two different basic functions for this purpose:
1. TrutzContent:
A content filter that prevents a device or user from directly accessing a particular Web page. Examples of unwanted calls:
- A young person wants to load a website with content harmful to young people.
- An Internet device unnoticedly calls up a web page in the background without a user deliberately initiating it. These can be TVs, washing machines or game consoles (if they are connected to the Internet), or even the standard Internet browser of the user's PC, which in turn contacts Mozilla or Google or the server of a plug-in provider independently, for example.
The TrutzBox® checks if the contact to such a server is allowed and blocks the connection to this server if necessary.
2. TrutzBrowse:
A user or an Internet-enabled device has validly accessed a Web page. When loading the page, however, this website contacts other web servers (often commercial data trackers) that may be interested in the user data. TrutzBox® monitors calls to other web servers that are indirectly contacted without the user's knowledge during the loading process of the deliberately accessed web page.
In both case 1 (TrutzContent) and case 2 (TrutzBrowse), the TrutzBox® compares every web page called up with the web pages (filter lists) known to it. Comidio provides approx. 110 filter lists covering 55 different Internet topics. These filter lists are updated regularly. The TrutzBox® Administrator can add own filter lists if required.
Approach of the TrutzBox®:
Wenn ein Internet-Nutzer eine Webseite aufruft, dann prüft die TrutzContent Funktion zunächst, ob der PC und/oder der Nutzer, der diesen Webseitenaufruf angestoßen hat, diese Seite überhaupt aufrufen darf. Soll diese Webseite gemäß den Filterlisten blockiert werden, dann bekommt der Internet-Nutzer im Browser eine Fehlermeldung angezeigt.
If the website can be accessed, the TrutzBox® allows the data from the web server to pass to the browser, but it monitors each call to other web servers that the website then contacts automatically. Usually a website loads additional content from many other web servers. For each contact with a web server other than the originally called web server, the TrutzBox® checks whether this later called web server is in a filter list group "TrutzBrowse". If it is listed there, the connection to this server will be blocked.
This prevents data tracker calls that are programmed into most websites, and data trackers cannot spy on user behavior.
Each time a Web server is granted (permitted) access, information is sent from the Web browser to the Web server via the HTTP header (http request header). Without the TrutzBox® the browser would then deliver this requested data to the web server. This can be very personal data, such as which other pages you have recently called up, are you currently logged on to Facebook or how exactly does your PC/browser configuration look in order to recognize you on further calls. The HTTP header filter also controls the setting and retrieval of cookies
With its TrutzBrowse function, the TrutzBox® is thus able to control the entire HTTP data exchange on the Internet and to block or falsify these HTTP header data as long as they are not absolutely necessary..
-> Table of Contents (of this manual)
4.1.2.1 Handling SSL connections
The proxy can only break (and analyze) an SSL-encrypted connection between a program and a server if the SSL key has been signed by one of the known certificate authorities. Here are two cases where breaking the encrypted connection does not work:
- if an app establishes an encrypted connection to the server, but the key used is a self-generated key and has therefore not been signed by an official certification authority. If the app is a browser, the user is asked if he accepts the server. If the app is not a browser, the user cannot be requested.
- if the client is authenticated. In this case, a key is usually programmed into the client.
In all cases where the SSL connection cannot be broken, the SecSlider is automatically set to L10 and thus the data transfer is no longer analyzed. This ensures that apps still work "without manual intervention". The user (or the TrutzBox administrator) can deactivate this automatic feature in the "Configure filter" menu with the option "If SSL errors occur, automatically deactivate filtering for the selected domain". The data connection is nevertheless displayed in "Status" for checking purposes. Since this automatic activation only becomes effective if the server has not yet been set in the slider table, this automatism can also prevent a single server if the SecSlider is set manually to any value for this server.
-> Table of Contents (of this manual)
4.1.3 Install proxy switch for activating/deactivating the TrutzBox® in the browser
Attention: Switching the TrutzBox on and off as a proxy (="Call forwarding") only makes sense if the browser to be used (or the terminal device used, e.g. PC) is operated in "proxy mode", i.e. the PC is connected to the Internet router (and not directly to the TrutzBox).
If the browser to be used (or the end-device used, e.g. PC) is operated in "transparent mode", i.e. the PC is connected directly to the TrutzBox (and not directly to the Internet router), I do not need a switch, as the PC is constantly protected via the TrutzBox and switching a proxy on or off makes no difference..
As is known, it is possible to activate or deactivate the TrutzBox® functionality "TrutzBrowse" by activating/deactivating the "PAC" file in the browser settings.
If you want to save yourself these "efforts", you can also install a "proxy switch" (in the form of a downloadable "Add-On" = additional function) in the respective browser and then easily activate or deactivate the TrutzBrowse functionality by simply pressing or selecting it in the browser header line.
The following shows the installations of two proxy switches:
- for Browser "Firefox": Add-On „Proxy Switcher“ and
- für Browser "Chrome": Add-On „Proxy SwitchyOmega“.
Of course, other proxy switches can also be implemented and used.
4.1.3.1 Proxy Switch for "Firefox" Browser
Attention: Switching the TrutzBox on and off as a proxy (=" Redirection") only makes sense if the browser to be used (or the end-device used, e.g. PC) is operated in "Proxy Mode", i.e. the PC is connected to the Internet router (and not directly to the TrutzBox).
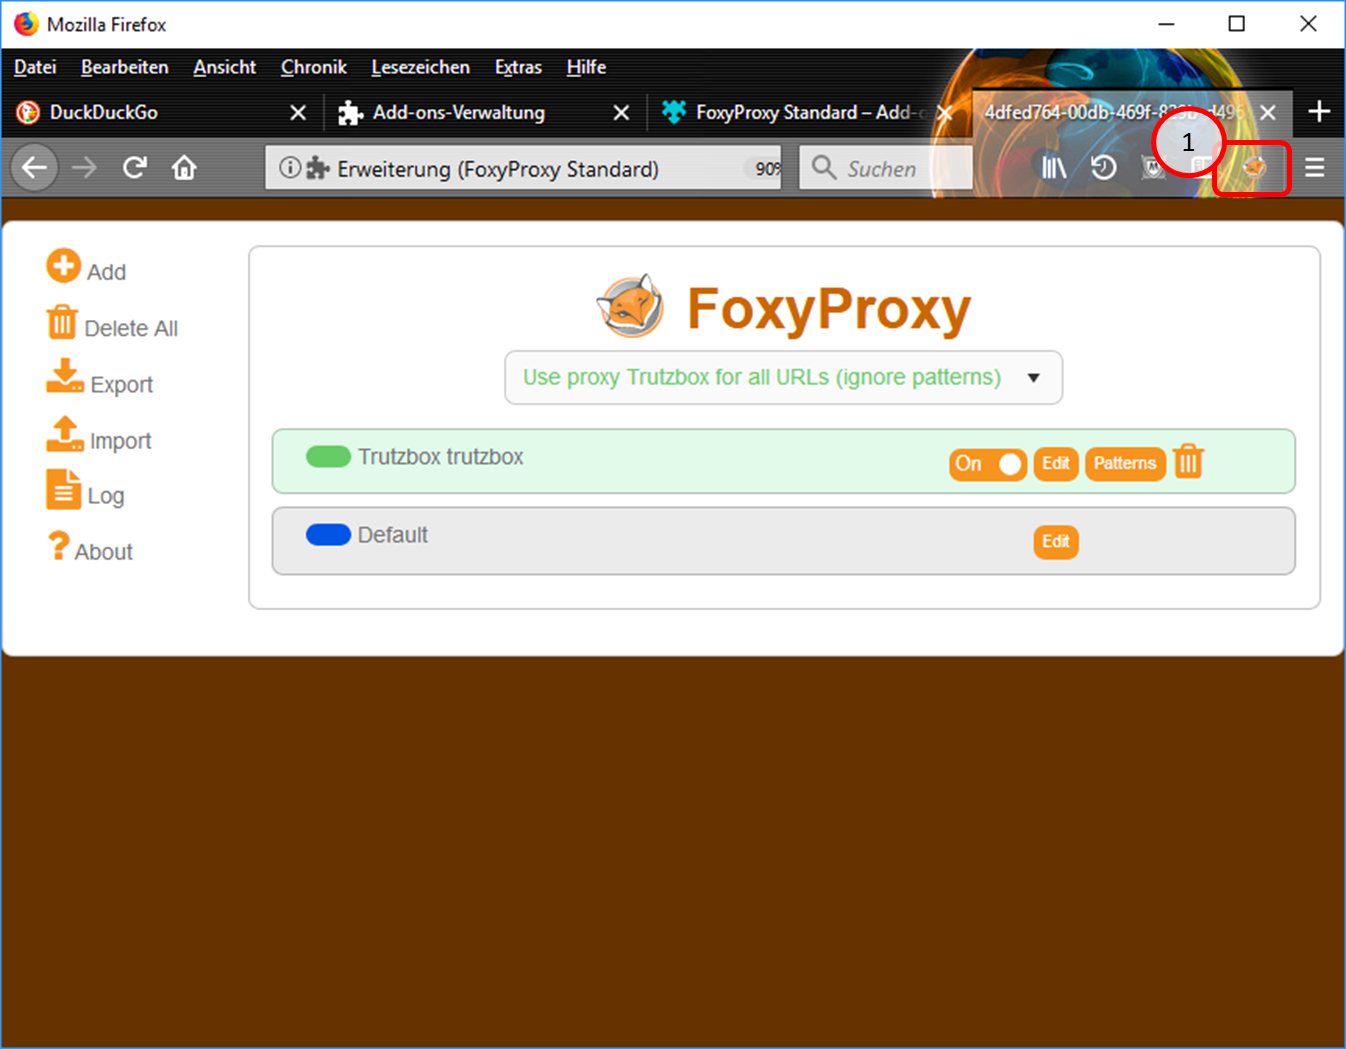
If the„FoxyProxy Standard“ add-on is implemented, the user can activate and deactivate the "Trutzbox" proxy and thus the TrutzBrowse function by clicking the Proxy Switcher button (orange fox head) in the browser header.:
- to switch on: by clicking on the symbol "crossed out, orange fox head" the FoxyProxy selection window appears; there click on the green line "Use proxy Trutzbox for all URLs (ignore patterns)'" and the proxy is switched on and the symbol "orange fox head" appears.
- to turn off: by clicking on the symbol "orange fox head" the FoxyProxy selection window appears; click on the red line "Turn Off All Proxies" and the proxy is switched off and the symbol "crossed out, orange fox head" appears.
The"FoxyProxy Standard" add-on is installed as follows:
- Click on "Extras" (1).
- Click on "Add-ons" (2).
-> Table of Contents (of this manual)
- Ganz nach unten scrollen (1).
- Click on "Sehen Sie sich weitere Add-ons an!" (2).
-> Table of Contents (of this manual)

- Enter "proxy switch" in the search field (1).
- Click on "FoxyProxy Standard" (2).
-> Table of Contents (of this manual)
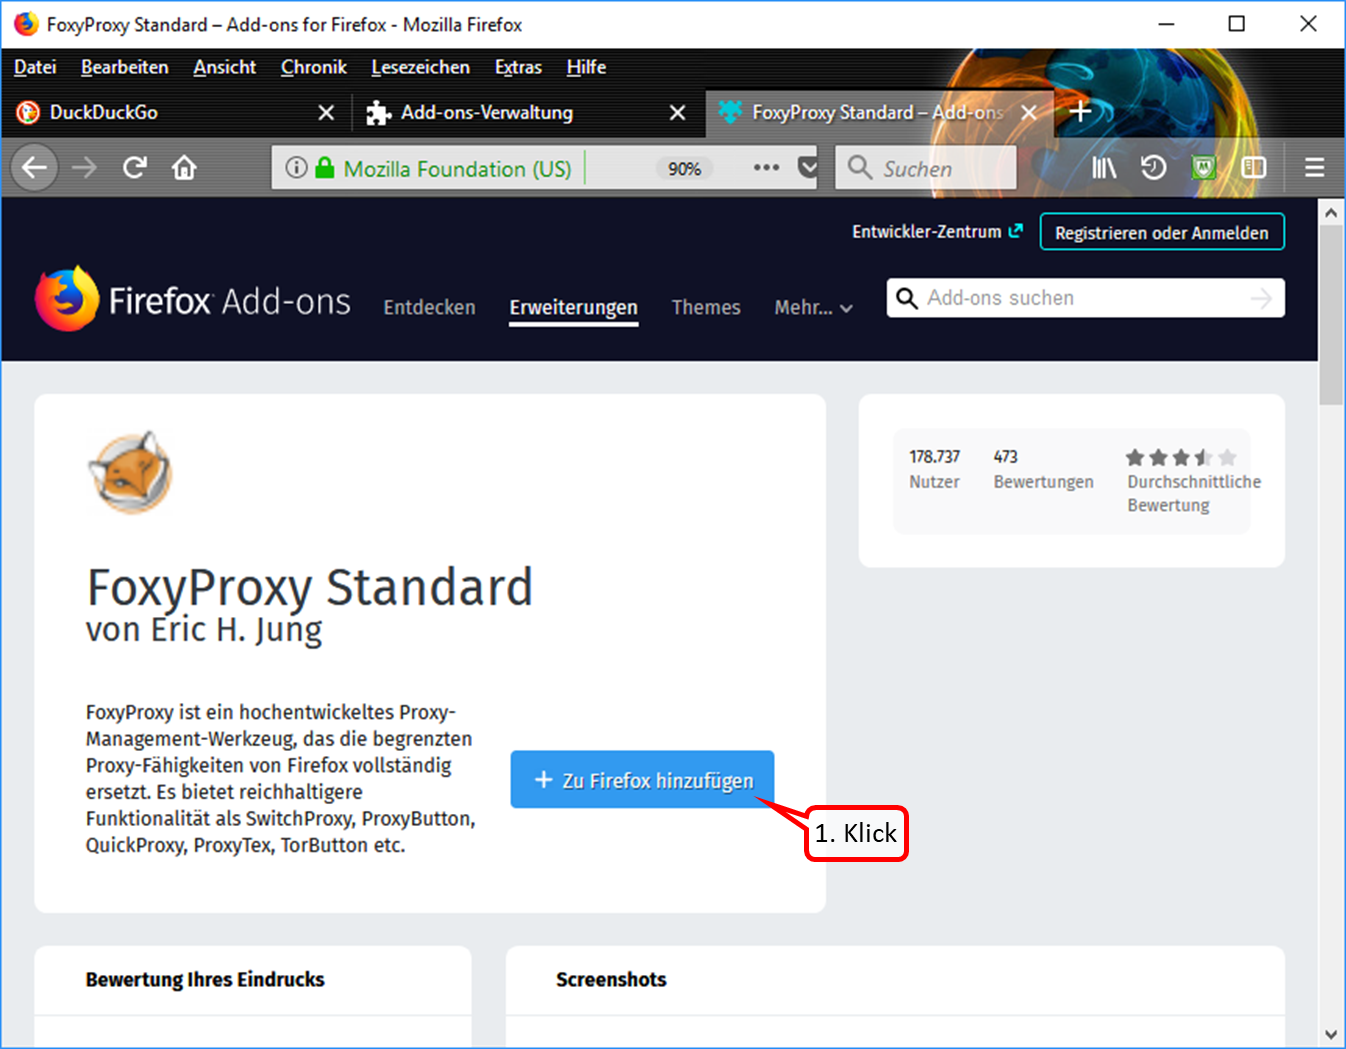
- Click on "+ Zu Firefox hinzufügen" (1).
-> Table of Contents (of this manual)
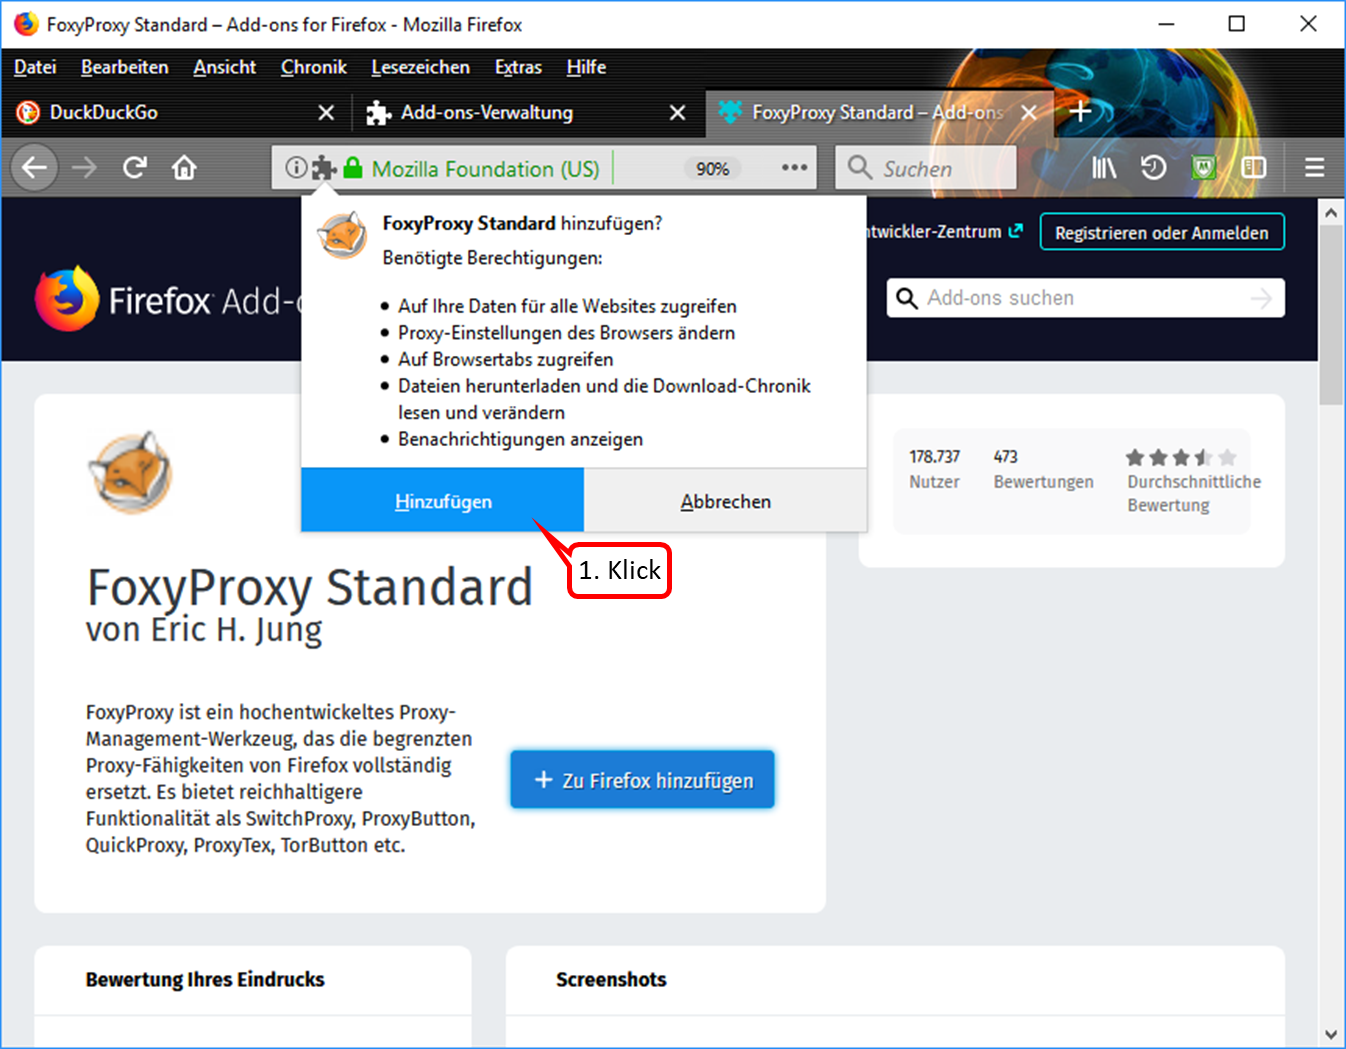
- Click on "Hinzufügen" (1).
-> Table of Contents (of this manual)
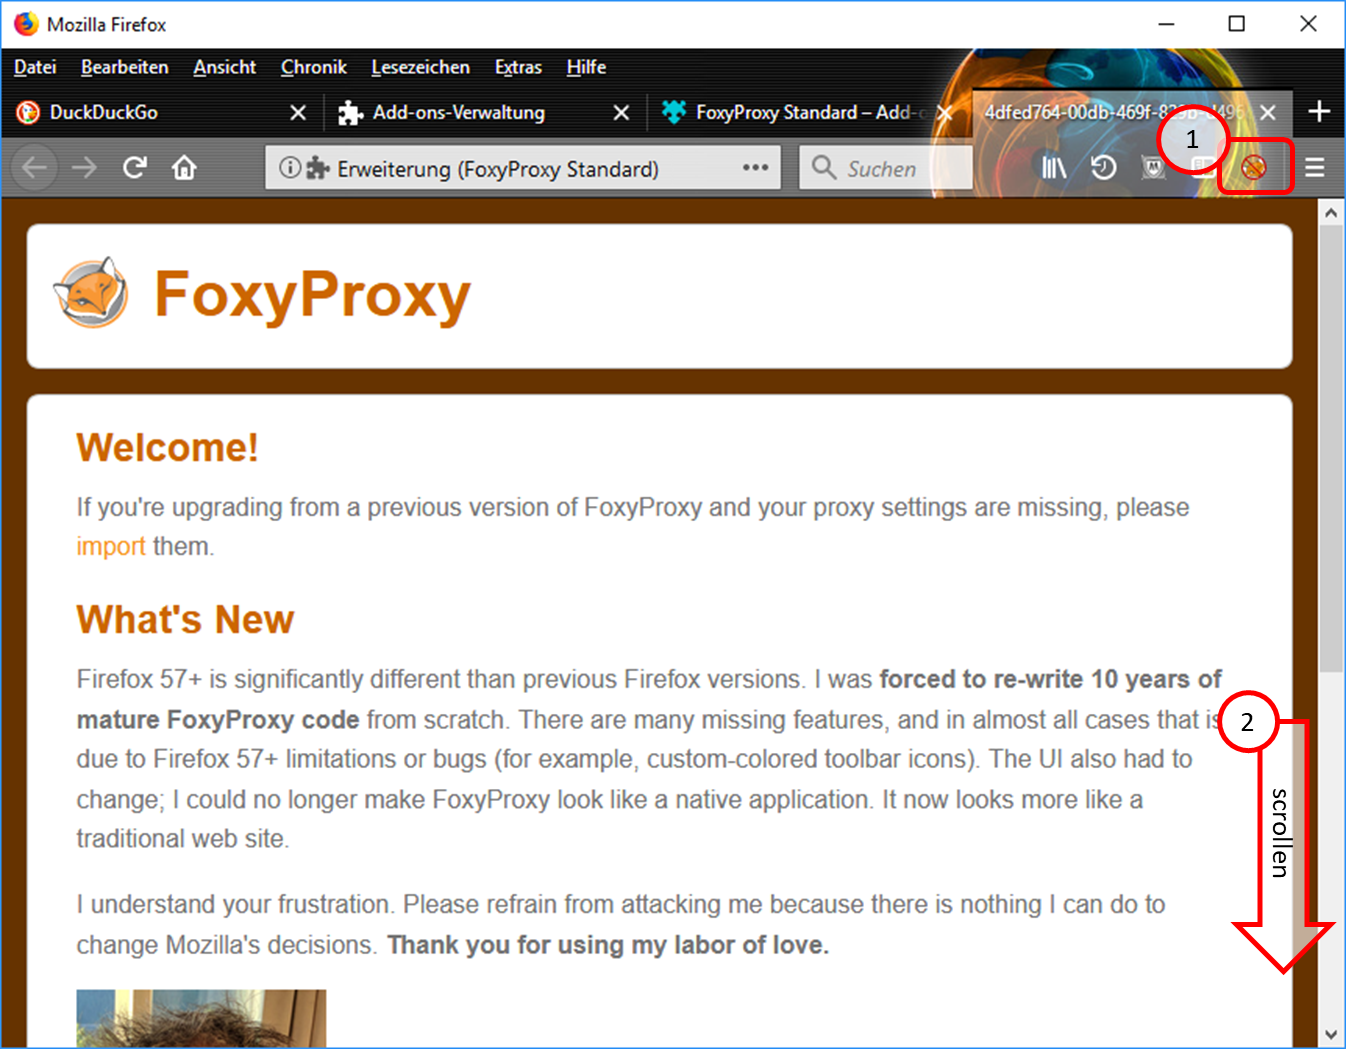
- The symbol "FoxyProxy switched off" (crossed out logo) is displayed in the symbol line. (1).
- Scroll all the way down (2).
-> Table of Contents (of this manual)
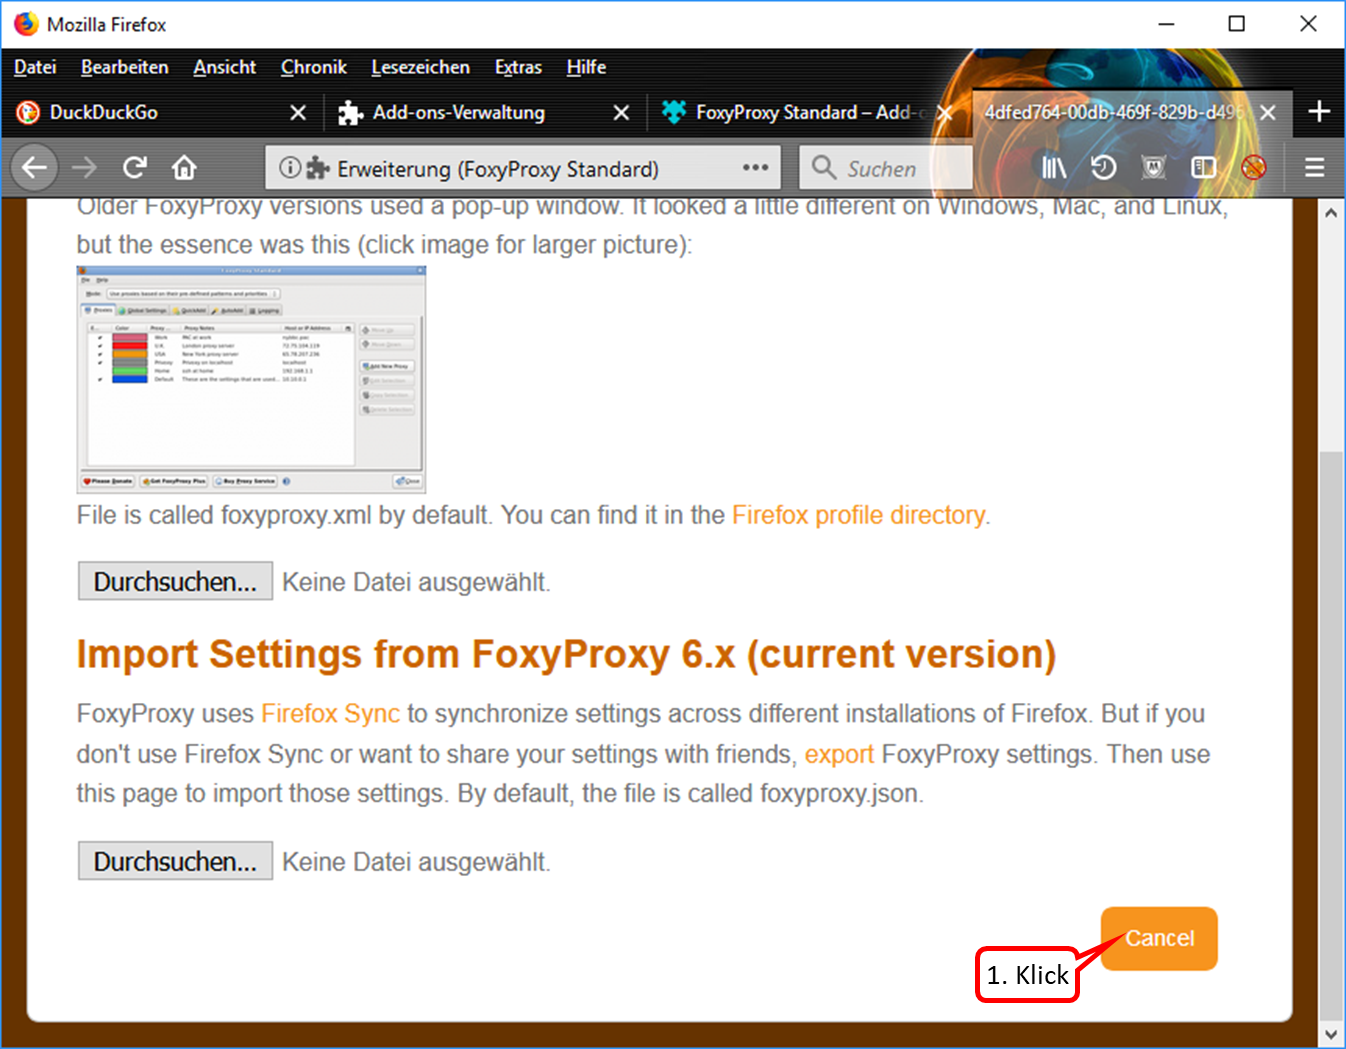
- If this view appears, click on "Cancel". (1).
-> Table of Contents (of this manual)
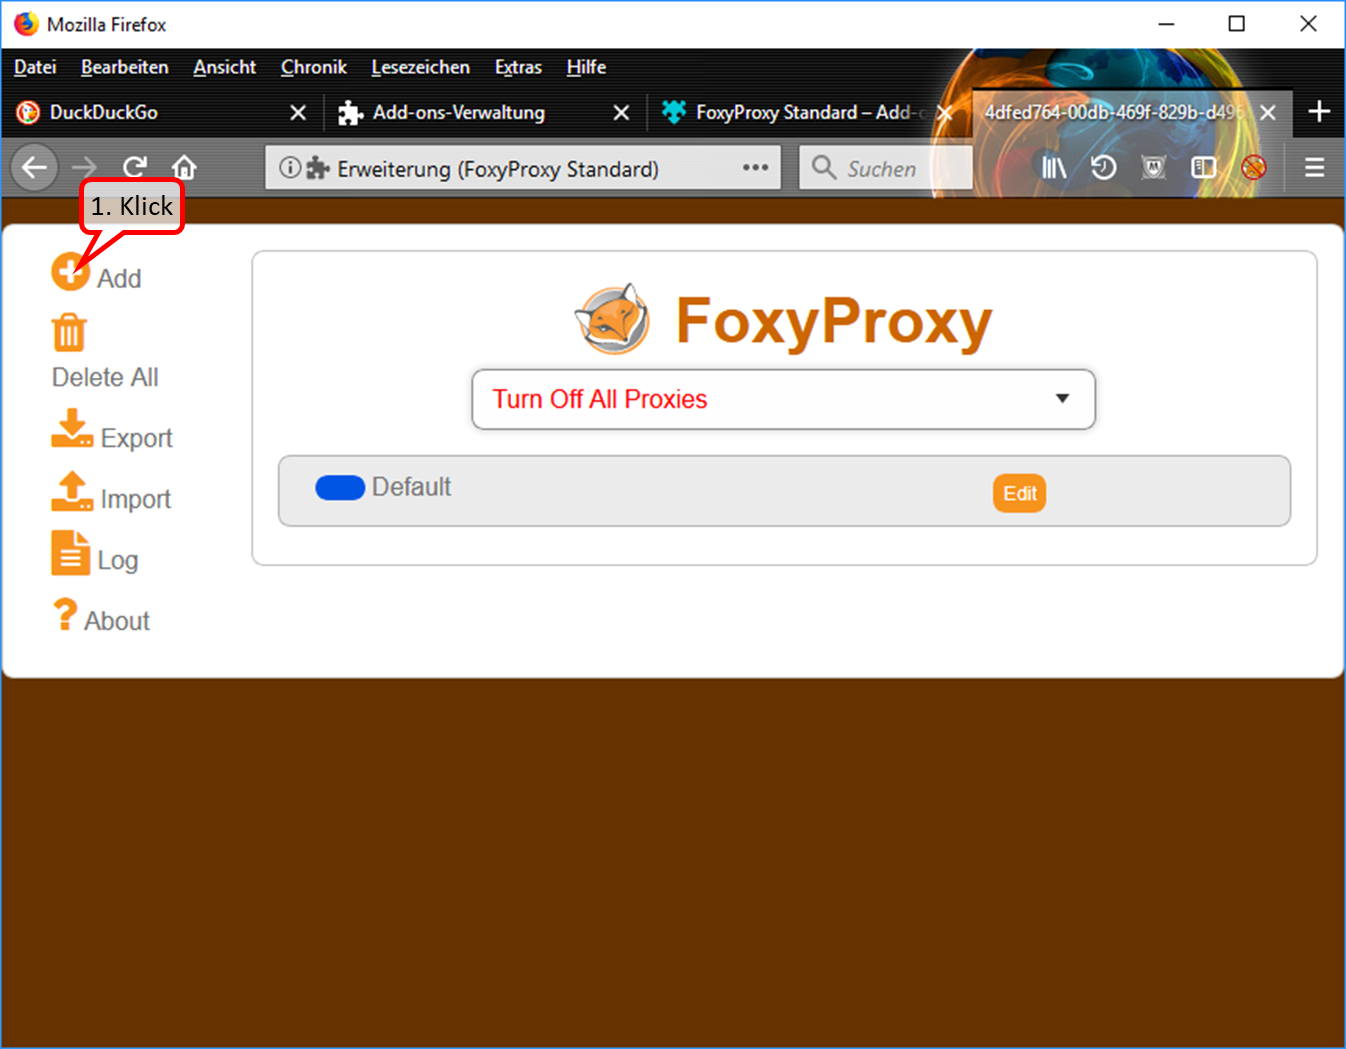
- To enter the Trutzbox as a proxy: Click on "Add" (1).
-> Table of Contents (of this manual)
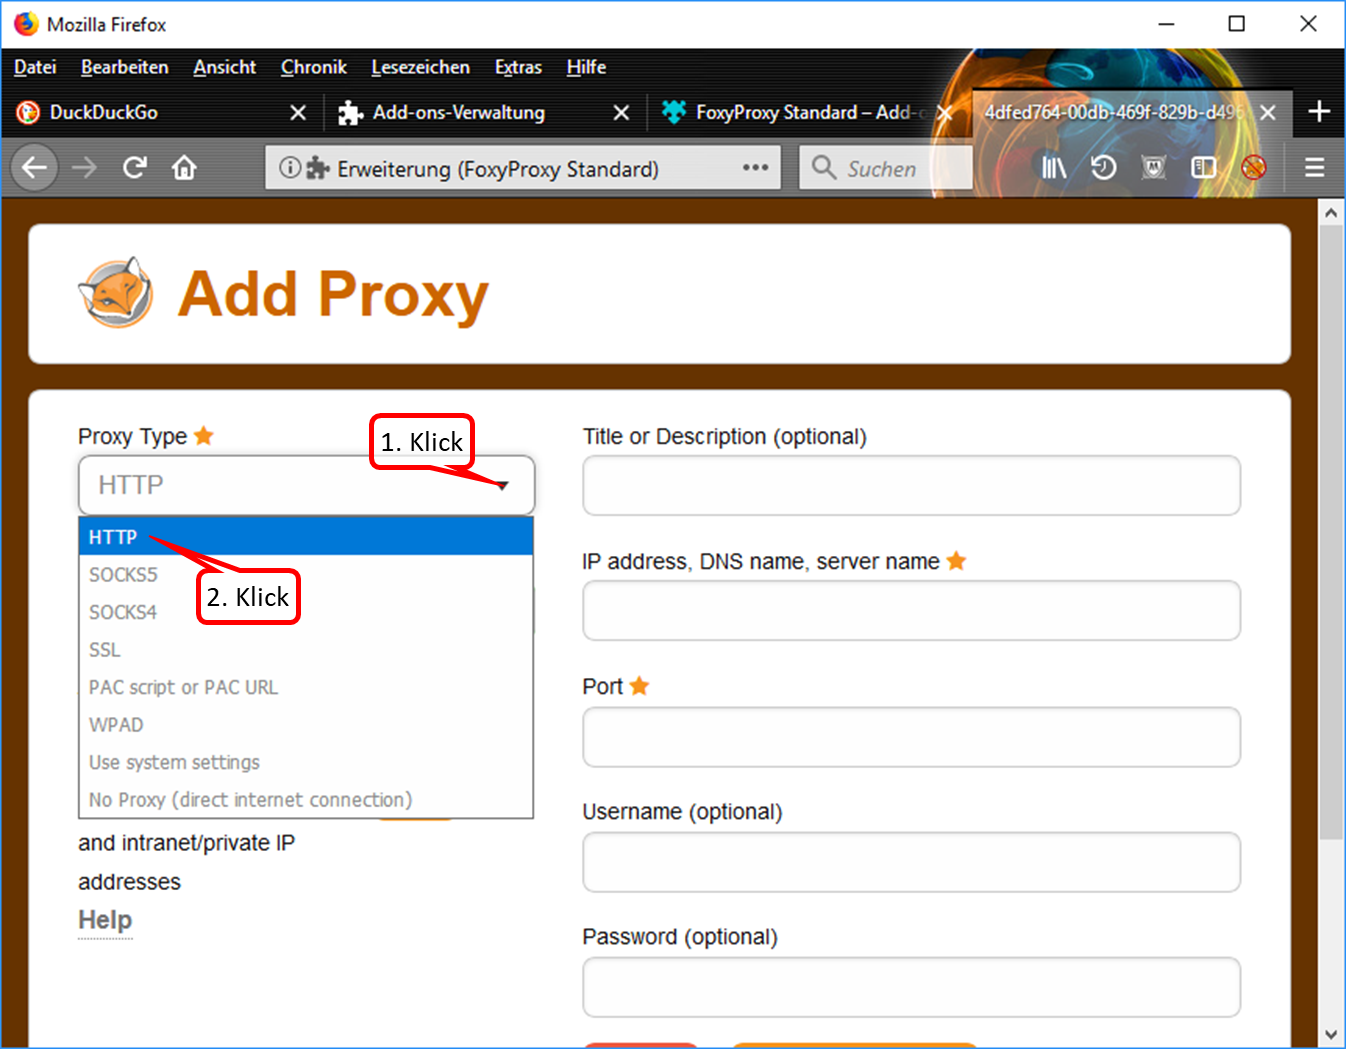
- Drop down the selection field (1).
- Click on "HTTP" (2).
-> Table of Contents (of this manual)
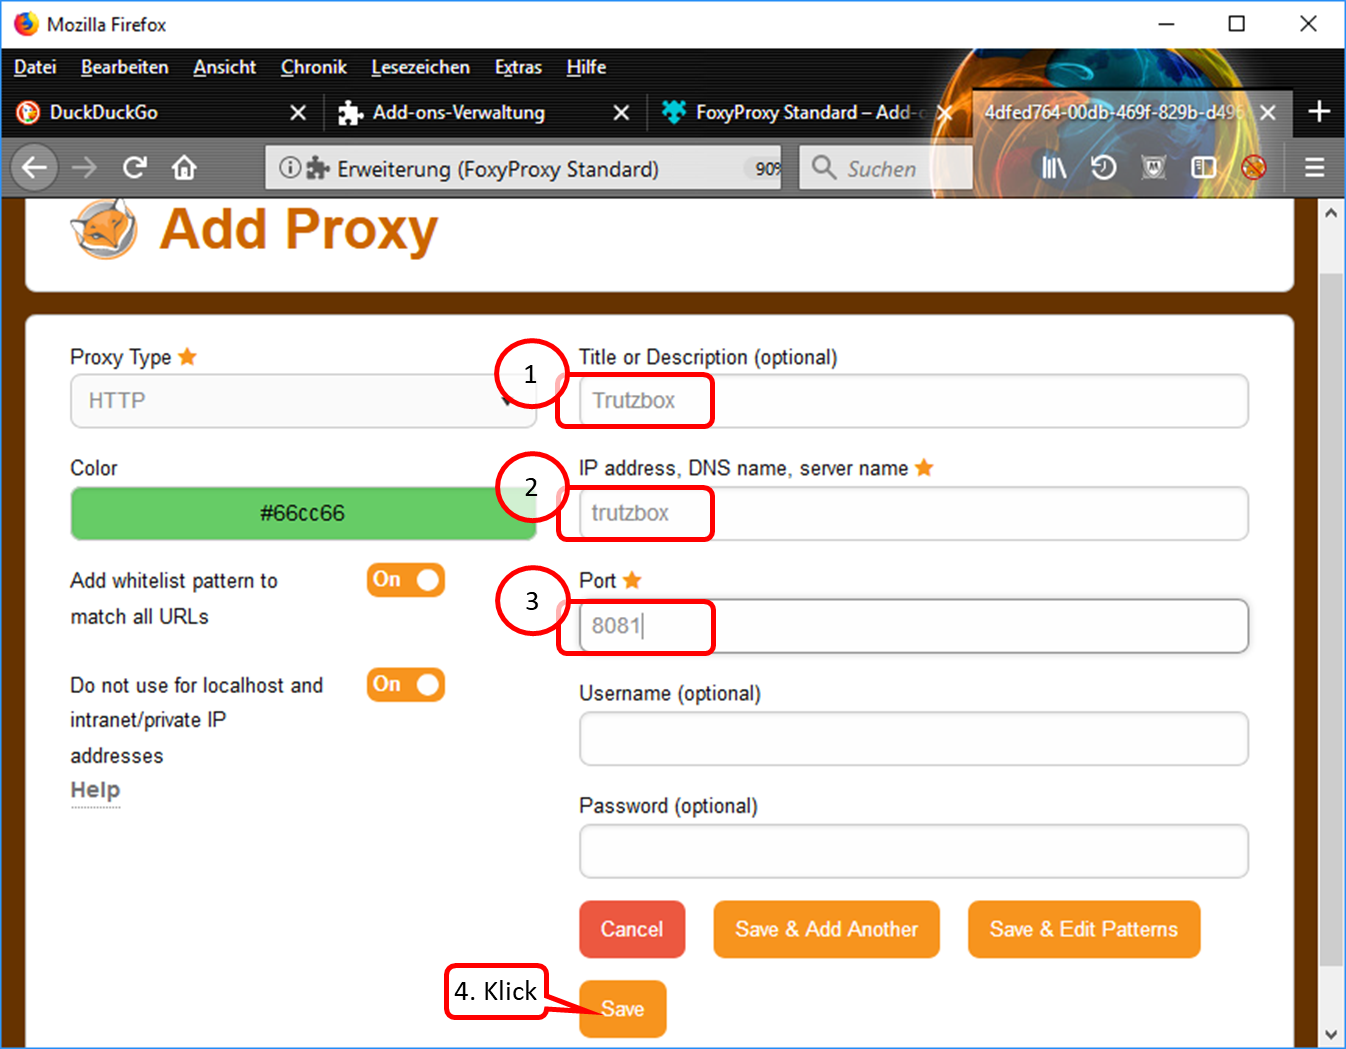
- Enter descriptive name, e.g. "Trutzbox“ (1).
- Enter "trutzbox" as server name (2).
- Enter "8081" as the port address. (3).
- Click on "Save" (4).
-> Table of Contents (of this manual)
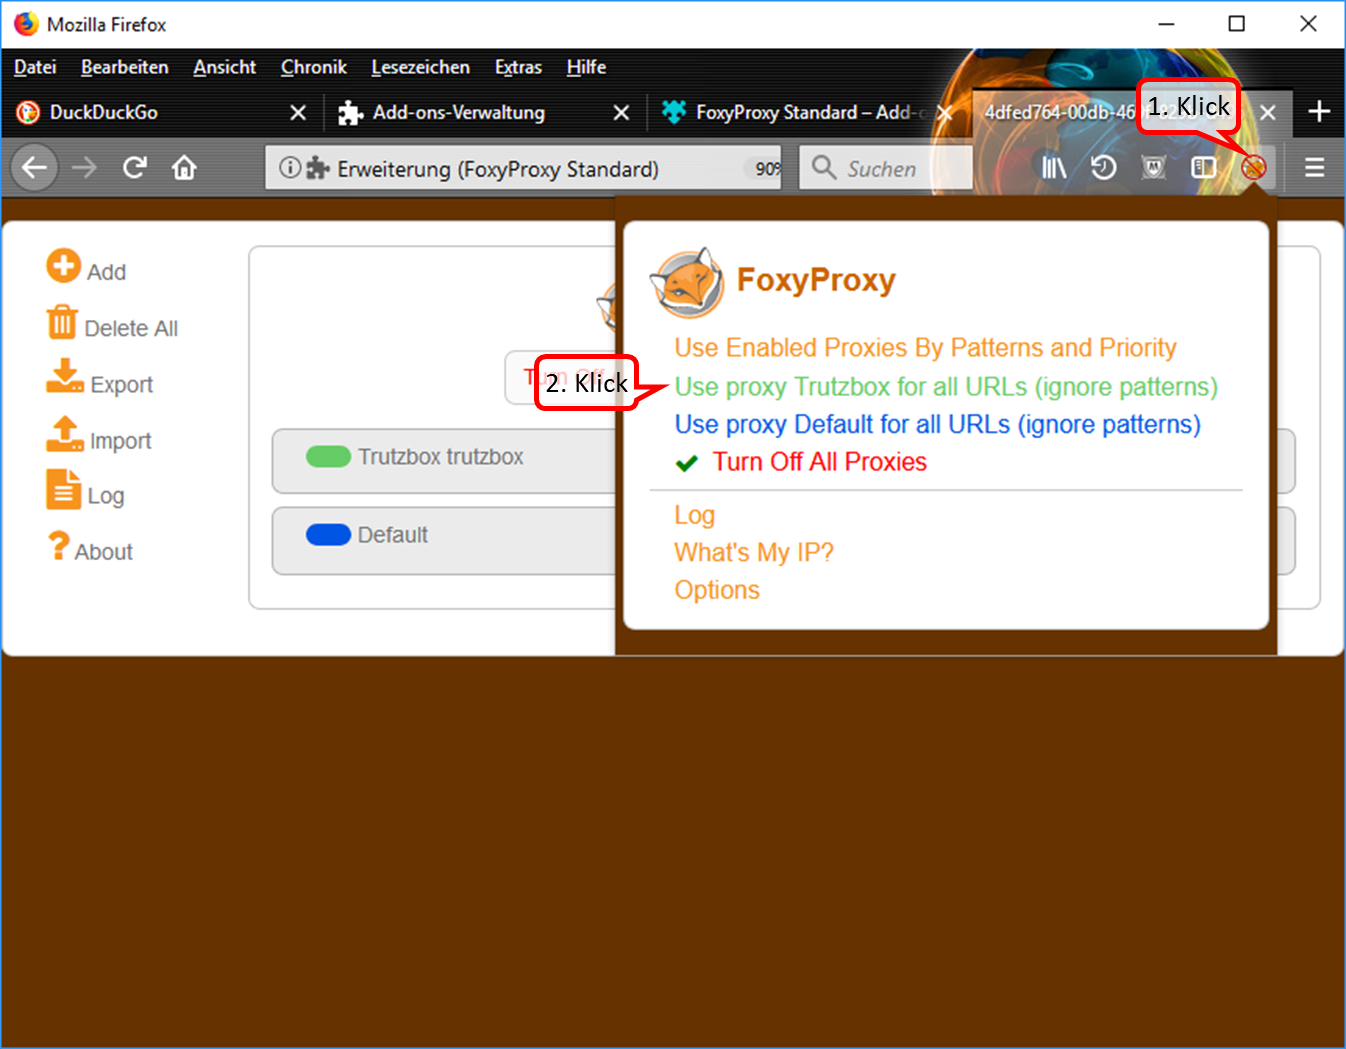
- Click on the symbol "FoxyProxy switched off" (crossed out logo) in the symbol line. (1).
- Switch on the Trutzbox as proxy by clicking on "Use proxy Trutzbox for all URLs" (2).
-> Table of Contents (of this manual)
In the symbol line, the "FoxyProxy" symbol (1) indicates that the proxy is switched on.
-> Table of Contents (of this manual)
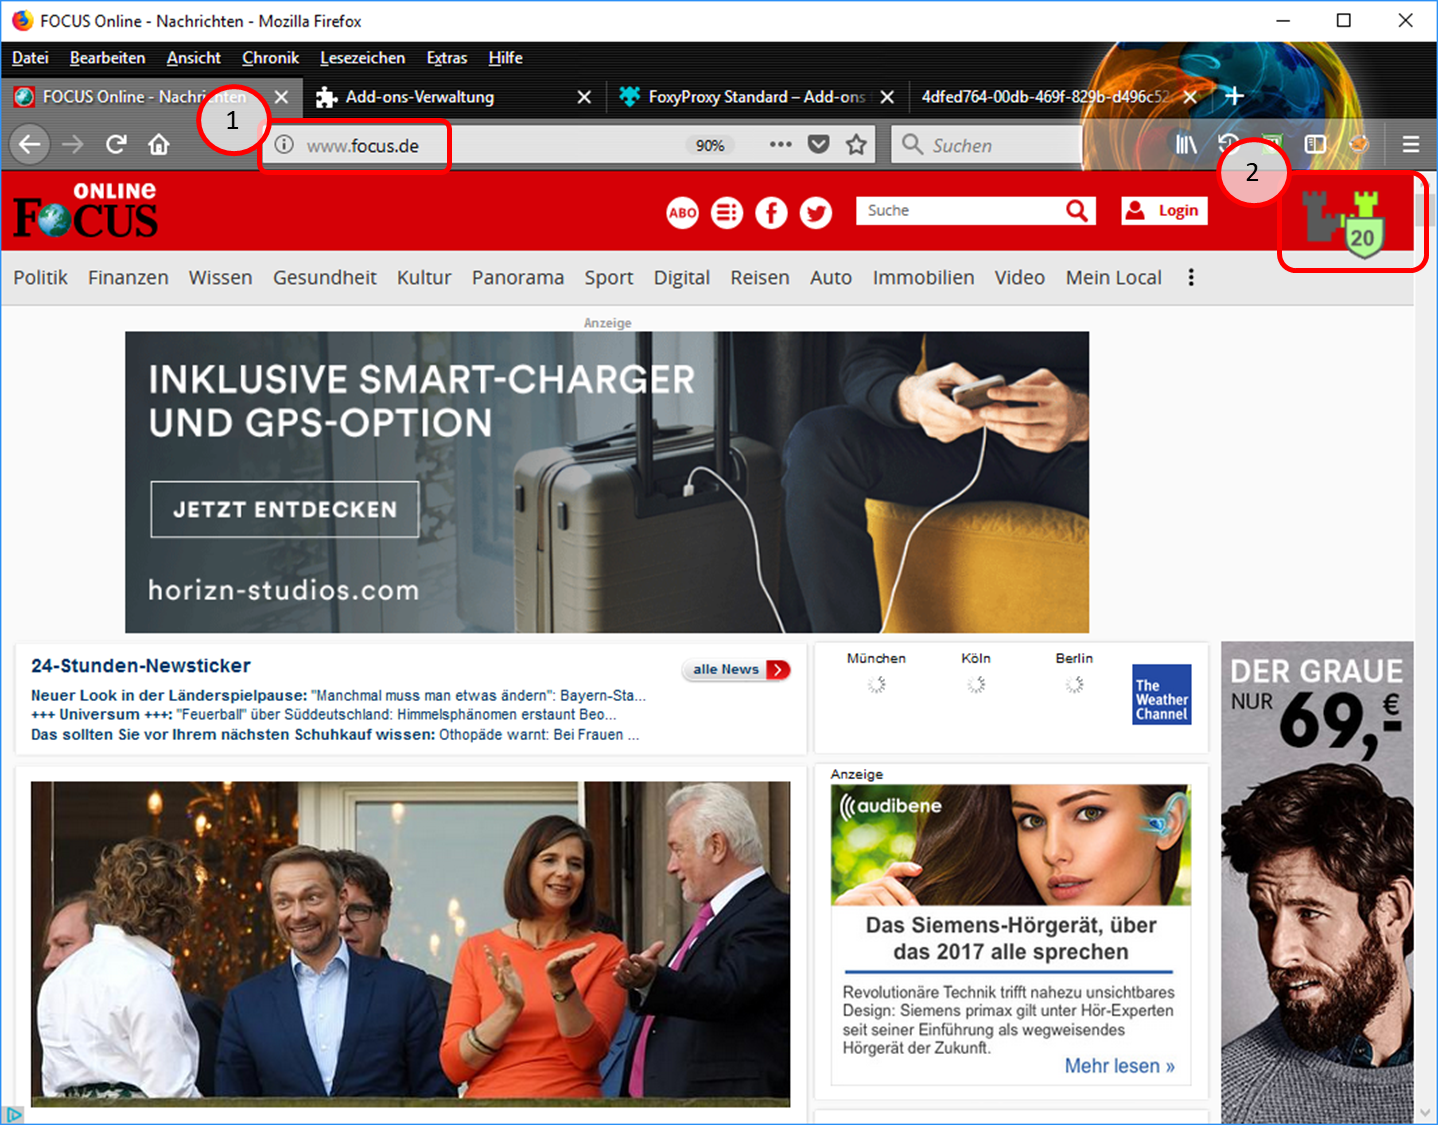
- Test input of e.g. "focus.de" (1).
- The Trutzburg (Trutzbox symbol) appears in the upper right corner in the color of the slider setting and shows the number of avoided tracker calls (2).
-> Table of Contents (of this manual)
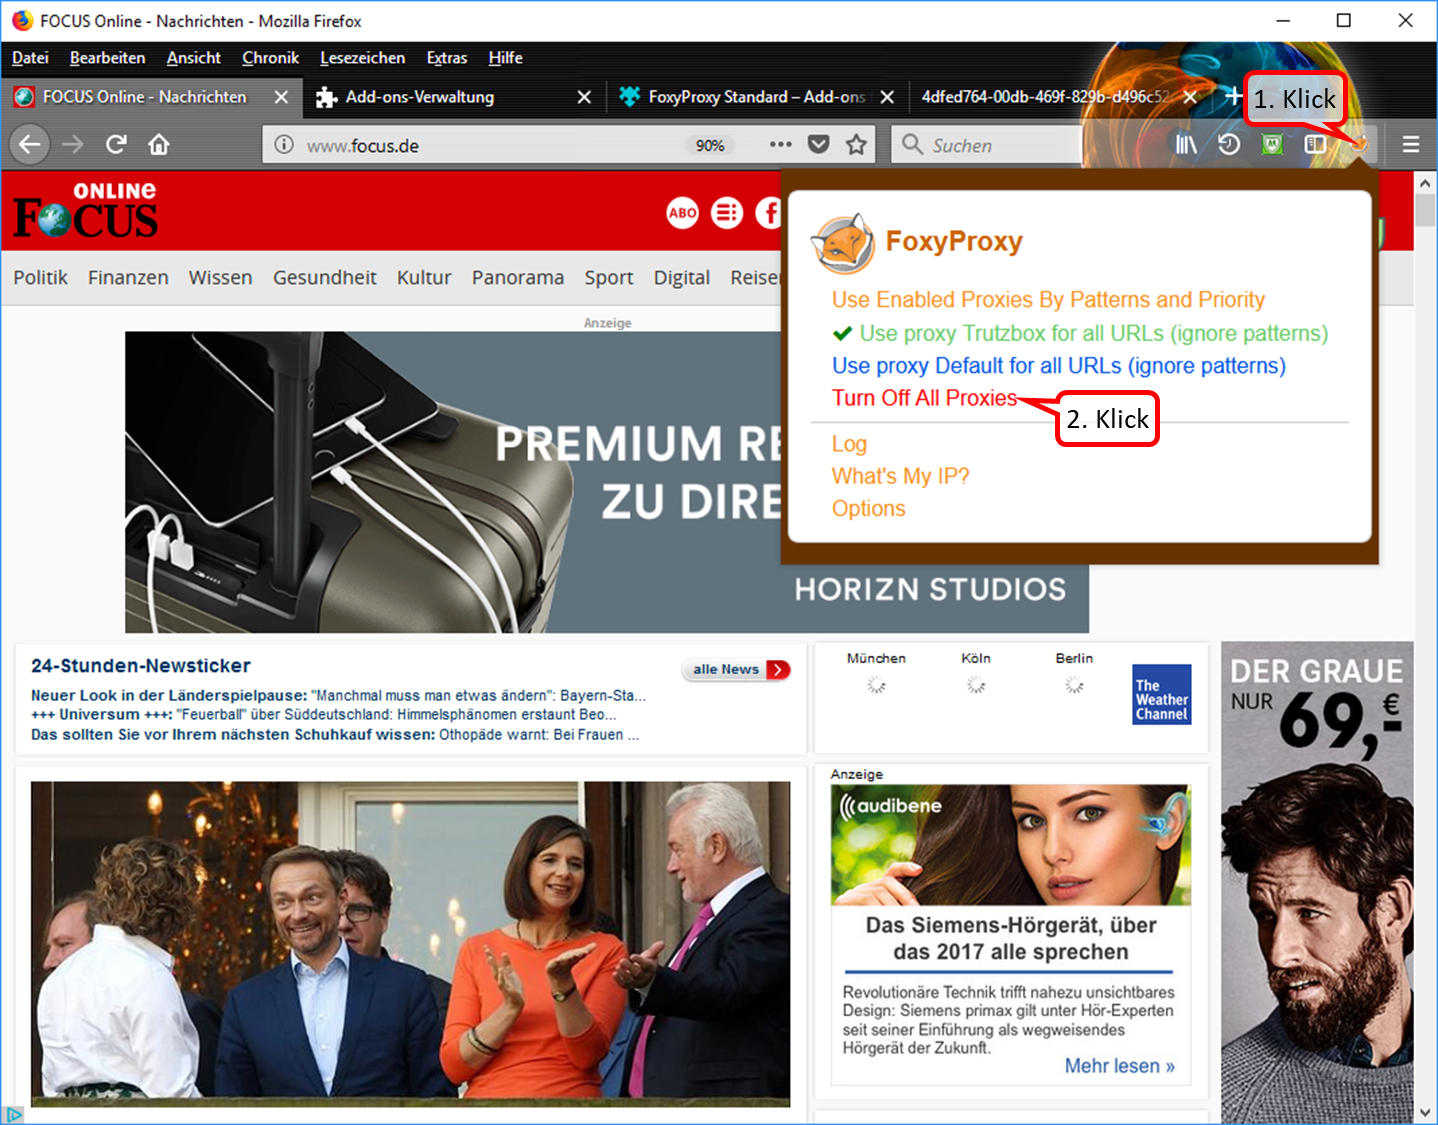
- To switch off the proxy: click on the "FoxyProxy" symbol in the symbol line (1). Then the selection menu opens up.
- In the selection menu, click on "Turn Off All Proxies (2).
-> Table of Contents (of this manual)
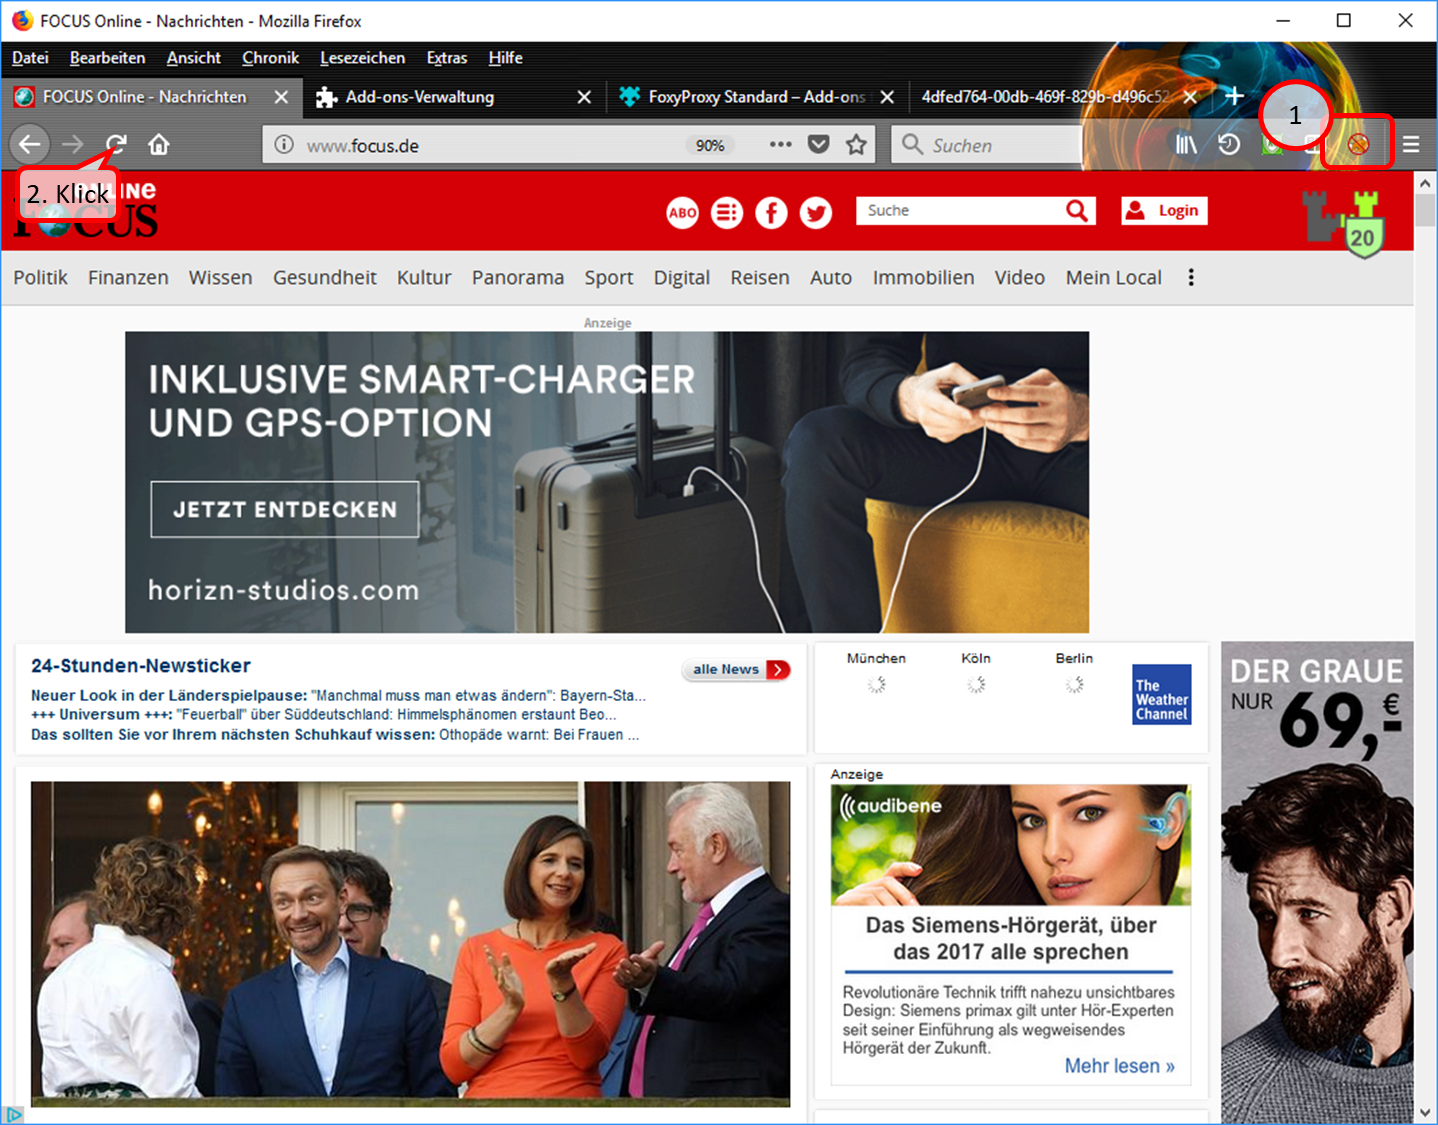
- In the symbol line, the symbol "FoxyProxy switched off" (crossed out logo) indicates that the proxy is switched off (1).
- Durch Refresh, bzw. erneutes Aufrufen, also z.B. Klick auf (2), wird die Seite neu aufgebaut.
-> Table of Contents (of this manual)
- Since the proxy is now switched off, the Trutzburg (Trutzbox symbol) is not displayed in the upper right corner. (2).
-> Table of Contents (of this manual)
4.1.3.2 Proxy Schalter für Browser "Chrome"
Caution: Switching the TrutzBox on and off as a proxy (="Call forwarding") only makes sense if the browser to be used (or the terminal device used, e.g. PC) is operated in "proxy mode", i.e. the PC is connected to the Internet router (and not directly to the TrutzBox).
If the add-on "Proxy SwitchyOmega" is implemented, the user can press and select a button in the header line of the Chrome Browser in the form of a ring:
- To switch on: click on grey circle. Ochre circle shows: TrutzBrowse is switched on.
- to switch off: click on the ochre circle. Grey circle shows: TrutzBrowse is switched off.
How to implement the "Proxy SwitchyOmega" add-on:
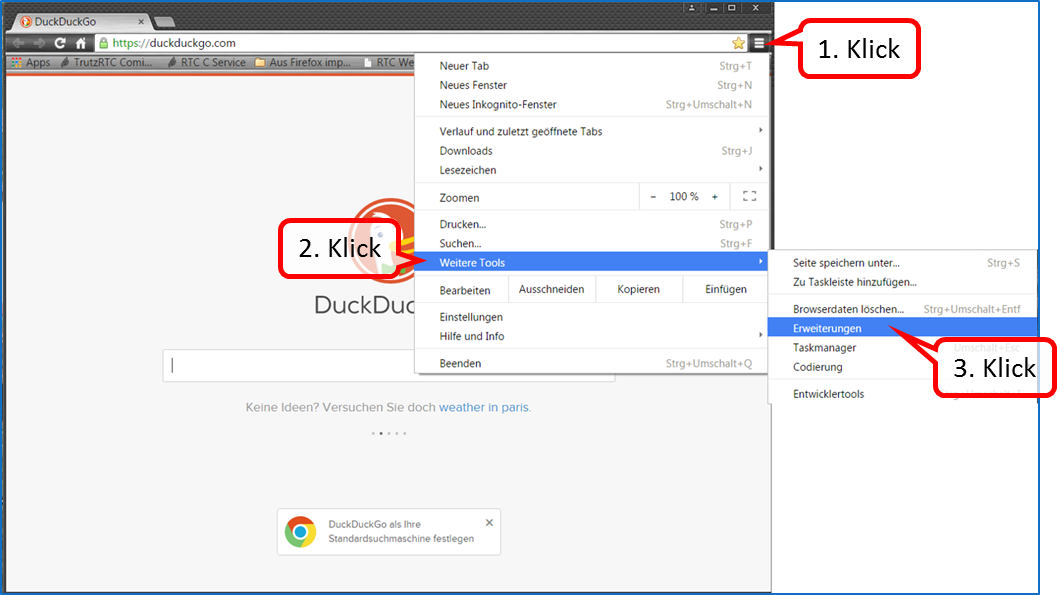
Click on menu selection (1); click on "More Tools" (2). "Click on "Settings" (3).
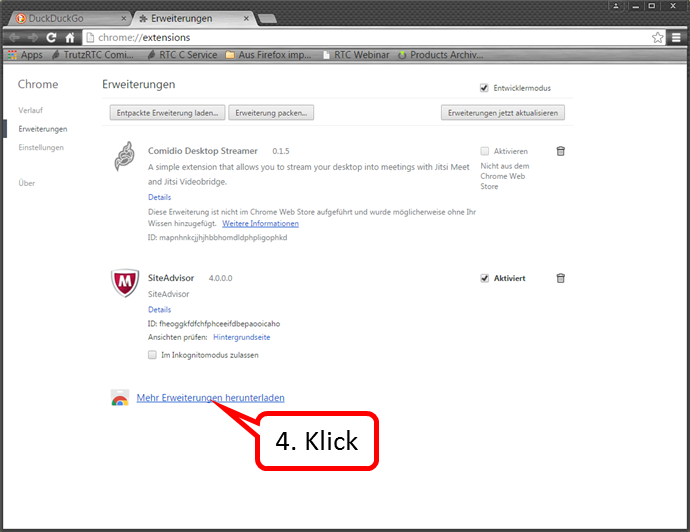
Click on „Mehr Erweiterungen herunterladen“ (4).
-> Table of Contents (of this manual)
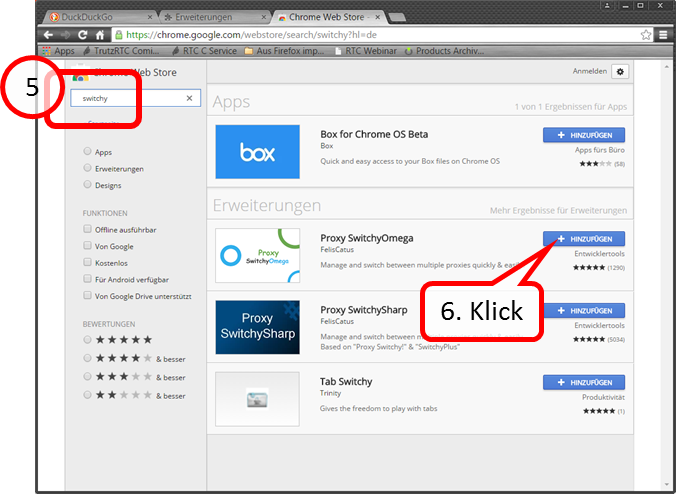
I Enter "switchy" in the search field (5). Click on „+ HINZUFÜGEN“(6).
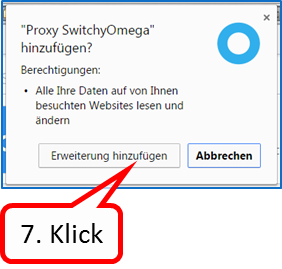
Click on „Erweiterung hinzufügen“ (7).
-> Table of Contents (of this manual)
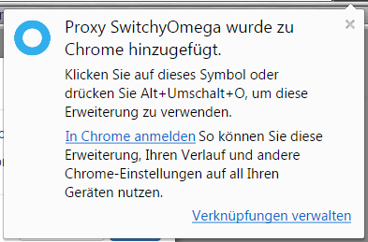
The confirmation message that the switch has been added.

Click on „Skip guide“ (8).
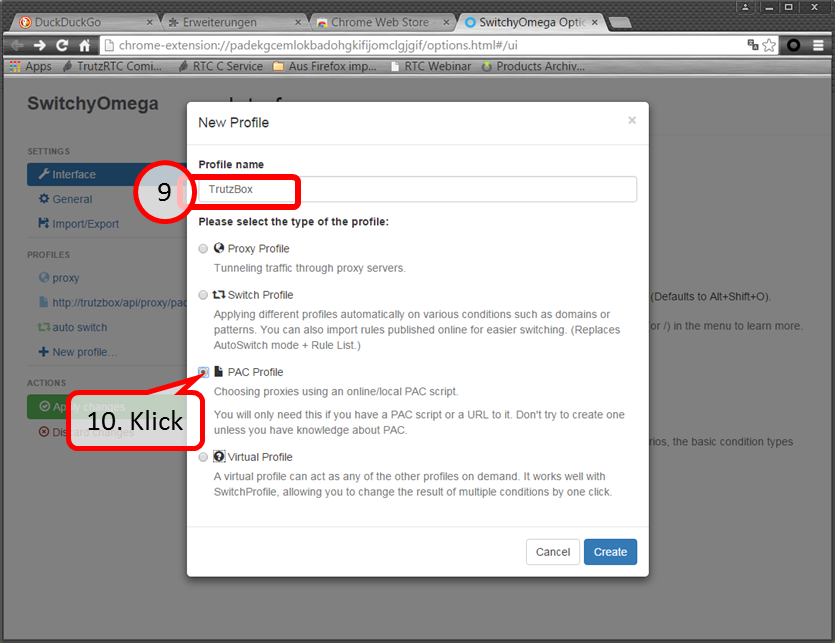
Enter „TrutzBox“ (09). Click on „PAC Profile“ (10).
-> Table of Contents (of this manual)
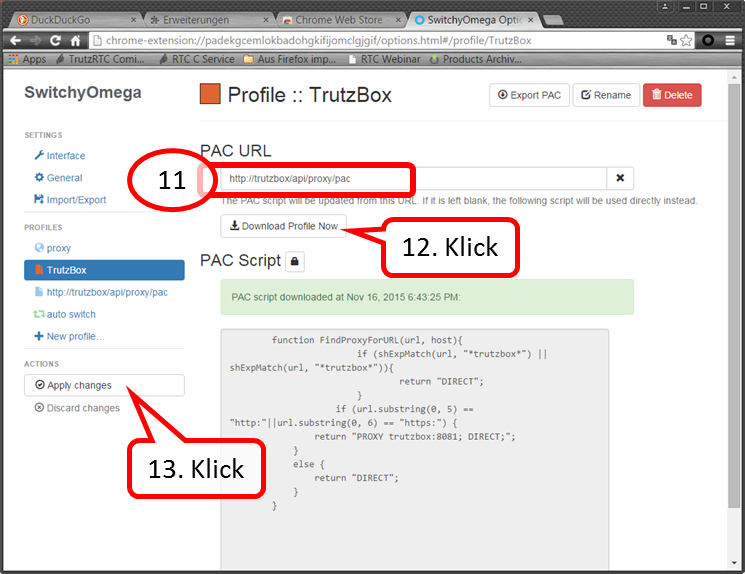
Enter „http://trutzbox/api/proxy/pac“ (11). Click on „Download Profile Now“ (12). Click on „Apply changes“ (13).
Click on „Interface“ (14). Click on „Quick Switch“ anklicken (15).
-> Table of Contents (of this manual)
Pull "TrutzBox" upwards (16). " Pull up [Direct]" (17). "Click on "Apply changes (18).
To switch on: click on the grey circle (19). Ochre circle shows: TrutzBrowse is switched on.
To turn off: click the ochre circle (20). Grey circle shows: TrutzBrowse is switched off.
-> Table of Contents (of this manual)
4.2 Encrypted Mailing - TrutzMail
You can use TrutzMail either via
- an immediately usable web-mailer: http://trutzbox/mail (Roundcube),
- your usual e-mail system (e.g. Outlook) or
- both ways.
4.2.1 Using the Web-Mailer
The Web mailer is called via https://trutzbox/mail.
The login is done by entering the user name and password. Both were created by the administrator either at der Setup or thereafter .
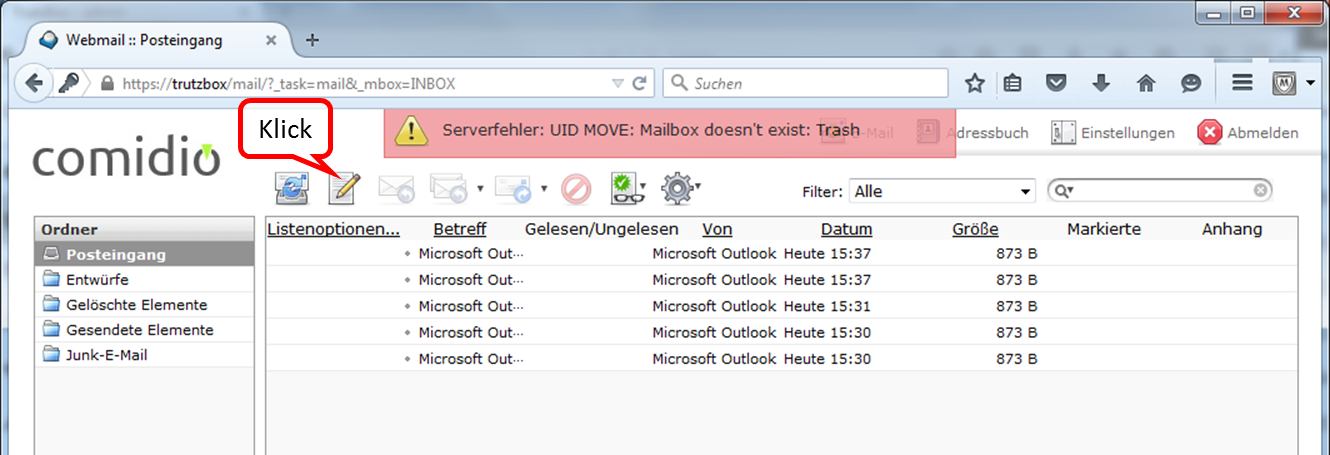
At the beginning you will see the folder "Posteingang".
By clicking on the pen you can create a new e-mail.
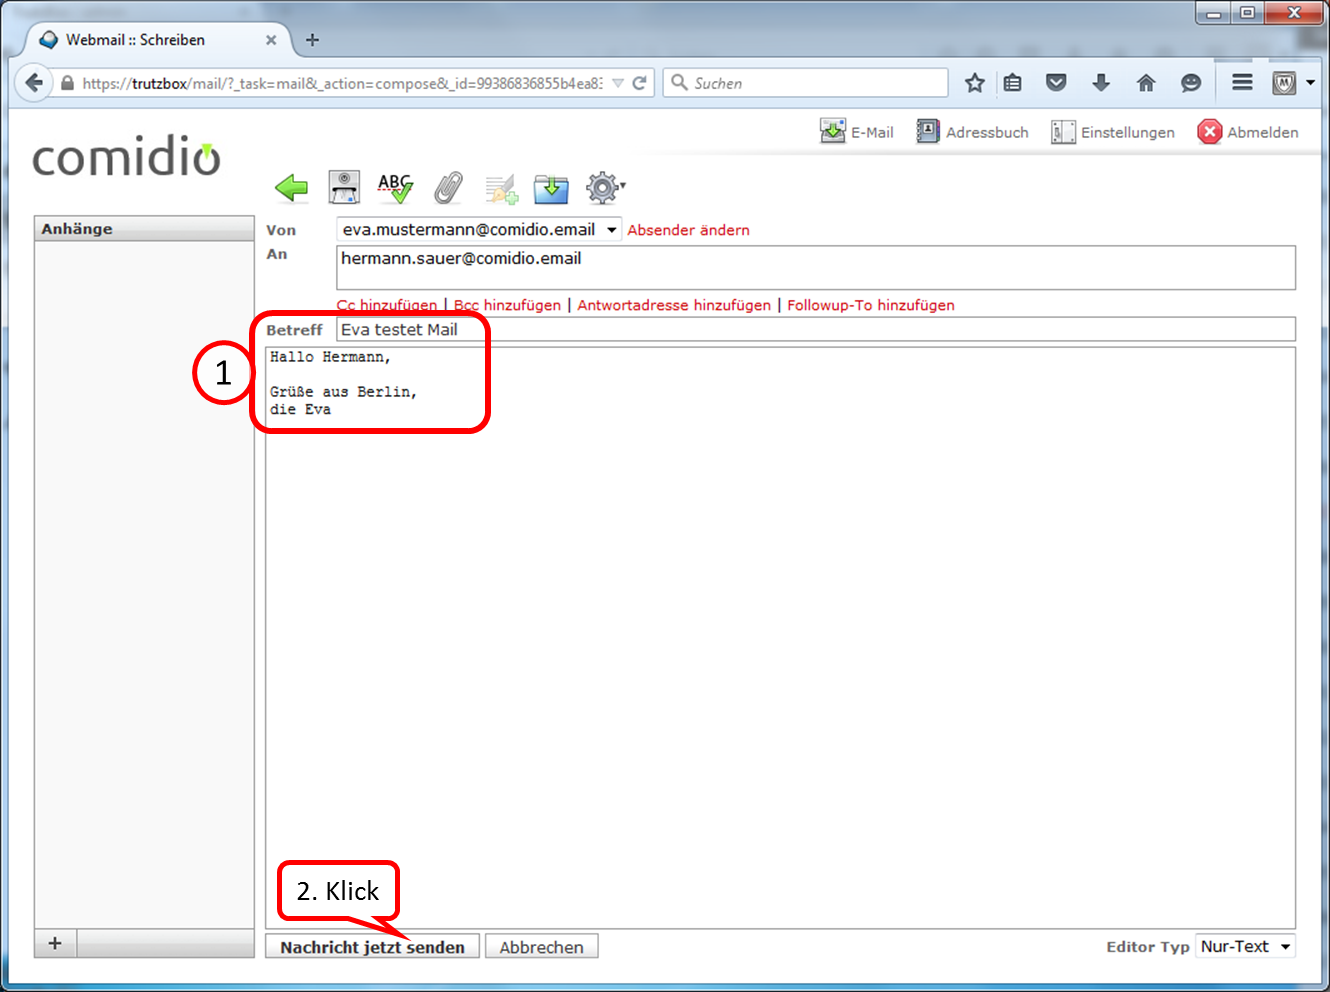
Enter the addressee under "An". Since you are in TrutzMail and communicate in encrypted form, the addressee must also have a secure e-mail address (ending with "@comidio.email").
After completing the content (1.) to transfer click on "Nachricht jetzt senden" (2.).
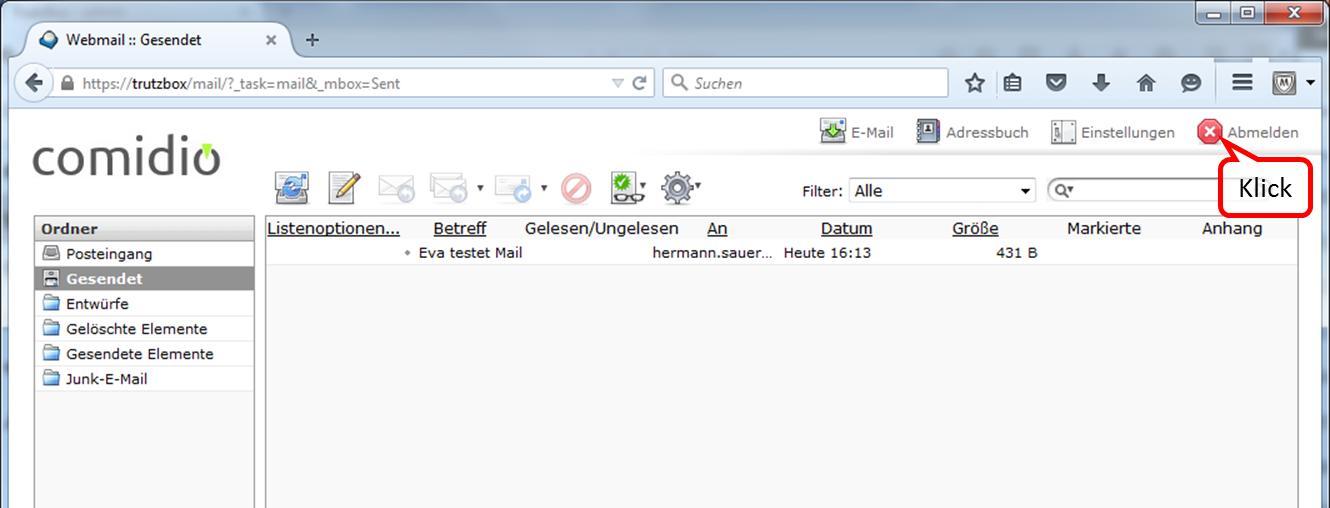
The sent message then appears in the folder "Gesendet".
To exit the web mailer, click on "Abmelden".
-> Table of Contents (of this manual)
4.2.2 Using a Mail-Client
To use your TrutzBox® mail server, set it up in your e-mail client.
| Name: | Eva Mustermann | freely selectable, is displayed like this |
| email address: | eva.mustermann@comidio.email | Email address assigned by the administrator |
| password: | ********* | password assigned by the administrator |
| account type: | IMAP | |
| incoming mail server: | trutzbox, port: 143, TLS | |
| outgoing email server (SMTP): | trutzbox, port: 587, TLS |
4.2.2.1 Setting up a TrutzBox account on Microsoft PC
The following description shows how to create a TrutzBox account in an e-mail client using Microsoft Outlook as an example. Start Outlook and click on "Datei" in the upper left corner.
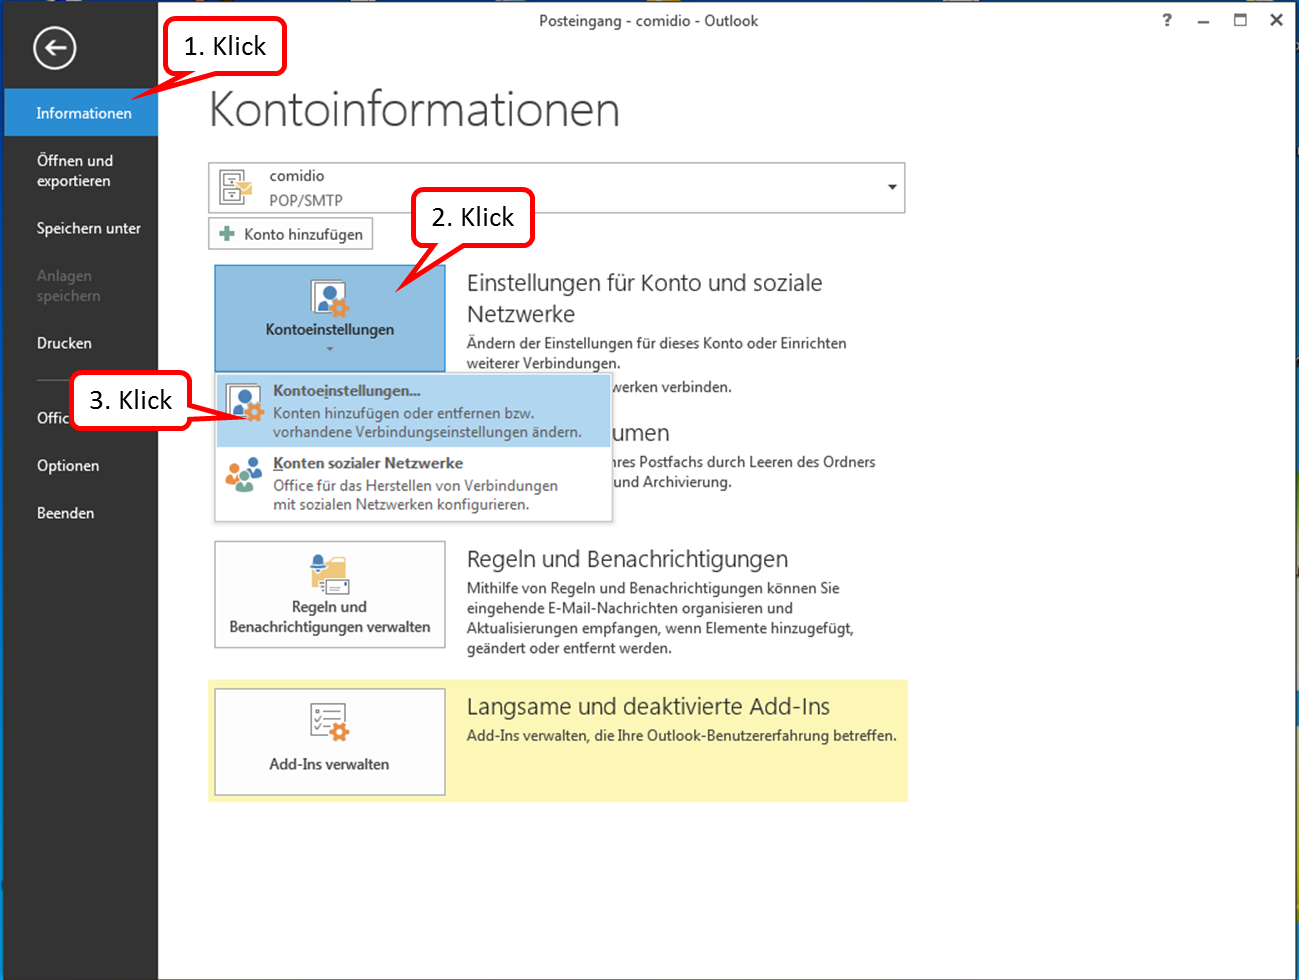
Click on " Informationen " and " Kontoeinstellungen " and click on the upper field " Kontoeinstellungen...".

Click on "New" to add a new email account.
-> Table of Contents (of this manual)
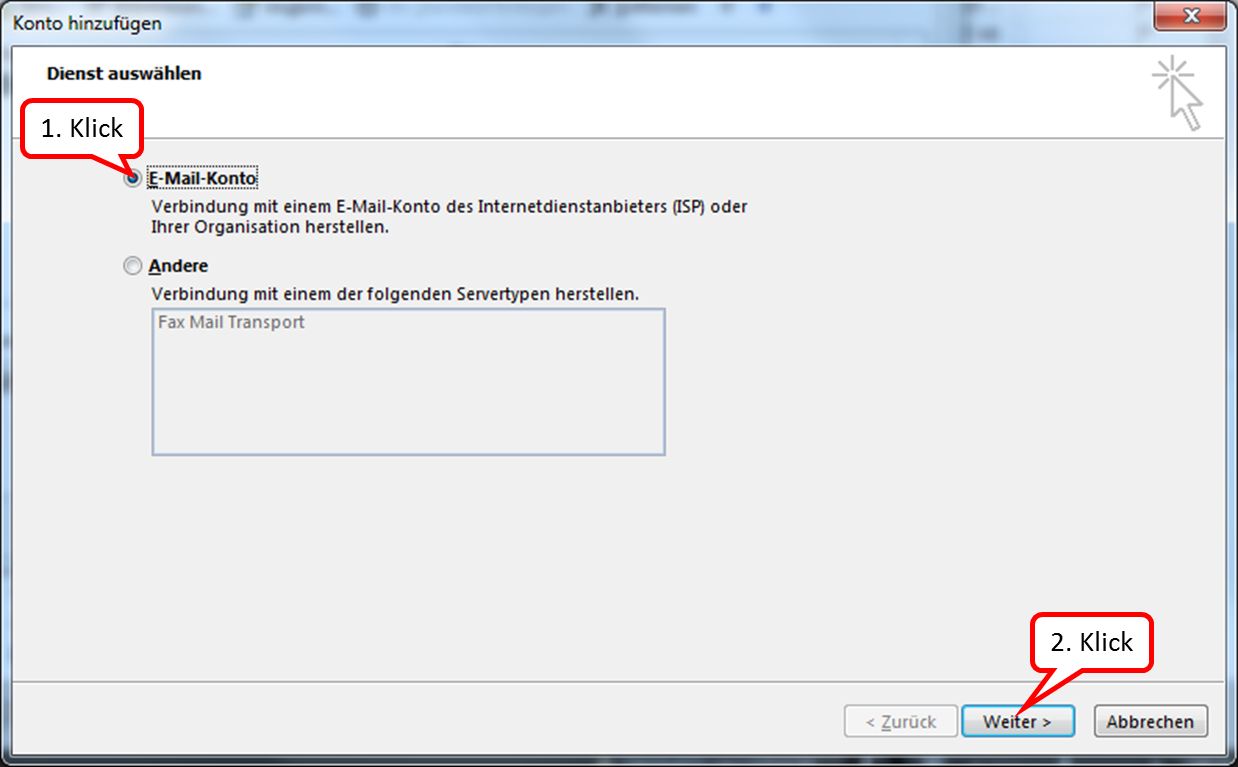
Click on "E-Mail-Konto" and on: "Weiter".
Enter the relevant data (email address and password can be obtained from the administrator).
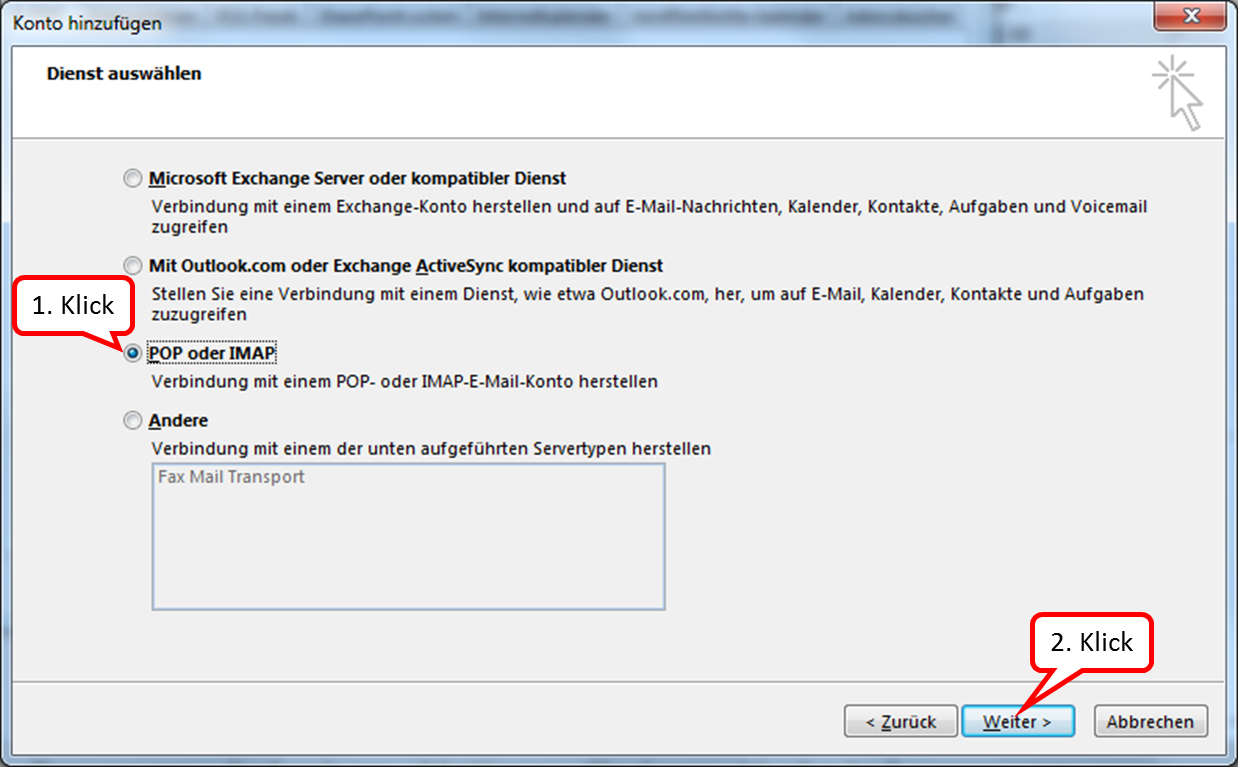
TrutzMail supports IMAP; please click on "POP or IMAP".
-> Table of Contents (of this manual)
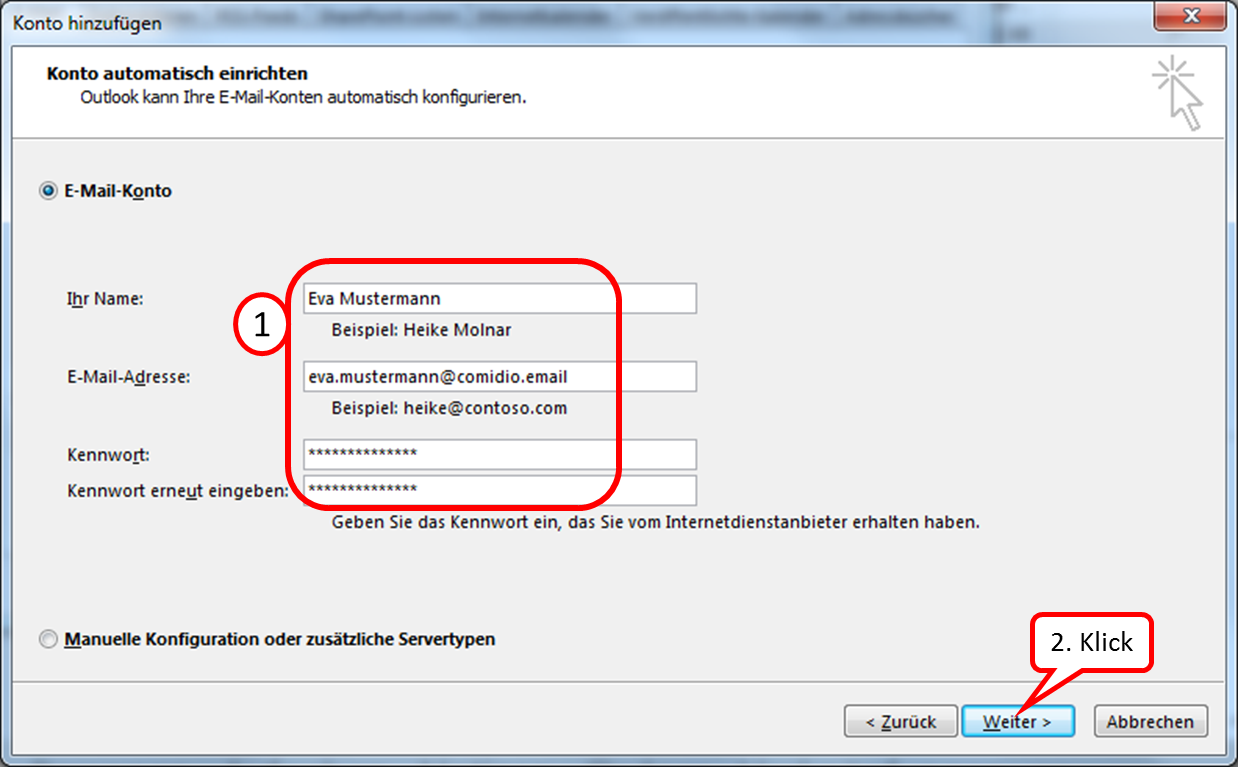
Enter the data accordingly (1.) and click on "Next" (2.).
-> Table of Contents (of this manual)
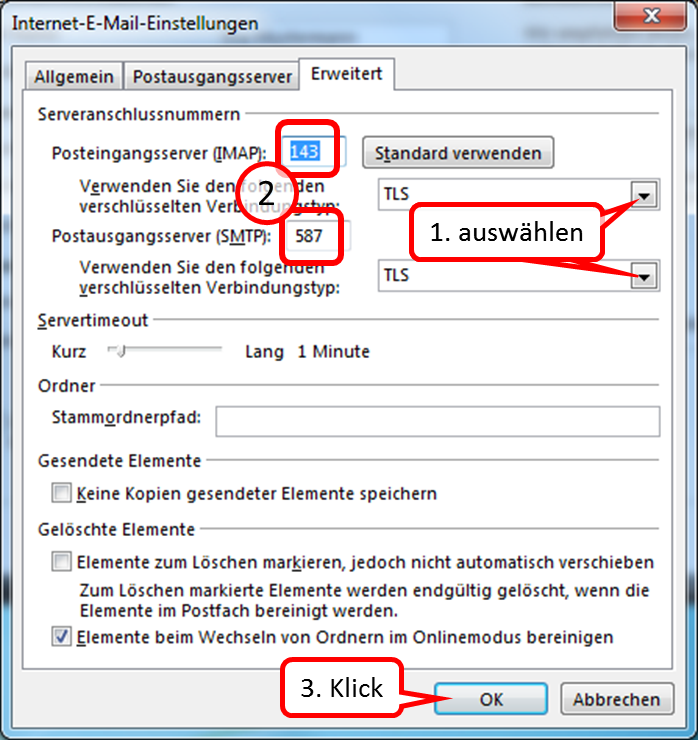
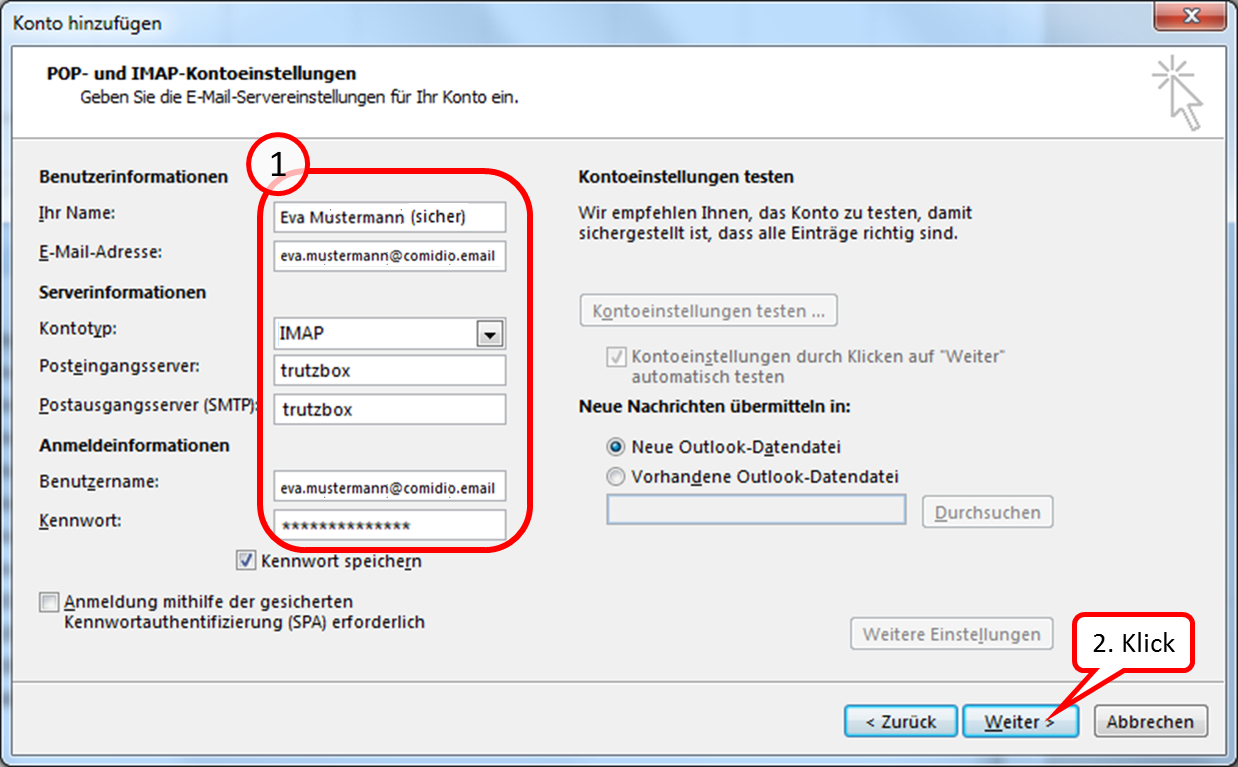
Select "TLS" for the incoming mail server and "TLS" for the outgoing mail server. Then enter the respective port numbers.
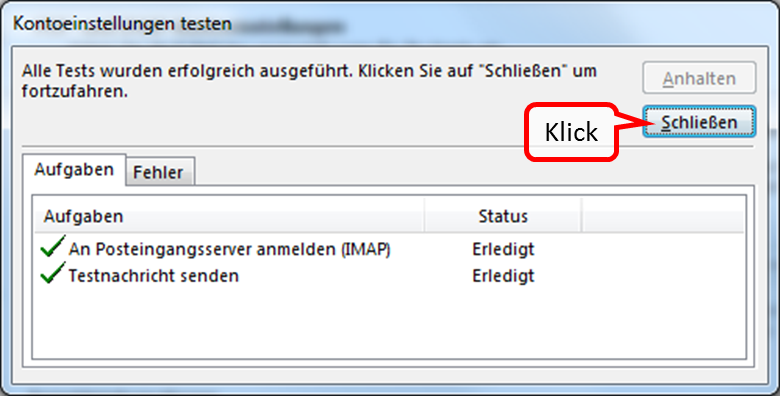
Click on "Close" to confirm the successful tests.
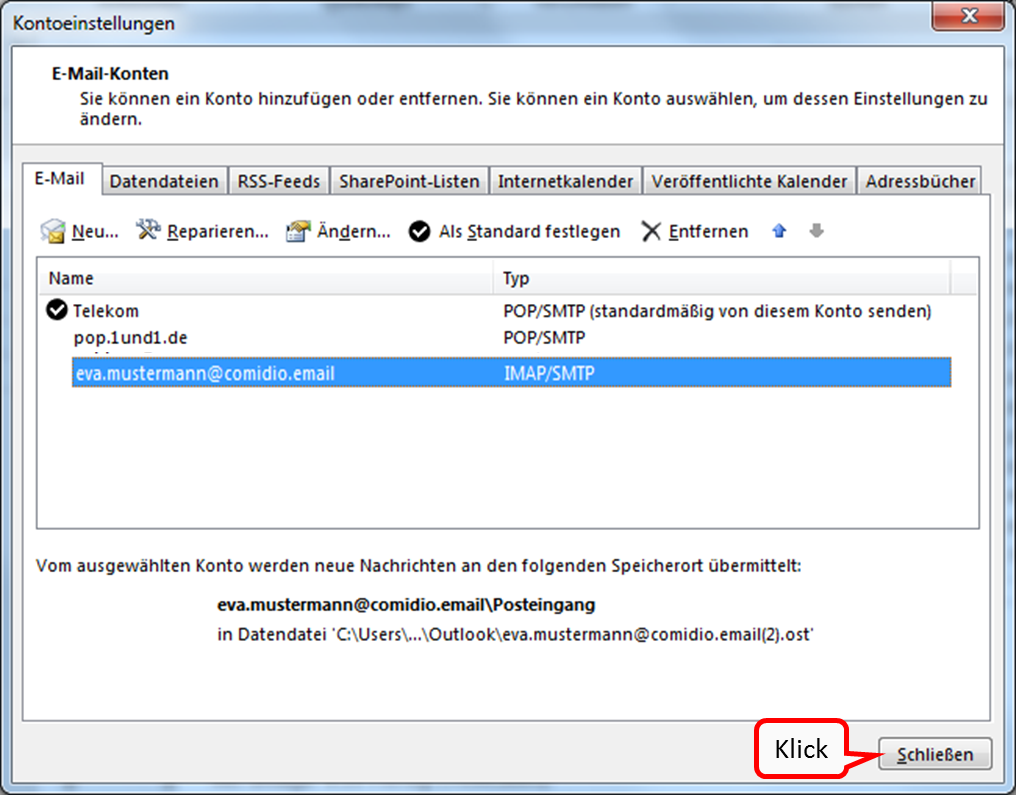
Your newly created email account now appears under "Kontoeinstellungen".
-> Table of Contents (of this manual)
4.2.2.2 Set up a TrutzBox account on Apple PC
The following description shows how to create a TrutzBox account in an email client using Microsoft Outlook on Apple PC as an example.
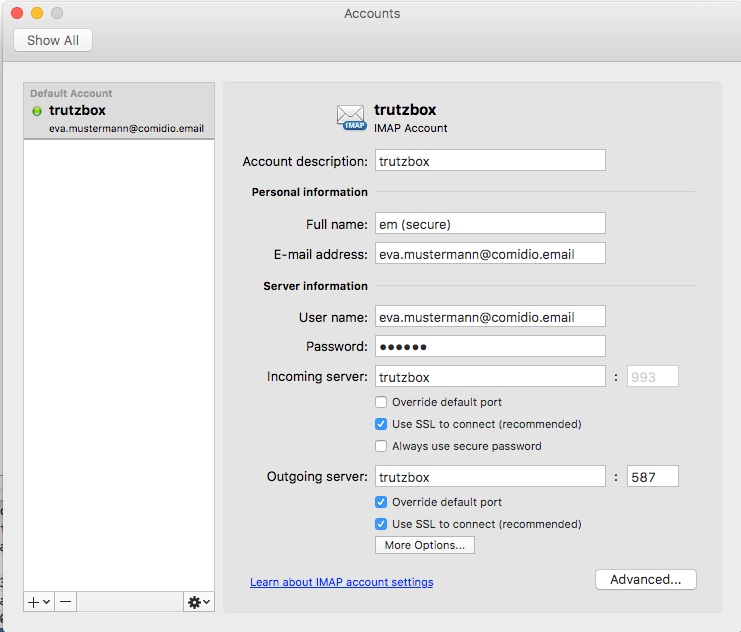
Please make the appropriate settings.
Please make the appropriate settings.
-> Table of Contents (of this manual)
4.3 Protection of minors - TrutzContent
The TrutzBox® monitors web access and is thus able to prevent unwanted data traffic. The TrutzBox® distinguishes whether a device or a user calls up a web page directly or whether a web server - after the deliberately called up web page has been loaded - contacts further web pages and loads them without the user's knowledge and without his consent.
The TrutzBox® offers two different basic functions here:
1. TrutzContent:
A content filter that prevents a device or user from directly accessing a particular Web page. Examples of unwanted calls:
- A young person wants to load a website with content harmful to young people.
- An Internet device that unnoticedly calls up a web page in the background, without a user deliberately initiating it, calls up a web page in the background. These can be TVs, washing machines or game consoles (if they are connected to the Internet), or even the standard Internet browser of the user's PC, which in turn contacts Mozilla or Google or the server of a plug-in provider independently.
The TrutzBox® checks if the contact to such a server is allowed and blocks the forwarding if necessary.
-> Table of Contents (of this manual)
4.4 Real time communication- TrutzRTC
As part of the updates, two real-time communication functions are implemented on the TrutzBox® (without the customer's active involvement and free of charge):
- TrutzChat = XMPP Service for messaging and, depending on the client used, other functions such as audio, video communication, file transfer, screen sharing ...
- TrutzMeeting Audio and video conferencing service: Server on which you can connect to a browser that supports the WebRTC standard and which is capable of connecting several audio or video conference participants.
TrutzRTC runs automatically, does not need to be configured and has no user interface on the TrutzBox.
-> Table of Contents (of this manual)
4.4.1 TrutzChat (XMPP Service)
It works similar to e-mail. The XMPP server on the TrutzBox manages users, their online status and their messages. If a message is to be sent to a subscriber who is not on the same server (i.e. on a different TrutzBox) as the sender, the target server is determined, contact is made with it and the message is delivered to this XMPP server. The same applies not only to messages but also to other functions, such as Presence status
Comidio has extended the XMPP server on the TrutzBox so that it is able to use the same security functions as those used by TrutzMail. This means:
- Communication partners are addressed with the TrutzMail address.
- The connection establishment and the message transmission with users on another TrutzBox, take place via Tor hidden services.
- The same certificates and keys are used to encrypt messages and authenticate the TrutzBox of the communication partner as for TrutzMail.
Once created, TrutzMail addresses can also be used directly for chat/messaging. This does not require any configuration on the TrutzBox.
Structure of the XMPP service between the TrutzBoxes
-> Table of Contents (of this manual)
4.4.1.1 preconditions:
In order to use the TrutzChat service, a TrutzMail address' and an XMPP-enabled program on the mobile device (PC or mobile) are required. Chat programs that support the XMPP protocol are available for all common operating systems with different features.
These links give a good overview of available XMPP clients:
- https://de.wikipedia.org/wiki/Liste_von_XMPP-Clients
- https://de.wikibooks.org/wiki/XMPP-Kompendium:_Einrichtung
- http://xmpp.org/software/clients.html
The individual selection depends partly on requirements, partly on taste.
Comidio uses the following clients:
| Apple Macintosh | Adium (https://adium.im) |
| Microsoft Windows | PSI (http://psi-im.org) |
| iOS | ChatSecure (https://chatsecure.org) |
| Android | Xabber (https://www.xabber.com/) |
After installing such a messaging client, the XMPP server must be configured in the client. All you have to do is enter the corresponding TrutzMail address with password.
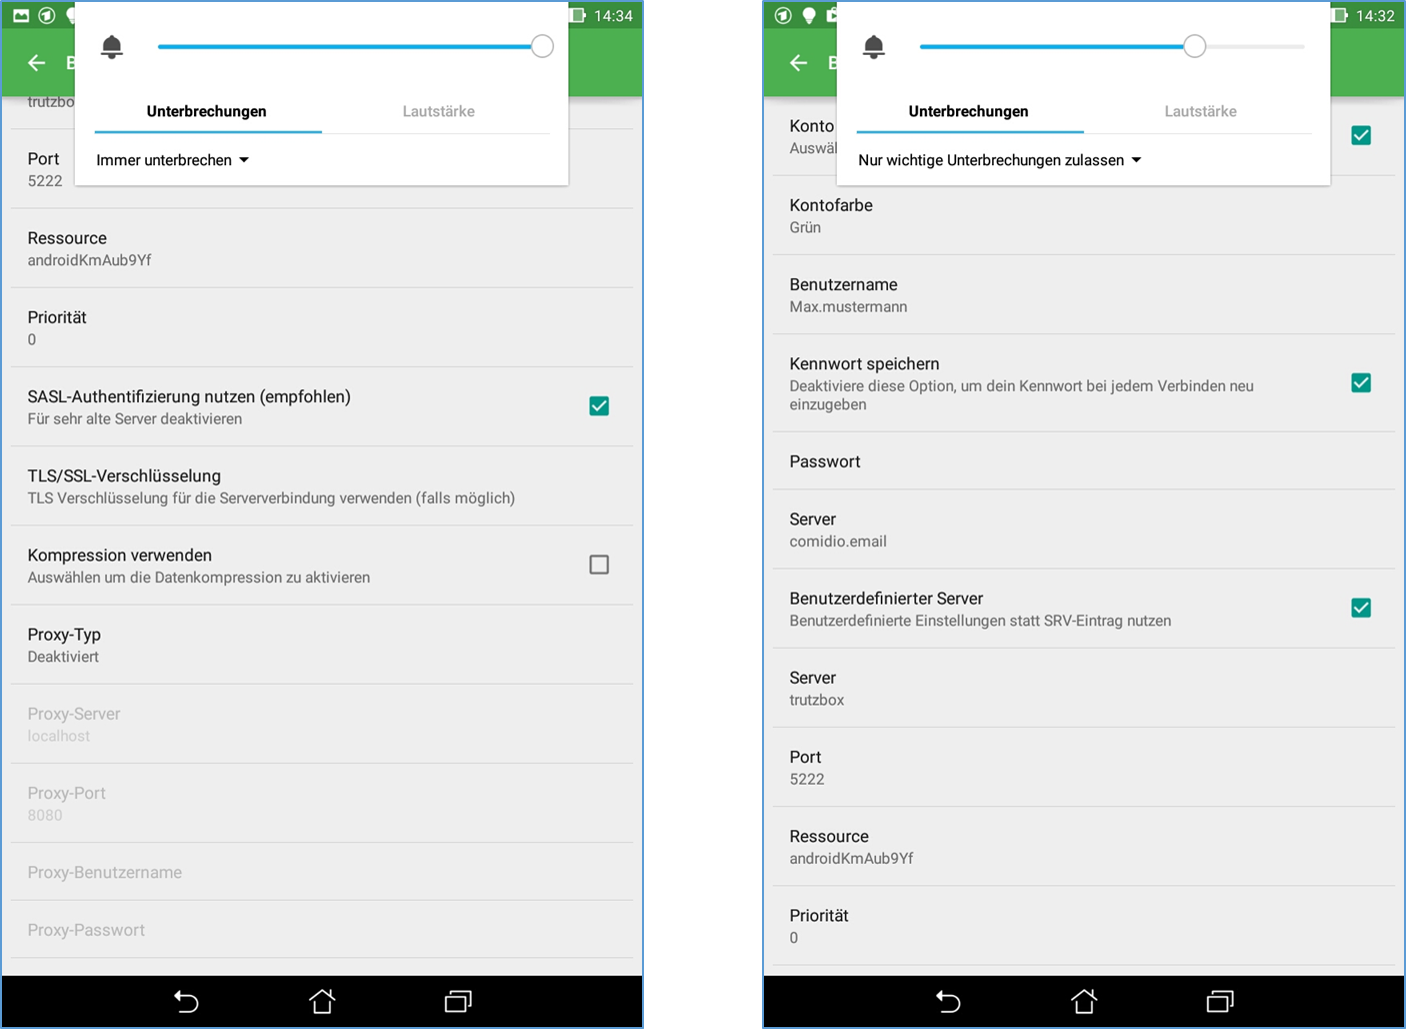
Since many XMPP clients determine the server name from the e-mail address, the incorrectly determined name "comidio.email" must still be changed to "trutzbox”.
The XMPP default port 5222 remains unchanged.
Several TrutzMail addresses can also be configured in one client.
Konfiguration des Chat-Programms Adium:
Afterwards any number of contacts can be added by entering the TrutzMail addresses.
-> Table of Contents (of this manual)
Configuration of the chat program Psi:
Configuration of the chat program ChatSecure:

Configuration of the chat program Xabber:
4.4.1.2 TrutzChat XMPP Standard Functions
Depending on the functionality of the messaging client, the XMPP server on the TrutzBox supports the following XMPP standard functions:
- Instant-Messaging: Text messages incl. formatting and emoticons
- Create and manage communication groups, group chats (multi-user chat - MUC ), but currently only for communication participants who are logged on to the same TrutzBox.
- Audio/Video Communication: Telephone Calls
- File transfer: Send files to the communication partner(s)
- Screen Sharing: makes one's own screen visible to others
- Remote-Desktop: the communication partner can operate my PC
- OTR (Off-the-Record Messaging): unofficial, confidential, non-public communications
- Online-Status, Last-Seen: is the communication partner online, ready to talk... or when was the last time he was online
-> Table of Contents (of this manual)
4.4.1.3 External connections to TrutzRTC
As long as the TrutzBox with the host name "trutzbox" is available, the messaging client can connect directly to the XMPP server on the TrutzBox.
However, this only works from the home network if the client is connected to the Internet router or the secure network of the TrutzBox (transparent mode).
To connect to the XMPP server on the TrutzBox while travelling, the TrutzBox " Fernzugriff " should be used.
To do this, set up the TrutzBox remote access as described in „Fernzugriff“ and authorise the TrutzRTC user for remote access under " Benutzer verwalten " on the TrutzBox.
If „Fernzugriff“is then set up and started on the mobile device, the messaging program can access the TrutzRTC server as in the home network.
There is no need to open additional ports on the Internet router at home.
-> Table of Contents (of this manual)
4.4.2 TrutzMeeting: Audio- and Video-Conference Service
Using the XMPP server and the correct messaging client, it is possible to establish an audio/video connection, but only with one other participant, and it is necessary that all participants use a client that supports the same audio/video code. Therefore, standard XMPP clients are not an optimal solution for telephone or video conferences.
To provide TrutzBox users with a secure solution for multiparty telephone or video conferencing, the TrutzBox offers a WebRTC-enabled conference server that allows audio/video conferencing directly from a standard Internet browser, without the need for additional software.
Around the TrutzBox user also a secure solution for telephone or video WebRTC is a living standard defined in phases, which is gradually implemented by the browser manufacturers. This means that there are no uniform functionalities across all browsers and the WebRTC functions run differently stable.
For example, the screensharing function is not yet implemented stably.We will update with appropriate browsers.
4.4.2.1 preconditions
During the later operating phase, the maximum number of video conference participants will correspond to the TrutzMail addresses booked.
There is no participant limit in the current beta test phase.
To start a video conference, simply access the TrutzBox on port 9082 using a WebRTC-enabled browser.
A room name is appended to the end of the link:
z.B.: https://trutzbox:9082/raumname
No special characters may be used for the selected room name!
4.4.2.2 procedure
Durch Aufruf der oben genannten URL verbindet sich der Browser mit dem Raum “raumname”. Dabei sind zwei Fälle zu unterscheiden:
- The room does not yet exist:
so you are now the first person who wants to create this room, and you are the "room administrator" for this room. Then it is necessary to log on to the conference server with his TrutzMail address and the TrutzMail Password. This means that only TrutzBox users who have a TrutzMail account on this TrutzBox can open a new room. After creating and connecting to the room, the room administrator can optionally define another password for this room.
- The room already exists:
then the browser connects to the room. If the room administrator has placed a password in the room, this must now be entered. If the room has already been created, anyone can connect to the room. He does not need to be registered as a TrutzBox user or have a TrutzMail address. As soon as the browser is connected to the room, you should enter your "Anzeigenamen" by clicking on the connection window below.
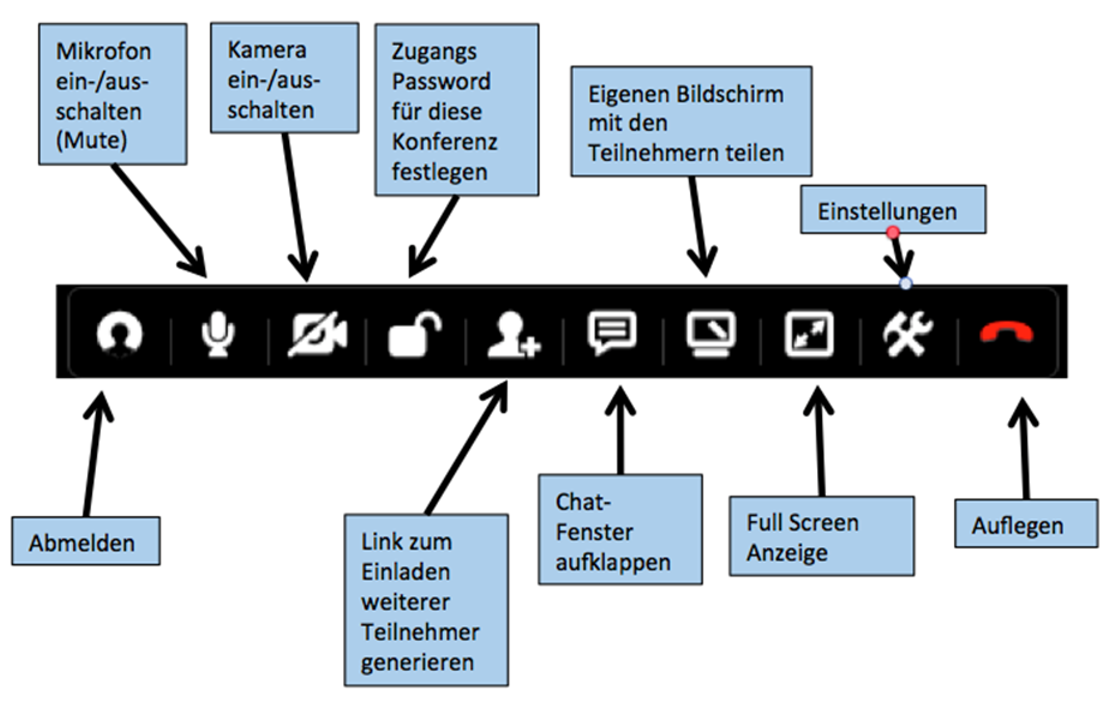
Positioning the mouse at the top of the screen opens an operating menu.
This menu offers the following functions:
 -> Table of Contents (of this manual)
4.4.2.3 Screen-Sharing
With the function "Share your own screen with the participants" it is possible to share your own screen content with other conference participants.
Since all browsers have a built-in security setting that prevents software from reading the screen content, the browser must be informed that the TrutzBox may read the screen content.
Chrome
With Chrome it is necessary that this feature is already activated when you call it up.
Chrome on Mac
For this purpose on the
- Mac: start chrome in the console with this command:
open -a 'Google Chrome' --args '--enable-usermedia-screen-capturing'
Chrome on Windows
- For more information, see: https://github.com/muaz-khan/WebRTC-Experiment/tree/master/Pluginfree-Screen-Sharing
For a shortcut to Chrome, proceed as follows:
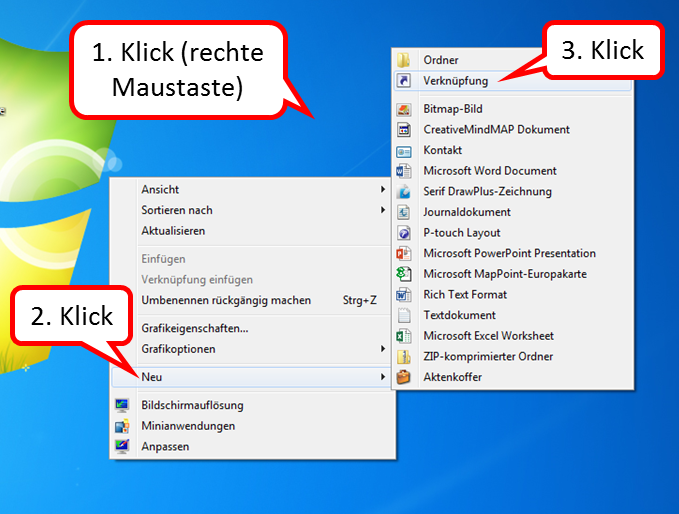
- Right-click on the Desktop Interface (1),
- click on "Neu" (2),
- click on "Verknüpfung" (3).
-> Table of Contents (of this manual)
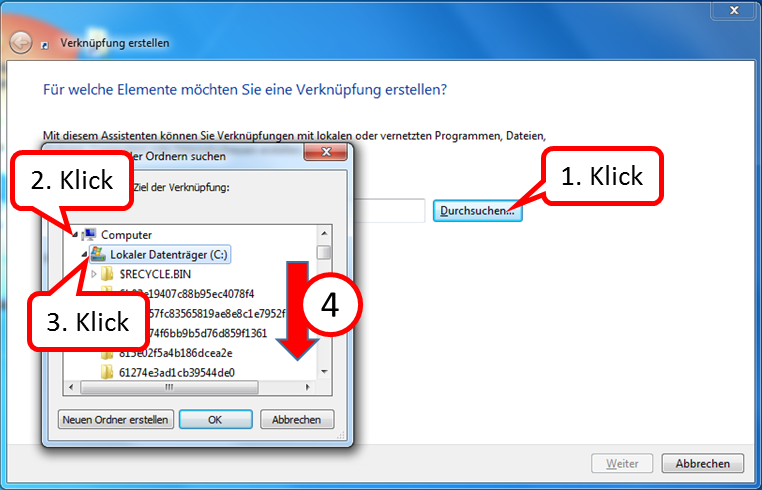
Then the file "chrome.exe" is searched for:
(The screenshots are exemplary, the folder names on your PC may be different; it is important that the path to "chrome.exe" is found.)
- click on "Durchsuchen ..." (1),
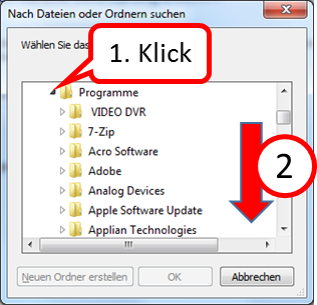
- Open the "Computer" folder (2) by clicking on the arrow in front of it,
- Open the "Local Disk (C:)" folder (3) by clicking on the arrow in front of it,
- Scroll down (4) until you see the "Programs" folder.
-> Table of Contents (of this manual)
- Open the "Programs" folder (1) by clicking on the arrow in front of it,
- Scroll down (2) until you see the "Google" folder.
-> Table of Contents (of this manual)
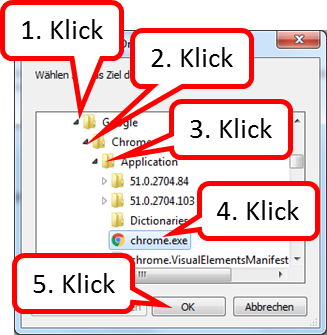
- Open the folder "Google" (1) by clicking on the arrow in front of it,
- Open the folder "Chrome" (2) by clicking on the arrow in front of it,
- Open the "Application" folder (3) by clicking on the arrow in front of it,
- click on "chrome.exe" (4),
- click on "OK" (5).
-> Table of Contents (of this manual)
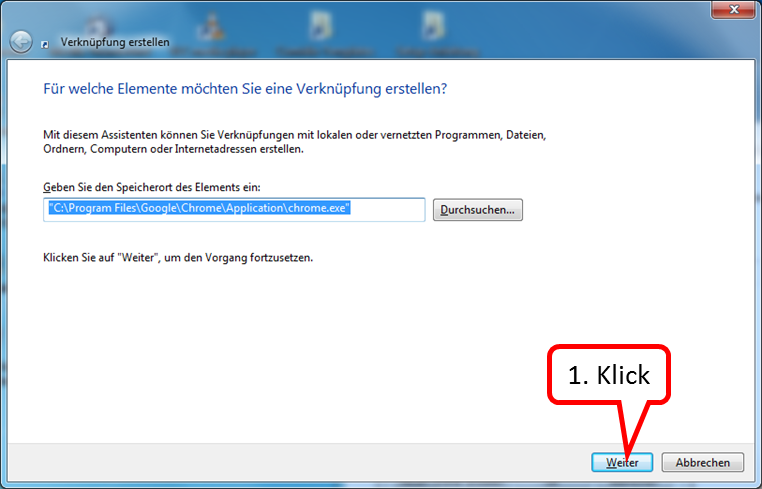
click on "Weiter" (1).
-> Table of Contents (of this manual)
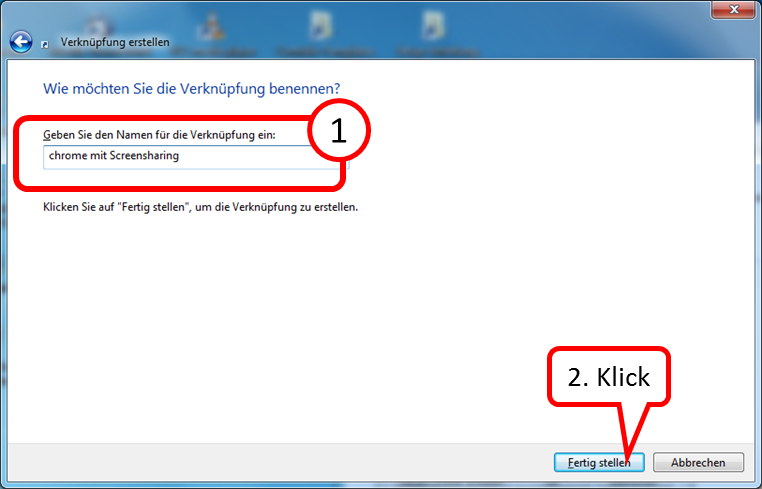
- Enter the name under which you want to find the link to call up the program. (1),
- click on "Fertig stellen" (2).
-> Table of Contents (of this manual)
Now open the new shortcut to add the parameters:
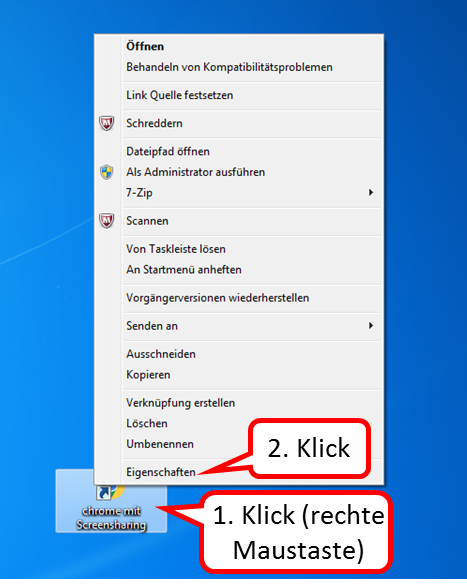
- Right-click on Desktop Interface (1),
- click on "Eigenschaften" (2).
-> Table of Contents (of this manual)
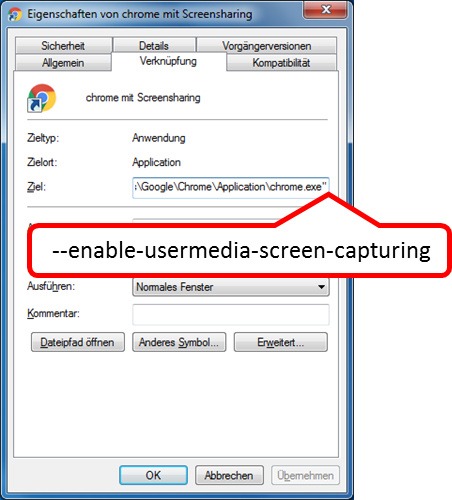
In the "Ziel" field after the closing quotation mark, enter:
[Leerzeichen]--enable-usermedia-screen-capturing
-> Table of Contents (of this manual)
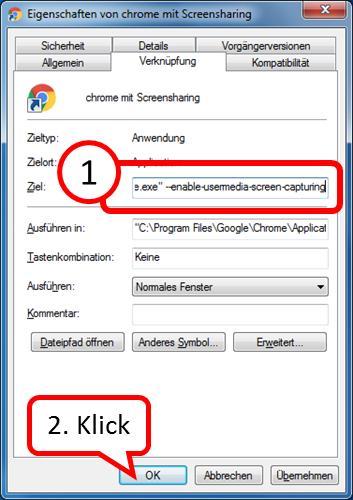
- Check your input for spelling (1),
- click on "OK" (2).
-> Table of Contents (of this manual)
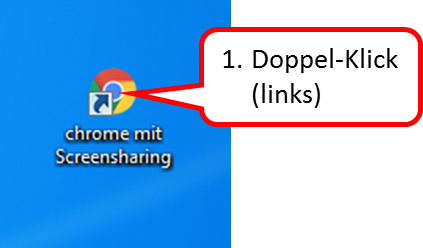
It is recommended to use the browser Chrome solely for TrutzRTC/Webmeeting.
- If no own screen pages (no screen sharing) are to be shown, the "normal" Chrome call can be made.
- If you want to show your own screen pages (screen sharing), you can use the newly created chrome shortcut.
-> Table of Contents (of this manual)
Firefox
For Firefox' you have to change an internal configuration after starting Firefox by entering the command about:config. Search for allowed and add the domain trutzbox to the list of allowed domains by double clicking on the parameter "media.getusermedia.screensharing.allowed_domains"'.
4.4.2.4 Performance limits of the conference server
The TrutzRTC conference server is based on the open source software Jitsi-Video-Bridge . Although this conference server is very powerful and the TrutzBox hardware is also very powerful, the number of participants is not unlimited. The number of participants depends on the speed of the Internet connection of each individual participant and the TrutzBox owner. Approx. 40KBit/s up- and down-load speed per subscriber is sufficient for voice transmission. For camera or screen sharing up to 800 KBit/s are required. Thus, with normal DSL/VDSL Internet connections, bottlenecks will probably occur before the TrutzBox hardware becomes a bottleneck. Such Internet bottlenecks can best be analyzed on the Internet router.
4.4.2.5 External connections to the TrutzRTC conference server
No TrutzBox is required to connect to the TrutzBox conference server externally, i.e. via the Internet. Who knows the link (and the possibly assigned password), can participate in the conference. This makes it easier to use webinars or spontaneous conferences.
To do this, however, these two ports must be opened on the Internet router and forwarded to the TrutzBox:
- TCP-9082
- UDP-9083
With the link "https://externe-ip-adresse:9082/raumname" the room can then be joined on the Internet.
Since the external IP address changes once a day for most home Internet connections, it is advisable to use a DynDNS service here as well.
Another way to determine the correct external link for participating in a conference has been integrated into the TrutzBox XMPP server. If you transmit the symbol "#" with a room name to a person in the XMPP chat, then this "command" is converted into the external link to the conference server. This means that:
#meinraum
converts into the address
https://188.107.13.86:9082/meinraum
which the chat participant can click directly.
-> Table of Contents (of this manual)
4.5 TrutzBox® shutdown (do not unplug!)
If a TrutzBox is to be switched off and/or restarted, please DO NOT disconnect the plug, but proceed as follows:
4.5.1 TrutzBox® shutdown, "switch off" via TrutzBox user interface
In the TrutzBox user interface:
- Click on „System“ -> „Ein-/Ausschalten“
- if you want TrutzBox to start up again: Click on the button „Neu starten“
- if TrutzBox is to be switched off: Click on the button „Ausschalten“
4.5.2 TrutzBox® shutdown, "switch off" via Webmin
If the administrator can no longer access the TrutzBox user interface, an attempt is made to access it directly via Webmin. Call up in the browser: https://trutzbox:10000/ :
- Enter admin as user
- Enter the administrator password of the TrutzBox
- Click on „System“ -> „System-Start und -Stop“ and scroll all the way down
- if you want TrutzBox to start up again: Click on the button „System neu starten“
- if TrutzBox is to be switched off: Click on the button „System herunterfahren“
4.5.3 TrutzBox® shutdown, "switch off" Emergency
If the administrator
- neither via the user interface
- nor about Webmin
an access, in an emergency, the "connector must be disconnected".
Please wait approx. 10 seconds and then reconnect the power supply.
If the TrutzBox does not start up (correctly) in approx. 15 minutes, please contact Comidio Support : Email to support@comidio.de .
-> Table of Contents (of this manual)
4.6 TrutzServices
4.6.1 TrutzServices in active subscription
The quality of protection provided by TrutzBox® depends largely on how up-to-date the software is with regard to functions and data. This is only guaranteed if the TrutzBox® receives regular and automatic updates.
TrutzServices, the Comidio services for TrutzBox®, include the following update services:
- TrutzBrowse: Updates for header extensions, slider presets and blacklists,
- TrutzMail: Updates of Receiver Certificates,
- TrutzContent: Updates for filter lists,
- TrutzBase: Signatures and updates for virus scanners and
- TrutzBox® Software: Fault-fixes, security updates and minor functional extensions.
All these services are included in TrutzServices.
The updates were carried out partly regularly (e.g. virus scanner updates), partly on an occasion basis (e.g. security updates). Major updates run in the early morning hours (around 04:00) so that they do not disturb the user.
Therefore it is not only useful to leave the TrutzBox® constantly switched on for the e-mail exchange, but also necessary for the execution of the updates.
4.6.2 What happens if TrutzBox services are not being extended?
In this case, the TrutzMail certificates expire, i.e. services that are bound to these TrutzMail addresses can no longer be used. Currently these are:
- the exchange of TrutzMails,
- TrutzRTC (Video Conferences and Chat),
- Comidio-Software-Updates.
The Debian updates can still be imported. All other services, such as TrutzBrowse and TrutzContent can still be used, but without updating the filter lists. The same would apply if Comidio did not renew its services.
Since the TrutzBox hardware is based on a high-quality standard board (an APU2 from PCEngines), the hardware could be used as a powerful server (including the built-in SSD disk) for other purposes.
.
-> Table of Contents (of this manual)